1
More Annotations


3


4
Favourite Annotations


5


6
Text
TIPS FOR POWERING YOUR FLIGHT CONTROLLER Using an individual voltage reguator/BEC – Powering your flight controller via an individual BEC is an effective method since 5V voltage reguators are tiny and cheap devices. You will need to connect the inputs of the voltage regulator to the same circuit as your battery voltage, and the outputs will connect to the 5V, and ground inputs on your flight controller. HOW TO SETUP ANY BETAFLIGHT 🐝 FLIGHT Betaflight Setup Tab. The first step you should take is in the ‘Setup’ tab. Here you will find a button that says ‘Calibrate Accelerometer’ – and this is exactly what you should do. To do this right, you need to make sure your flight controller is stationary on a very level surface, then click the ‘Calibrate Accelerometer’
button.
OPERATING THE ANDROID-COMPATIBLE FPV Operating the Android-Compatible FPV Receiver. This is a short and sweet operating manual for the Android-compatible 150Ch 5.8GHz OTG FPV receiver that enables you to receive the live FPV footage from your drone directly onto your phone. It’s pretty neat and simple tooperate.
HOW TO CONNECT QUADCOPTER MOTORS AND ESC Motors to ESC. To connect your motors to your ESC you just need to solder the 3 motor wires to the motor solder pads on the one side of the ESC. They will be 3 tabs close to each other and are usually the biggest ones on an ESC. An example connection is shown in the image below. Typical motor to ESC connection. OMNIBUS F4 V5 FLIGHT CONTROLLER GUIDE The first thing to do is to enable the softserial feature on the configuration tab. In the CLI and type the resource to get a list of pins, look for TX1. In this example, TX1 is assigned to A09. This is the case for most flight controllers, but sometimes it can be different. Now we will enable softserial 1 YUNEEC TYPHOON H FIRMWARE UPDATE V3.0 Other Important key Typhoon H functions: Return to Home Height – User Adjustable height 20m (66ft) ~ 188m (400ft); GPS On/Off – Turn GPS On/Off Mid-Flight; ST16 Internal Storage Playback – Store and view video or stills on ST16 while airborne; ST16 HDMI Out – For 2nd larger monitor or external transmission; The above updates are just a few of the recently added Camera and FlightEV800D REVIEW
The best thing about the first generation EV800 headset was the fact that they can convert between FPV googles and a monitor giving you the best of both worlds, hence the name FPV moggle. Now there is a new release which adds DVR functionality and diversity receivers. But does having the dual use functionality mean they are just average at both? SETTING UP BEGINNER FLIGHT MODES IN CLEANFLIGHT/BETAFLIGHT We are going to focus on two switches on the FlySky FS-i6 to cover the flight modes and the arming switch – SWA and SWC. These will be mapped to Channel 5 and 6 which correspond to AUX1 and AUX2 in BetaFlight. We first go into the Menu on the FS-i6 by pressing and holding the ‘OK’ button. You then select the ‘FunctionsSetup’.
QUADCOPTER NOT ARMING? 🐝 HOW TO SOLVE IN BETAFLIGHT An easy way to check this is with your quad connected to betaflight GUI you can go to the receiver tab, with your receiver and radio powered on you should see the bars moving when you move the sticks on your radio. If not, you need to properly connect, setup and bind your receiver. Consult your manual on how to do this. HOW TO FLASH FIRMWARE ONTO THE EACHINE PRO58 RECEIVER A window will pop up and ask you to select the .bin firmware file you want to load. Select your firmware file (which will be a .BIN file) that you downloaded previously, and click open. Now click the start button and after a few seconds the firmware should be TIPS FOR POWERING YOUR FLIGHT CONTROLLER Using an individual voltage reguator/BEC – Powering your flight controller via an individual BEC is an effective method since 5V voltage reguators are tiny and cheap devices. You will need to connect the inputs of the voltage regulator to the same circuit as your battery voltage, and the outputs will connect to the 5V, and ground inputs on your flight controller. HOW TO SETUP ANY BETAFLIGHT 🐝 FLIGHT Betaflight Setup Tab. The first step you should take is in the ‘Setup’ tab. Here you will find a button that says ‘Calibrate Accelerometer’ – and this is exactly what you should do. To do this right, you need to make sure your flight controller is stationary on a very level surface, then click the ‘Calibrate Accelerometer’button.
OPERATING THE ANDROID-COMPATIBLE FPV Operating the Android-Compatible FPV Receiver. This is a short and sweet operating manual for the Android-compatible 150Ch 5.8GHz OTG FPV receiver that enables you to receive the live FPV footage from your drone directly onto your phone. It’s pretty neat and simple tooperate.
HOW TO CONNECT QUADCOPTER MOTORS AND ESC Motors to ESC. To connect your motors to your ESC you just need to solder the 3 motor wires to the motor solder pads on the one side of the ESC. They will be 3 tabs close to each other and are usually the biggest ones on an ESC. An example connection is shown in the image below. Typical motor to ESC connection. OMNIBUS F4 V5 FLIGHT CONTROLLER GUIDE The first thing to do is to enable the softserial feature on the configuration tab. In the CLI and type the resource to get a list of pins, look for TX1. In this example, TX1 is assigned to A09. This is the case for most flight controllers, but sometimes it can be different. Now we will enable softserial 1 YUNEEC TYPHOON H FIRMWARE UPDATE V3.0 Other Important key Typhoon H functions: Return to Home Height – User Adjustable height 20m (66ft) ~ 188m (400ft); GPS On/Off – Turn GPS On/Off Mid-Flight; ST16 Internal Storage Playback – Store and view video or stills on ST16 while airborne; ST16 HDMI Out – For 2nd larger monitor or external transmission; The above updates are just a few of the recently added Camera and FlightEV800D REVIEW
The best thing about the first generation EV800 headset was the fact that they can convert between FPV googles and a monitor giving you the best of both worlds, hence the name FPV moggle. Now there is a new release which adds DVR functionality and diversity receivers. But does having the dual use functionality mean they are just average at both? SETTING UP BEGINNER FLIGHT MODES IN CLEANFLIGHT/BETAFLIGHT We are going to focus on two switches on the FlySky FS-i6 to cover the flight modes and the arming switch – SWA and SWC. These will be mapped to Channel 5 and 6 which correspond to AUX1 and AUX2 in BetaFlight. We first go into the Menu on the FS-i6 by pressing and holding the ‘OK’ button. You then select the ‘FunctionsSetup’.
QUADCOPTER NOT ARMING? 🐝 HOW TO SOLVE IN BETAFLIGHT An easy way to check this is with your quad connected to betaflight GUI you can go to the receiver tab, with your receiver and radio powered on you should see the bars moving when you move the sticks on your radio. If not, you need to properly connect, setup and bind your receiver. Consult your manual on how to do this. HOW TO FLASH FIRMWARE ONTO THE EACHINE PRO58 RECEIVER A window will pop up and ask you to select the .bin firmware file you want to load. Select your firmware file (which will be a .BIN file) that you downloaded previously, and click open. Now click the start button and after a few seconds the firmware should be HOW TO SETUP ANY BETAFLIGHT 🐝 FLIGHT Betaflight Setup Tab. The first step you should take is in the ‘Setup’ tab. Here you will find a button that says ‘Calibrate Accelerometer’ – and this is exactly what you should do. To do this right, you need to make sure your flight controller is stationary on a very level surface, then click the ‘Calibrate Accelerometer’button.
HOW TO CONNECT QUADCOPTER MOTORS AND ESC Motors to ESC. To connect your motors to your ESC you just need to solder the 3 motor wires to the motor solder pads on the one side of the ESC. They will be 3 tabs close to each other and are usually the biggest ones on an ESC. An example connection is shown in the image below. Typical motor to ESC connection. WIZARD X220S 👾 INITIAL SETUP GUIDE IN The wizard X220s takes what we love about the standard Wizard X220 and cranks it up to 11 with impressive performance. This article will help you get your Wizard X220s into the air quickly and also tweak some settings for optimal performance.. ⚠During any configuration of your drone please ensure the propellers are removed from your quad! COMPLETE LIST OF FLIGHT CONTROLLER FIRMWARE PROJECTS There are loads of different flight controller projects out there. Each usually focus on some specific hardware, technology or aims. In this article, we have composed a master list of all of the flight controller firmware and software out there, along with a few commentsabout each of them.
RADIO RECEIVER END POINT CALIBRATION IN The first thing to do is to calibrate the end points, so that each channel has a range from 1000 to 2000. This is done via your radio control menu. You find the ‘End Points’ menu on your radio and select the channel that needs to be adjusted. Here, we are using the FlySky FS-i6 radio transmitter but the principle is the same for allradios.
SETTING UP BEGINNER FLIGHT MODES IN CLEANFLIGHT/BETAFLIGHT We are going to focus on two switches on the FlySky FS-i6 to cover the flight modes and the arming switch – SWA and SWC. These will be mapped to Channel 5 and 6 which correspond to AUX1 and AUX2 in BetaFlight. We first go into the Menu on the FS-i6 by pressing and holding the ‘OK’ button. You then select the ‘FunctionsSetup’.
SMARTPORT TELEMETRY VIA SOFTSERIAL (BETAFLIGHT The first thing to do is to enable the softserial feature on the configuration tab. Now we need to tell the flight controller what pins we want to use for softserial. In the CLI and type resource to get a list of pins, look for TX1. In this example, TX1 is assigned to A09. This is the case for most flight controllers, but sometimes it can be WIZARD X220 BETAFLIGHT UPDATE AND INITIAL SETUP Step 2: Connect board to BetaFlight. We can then connect the board to BetaFlight via the USB connection (i.e. plug a USB cable from the board to the computer). You will know the board is in bootloader mode as a blue LED will turn on (solidly) and no other LED will turn on. If you plug the board in when it is NOT in bootloader mode, you will see MOBULA6 🐟 TINY WHOOP REVIEW: IS IT ACTUALLY THE BEST TINY The Good. Excellent value for money at around $85. Super lightweight design means it flies well. You can easily do acro with the mobula6. Available in two motor kV options. 19000kV and 25000kV variants. 25000kV is best for whoop racers who want insane whoop perforance, but it comes at the cost of shorter flight times. HOW TO FLASH FIRMWARE ONTO THE EACHINE PRO58 RECEIVER A window will pop up and ask you to select the .bin firmware file you want to load. Select your firmware file (which will be a .BIN file) that you downloaded previously, and click open. Now click the start button and after a few seconds the firmware should beDRONETREST BLOG
Posted. by Alex. October 24, 2019. CAA has published their latest updates to the controversial drone and model aircraft registration scheme. The annual fee has been reduced from £16.50 to £9 following an outcry from the. Posted in. Interesting. Products. TIPS FOR POWERING YOUR FLIGHT CONTROLLER Using an individual voltage reguator/BEC – Powering your flight controller via an individual BEC is an effective method since 5V voltage reguators are tiny and cheap devices. You will need to connect the inputs of the voltage regulator to the same circuit as your battery voltage, and the outputs will connect to the 5V, and ground inputs on your flight controller. OPERATING THE ANDROID-COMPATIBLE FPV Operating the Android-Compatible FPV Receiver. This is a short and sweet operating manual for the Android-compatible 150Ch 5.8GHz OTG FPV receiver that enables you to receive the live FPV footage from your drone directly onto your phone. It’s pretty neat and simple tooperate.
HOW TO CONNECT QUADCOPTER MOTORS AND ESC Motors to ESC. To connect your motors to your ESC you just need to solder the 3 motor wires to the motor solder pads on the one side of the ESC. They will be 3 tabs close to each other and are usually the biggest ones on an ESC. An example connection is shown in the image below. Typical motor to ESC connection. HOW TO SETUP ANY BETAFLIGHT 🐝 FLIGHT Betaflight Setup Tab. The first step you should take is in the ‘Setup’ tab. Here you will find a button that says ‘Calibrate Accelerometer’ – and this is exactly what you should do. To do this right, you need to make sure your flight controller is stationary on a very level surface, then click the ‘Calibrate Accelerometer’button.
OMNIBUS F4 V5 FLIGHT CONTROLLER GUIDE The first thing to do is to enable the softserial feature on the configuration tab. In the CLI and type the resource to get a list of pins, look for TX1. In this example, TX1 is assigned to A09. This is the case for most flight controllers, but sometimes it can be different. Now we will enable softserial 1 HOW-TO: TARANIS CUSTOM SPLASH SCREEN 🎮 On your computer open “OpenTX Companion” and connect to you transmitter by clicking the “Read Model and settings” icon on the left (Screen shot below) Your know your radio is connected and working when it lists your models from your radio on the computer. Now the next step is the most important when making any changes to you radio.. YUNEEC TYPHOON H FIRMWARE UPDATE V3.0 Other Important key Typhoon H functions: Return to Home Height – User Adjustable height 20m (66ft) ~ 188m (400ft); GPS On/Off – Turn GPS On/Off Mid-Flight; ST16 Internal Storage Playback – Store and view video or stills on ST16 while airborne; ST16 HDMI Out – For 2nd larger monitor or external transmission; The above updates are just a few of the recently added Camera and FlightEV800D REVIEW
The best thing about the first generation EV800 headset was the fact that they can convert between FPV googles and a monitor giving you the best of both worlds, hence the name FPV moggle. Now there is a new release which adds DVR functionality and diversity receivers. But does having the dual use functionality mean they are just average at both? QUADCOPTER NOT ARMING? 🐝 HOW TO SOLVE IN BETAFLIGHT An easy way to check this is with your quad connected to betaflight GUI you can go to the receiver tab, with your receiver and radio powered on you should see the bars moving when you move the sticks on your radio. If not, you need to properly connect, setup and bind your receiver. Consult your manual on how to do this.DRONETREST BLOG
Posted. by Alex. October 24, 2019. CAA has published their latest updates to the controversial drone and model aircraft registration scheme. The annual fee has been reduced from £16.50 to £9 following an outcry from the. Posted in. Interesting. Products. TIPS FOR POWERING YOUR FLIGHT CONTROLLER Using an individual voltage reguator/BEC – Powering your flight controller via an individual BEC is an effective method since 5V voltage reguators are tiny and cheap devices. You will need to connect the inputs of the voltage regulator to the same circuit as your battery voltage, and the outputs will connect to the 5V, and ground inputs on your flight controller. OPERATING THE ANDROID-COMPATIBLE FPV Operating the Android-Compatible FPV Receiver. This is a short and sweet operating manual for the Android-compatible 150Ch 5.8GHz OTG FPV receiver that enables you to receive the live FPV footage from your drone directly onto your phone. It’s pretty neat and simple tooperate.
HOW TO CONNECT QUADCOPTER MOTORS AND ESC Motors to ESC. To connect your motors to your ESC you just need to solder the 3 motor wires to the motor solder pads on the one side of the ESC. They will be 3 tabs close to each other and are usually the biggest ones on an ESC. An example connection is shown in the image below. Typical motor to ESC connection. HOW TO SETUP ANY BETAFLIGHT 🐝 FLIGHT Betaflight Setup Tab. The first step you should take is in the ‘Setup’ tab. Here you will find a button that says ‘Calibrate Accelerometer’ – and this is exactly what you should do. To do this right, you need to make sure your flight controller is stationary on a very level surface, then click the ‘Calibrate Accelerometer’button.
OMNIBUS F4 V5 FLIGHT CONTROLLER GUIDE The first thing to do is to enable the softserial feature on the configuration tab. In the CLI and type the resource to get a list of pins, look for TX1. In this example, TX1 is assigned to A09. This is the case for most flight controllers, but sometimes it can be different. Now we will enable softserial 1 HOW-TO: TARANIS CUSTOM SPLASH SCREEN 🎮 On your computer open “OpenTX Companion” and connect to you transmitter by clicking the “Read Model and settings” icon on the left (Screen shot below) Your know your radio is connected and working when it lists your models from your radio on the computer. Now the next step is the most important when making any changes to you radio.. YUNEEC TYPHOON H FIRMWARE UPDATE V3.0 Other Important key Typhoon H functions: Return to Home Height – User Adjustable height 20m (66ft) ~ 188m (400ft); GPS On/Off – Turn GPS On/Off Mid-Flight; ST16 Internal Storage Playback – Store and view video or stills on ST16 while airborne; ST16 HDMI Out – For 2nd larger monitor or external transmission; The above updates are just a few of the recently added Camera and FlightEV800D REVIEW
The best thing about the first generation EV800 headset was the fact that they can convert between FPV googles and a monitor giving you the best of both worlds, hence the name FPV moggle. Now there is a new release which adds DVR functionality and diversity receivers. But does having the dual use functionality mean they are just average at both? QUADCOPTER NOT ARMING? 🐝 HOW TO SOLVE IN BETAFLIGHT An easy way to check this is with your quad connected to betaflight GUI you can go to the receiver tab, with your receiver and radio powered on you should see the bars moving when you move the sticks on your radio. If not, you need to properly connect, setup and bind your receiver. Consult your manual on how to do this. PRODUCTS – DRONETREST BLOG RunCam are releasing a RunCam Split 3 Nano – Whoop editionThe Control board instead of having the normal 20×20 or. A Fusion of the best: The image processing developed by BrainFPV, the OSD and UI by Achilles, and the hardware engineered and manufactured by TBS. When the brightest minds of. Posted in. Products. HOW TO SETUP ANY BETAFLIGHT 🐝 FLIGHT Betaflight Setup Tab. The first step you should take is in the ‘Setup’ tab. Here you will find a button that says ‘Calibrate Accelerometer’ – and this is exactly what you should do. To do this right, you need to make sure your flight controller is stationary on a very level surface, then click the ‘Calibrate Accelerometer’button.
OMNIBUS F4 V5 FLIGHT CONTROLLER GUIDE The first thing to do is to enable the softserial feature on the configuration tab. In the CLI and type the resource to get a list of pins, look for TX1. In this example, TX1 is assigned to A09. This is the case for most flight controllers, but sometimes it can be different. Now we will enable softserial 1 COMPLETE LIST OF FLIGHT CONTROLLER FIRMWARE PROJECTS There are loads of different flight controller projects out there. Each usually focus on some specific hardware, technology or aims. In this article, we have composed a master list of all of the flight controller firmware and software out there, along with a few commentsabout each of them.
THE COMPLETE GUIDE TO BUYING 💸 AN FPV QUADCOPTER FRAME As an example, the Qav220 or the Martian 220 are drones with a wheelbase of 220mm. To simplify things a bit the drone community categorised the frame sizes. The size of the frame will define the size of propeller and motor you can use with it. These sizes are not a golden rule, but a general guide is given in the table below.: HOW TO FLASH FIRMWARE ONTO THE EACHINE PRO58 RECEIVER A window will pop up and ask you to select the .bin firmware file you want to load. Select your firmware file (which will be a .BIN file) that you downloaded previously, and click open. Now click the start button and after a few seconds the firmware should be MOBULA6 🐟 TINY WHOOP REVIEW: IS IT ACTUALLY THE BEST TINY The Good. Excellent value for money at around $85. Super lightweight design means it flies well. You can easily do acro with the mobula6. Available in two motor kV options. 19000kV and 25000kV variants. 25000kV is best for whoop racers who want insane whoop perforance, but it comes at the cost of shorter flight times.VR-007 FPV GOGGLES
The VR-007 is a 4.3 inch FPV headset that uses a single 480×272 pixel LCD panel behind a Fresnel lens in a lightweight molded plastic enclosure. This enables ultra large viewing angles to get fully immersed into the FPV experience. A battery is also included that hasa
NO VOLTAGE IN OSD? 🔋 50% Throttle = 1 second on the timer > 1 second real time. 100% Throttle = 2 seconds on the timer > 2 seconds real time. So the higher your throttle the faster the timer ticks down. So if your cruising around at 40/50% your timer lasts longer cause your not draining your lipo as fast. The hardest part is working out how long the timershould be
FALCON 250 PRO GETTING STARTED GUIDE The falcon 250 Pro is a great beginner FPV racing drone in many aspects because it uses decent gear, is ready to fly and is also a great price. However the fact that it does not include a comprehensive manual makes it rather difficult to use as your first quadcopter so in this post I will include a couple of things you need to do to get the most out of your falcon 250 pro.DRONETREST BLOG
Posted. by Alex. October 24, 2019. CAA has published their latest updates to the controversial drone and model aircraft registration scheme. The annual fee has been reduced from £16.50 to £9 following an outcry from the. Posted in. Interesting. Products. TIPS FOR POWERING YOUR FLIGHT CONTROLLER Using an individual voltage reguator/BEC – Powering your flight controller via an individual BEC is an effective method since 5V voltage reguators are tiny and cheap devices. You will need to connect the inputs of the voltage regulator to the same circuit as your battery voltage, and the outputs will connect to the 5V, and ground inputs on your flight controller. HOW TO SETUP ANY BETAFLIGHT 🐝 FLIGHT Betaflight Setup Tab. The first step you should take is in the ‘Setup’ tab. Here you will find a button that says ‘Calibrate Accelerometer’ – and this is exactly what you should do. To do this right, you need to make sure your flight controller is stationary on a very level surface, then click the ‘Calibrate Accelerometer’button.
OMNIBUS F4 V5 FLIGHT CONTROLLER GUIDE The first thing to do is to enable the softserial feature on the configuration tab. In the CLI and type the resource to get a list of pins, look for TX1. In this example, TX1 is assigned to A09. This is the case for most flight controllers, but sometimes it can be different. Now we will enable softserial 1 HOW TO CONNECT QUADCOPTER MOTORS AND ESC Motors to ESC. To connect your motors to your ESC you just need to solder the 3 motor wires to the motor solder pads on the one side of the ESC. They will be 3 tabs close to each other and are usually the biggest ones on an ESC. An example connection is shown in the image below. Typical motor to ESC connection. OPERATING THE ANDROID-COMPATIBLE FPV Operating the Android-Compatible FPV Receiver. This is a short and sweet operating manual for the Android-compatible 150Ch 5.8GHz OTG FPV receiver that enables you to receive the live FPV footage from your drone directly onto your phone. It’s pretty neat and simple tooperate.
HOW-TO: TARANIS CUSTOM SPLASH SCREEN 🎮 On your computer open “OpenTX Companion” and connect to you transmitter by clicking the “Read Model and settings” icon on the left (Screen shot below) Your know your radio is connected and working when it lists your models from your radio on the computer. Now the next step is the most important when making any changes to you radio.. YUNEEC TYPHOON H FIRMWARE UPDATE V3.0 Other Important key Typhoon H functions: Return to Home Height – User Adjustable height 20m (66ft) ~ 188m (400ft); GPS On/Off – Turn GPS On/Off Mid-Flight; ST16 Internal Storage Playback – Store and view video or stills on ST16 while airborne; ST16 HDMI Out – For 2nd larger monitor or external transmission; The above updates are just a few of the recently added Camera and Flight SETTING UP BEGINNER FLIGHT MODES IN CLEANFLIGHT/BETAFLIGHT We are going to focus on two switches on the FlySky FS-i6 to cover the flight modes and the arming switch – SWA and SWC. These will be mapped to Channel 5 and 6 which correspond to AUX1 and AUX2 in BetaFlight. We first go into the Menu on the FS-i6 by pressing and holding the ‘OK’ button. You then select the ‘FunctionsSetup’.
QUADCOPTER NOT ARMING? 🐝 HOW TO SOLVE IN BETAFLIGHT An easy way to check this is with your quad connected to betaflight GUI you can go to the receiver tab, with your receiver and radio powered on you should see the bars moving when you move the sticks on your radio. If not, you need to properly connect, setup and bind your receiver. Consult your manual on how to do this.DRONETREST BLOG
Posted. by Alex. October 24, 2019. CAA has published their latest updates to the controversial drone and model aircraft registration scheme. The annual fee has been reduced from £16.50 to £9 following an outcry from the. Posted in. Interesting. Products. TIPS FOR POWERING YOUR FLIGHT CONTROLLER Using an individual voltage reguator/BEC – Powering your flight controller via an individual BEC is an effective method since 5V voltage reguators are tiny and cheap devices. You will need to connect the inputs of the voltage regulator to the same circuit as your battery voltage, and the outputs will connect to the 5V, and ground inputs on your flight controller. HOW TO SETUP ANY BETAFLIGHT 🐝 FLIGHT Betaflight Setup Tab. The first step you should take is in the ‘Setup’ tab. Here you will find a button that says ‘Calibrate Accelerometer’ – and this is exactly what you should do. To do this right, you need to make sure your flight controller is stationary on a very level surface, then click the ‘Calibrate Accelerometer’button.
OMNIBUS F4 V5 FLIGHT CONTROLLER GUIDE The first thing to do is to enable the softserial feature on the configuration tab. In the CLI and type the resource to get a list of pins, look for TX1. In this example, TX1 is assigned to A09. This is the case for most flight controllers, but sometimes it can be different. Now we will enable softserial 1 HOW TO CONNECT QUADCOPTER MOTORS AND ESC Motors to ESC. To connect your motors to your ESC you just need to solder the 3 motor wires to the motor solder pads on the one side of the ESC. They will be 3 tabs close to each other and are usually the biggest ones on an ESC. An example connection is shown in the image below. Typical motor to ESC connection. OPERATING THE ANDROID-COMPATIBLE FPV Operating the Android-Compatible FPV Receiver. This is a short and sweet operating manual for the Android-compatible 150Ch 5.8GHz OTG FPV receiver that enables you to receive the live FPV footage from your drone directly onto your phone. It’s pretty neat and simple tooperate.
HOW-TO: TARANIS CUSTOM SPLASH SCREEN 🎮 On your computer open “OpenTX Companion” and connect to you transmitter by clicking the “Read Model and settings” icon on the left (Screen shot below) Your know your radio is connected and working when it lists your models from your radio on the computer. Now the next step is the most important when making any changes to you radio.. YUNEEC TYPHOON H FIRMWARE UPDATE V3.0 Other Important key Typhoon H functions: Return to Home Height – User Adjustable height 20m (66ft) ~ 188m (400ft); GPS On/Off – Turn GPS On/Off Mid-Flight; ST16 Internal Storage Playback – Store and view video or stills on ST16 while airborne; ST16 HDMI Out – For 2nd larger monitor or external transmission; The above updates are just a few of the recently added Camera and Flight SETTING UP BEGINNER FLIGHT MODES IN CLEANFLIGHT/BETAFLIGHT We are going to focus on two switches on the FlySky FS-i6 to cover the flight modes and the arming switch – SWA and SWC. These will be mapped to Channel 5 and 6 which correspond to AUX1 and AUX2 in BetaFlight. We first go into the Menu on the FS-i6 by pressing and holding the ‘OK’ button. You then select the ‘FunctionsSetup’.
QUADCOPTER NOT ARMING? 🐝 HOW TO SOLVE IN BETAFLIGHT An easy way to check this is with your quad connected to betaflight GUI you can go to the receiver tab, with your receiver and radio powered on you should see the bars moving when you move the sticks on your radio. If not, you need to properly connect, setup and bind your receiver. Consult your manual on how to do this. HOW TO CONNECT QUADCOPTER MOTORS AND ESC Motors to ESC. To connect your motors to your ESC you just need to solder the 3 motor wires to the motor solder pads on the one side of the ESC. They will be 3 tabs close to each other and are usually the biggest ones on an ESC. An example connection is shown in the image below. Typical motor to ESC connection. FRSKY ACCESS PROTOCOL Frsky recently announced their new protocol they have been working on, called ACCESS. (Advanced Communication Control, Elevated Spread Spectrum). From what they said, this protocol is going to be be pretty awesome not only in terms of performance, but also ease of use. Read on to learn more. If you have used TBS crossfire for long range, you FETTECH – FETTECESC 4IN1 – DRONETREST BLOG The FETtecESC represents the next step forward in ESC technology utilising sine wave control technology. It supports KISS and Betaflight and runs at Dshot 2400. It supports 3-6S input and if running on 6S, it also has direct mounting options to add capacitors to ensure your circuits are running clean. Bottom line this is oneawesome ESC to get
COMPLETE LIST OF FLIGHT CONTROLLER FIRMWARE PROJECTS There are loads of different flight controller projects out there. Each usually focus on some specific hardware, technology or aims. In this article, we have composed a master list of all of the flight controller firmware and software out there, along with a few commentsabout each of them.
RADIO RECEIVER END POINT CALIBRATION IN The first thing to do is to calibrate the end points, so that each channel has a range from 1000 to 2000. This is done via your radio control menu. You find the ‘End Points’ menu on your radio and select the channel that needs to be adjusted. Here, we are using the FlySky FS-i6 radio transmitter but the principle is the same for allradios.
SETTING UP BEGINNER FLIGHT MODES IN CLEANFLIGHT/BETAFLIGHT We are going to focus on two switches on the FlySky FS-i6 to cover the flight modes and the arming switch – SWA and SWC. These will be mapped to Channel 5 and 6 which correspond to AUX1 and AUX2 in BetaFlight. We first go into the Menu on the FS-i6 by pressing and holding the ‘OK’ button. You then select the ‘FunctionsSetup’.
EV800D REVIEW
The best thing about the first generation EV800 headset was the fact that they can convert between FPV googles and a monitor giving you the best of both worlds, hence the name FPV moggle. Now there is a new release which adds DVR functionality and diversity receivers. But does having the dual use functionality mean they are just average at both? WIZARD X220S 👾 INITIAL SETUP GUIDE IN BETAFLIGHT The wizard X220s takes what we love about the standard Wizard X220 and cranks it up to 11 with impressive performance. This article will help you get your Wizard X220s into the air quickly and also tweak some settings for optimal performance.. ⚠During any configuration of your drone please ensure the propellers are removed from your quad! HOW TO BIND AND SETUP YOUR FLYSKY RADIO FOR A QUADCOPTER To setup your model, long press the OK button to access the radio main menu. Navigate to the System Setup menu, press OK. Using the Up and Down buttons, navigate to the Model select menu, in this menu, you can select various models that you have previously saved. To select and activate a model you press and hold the Cancel button (counter HOW TO FLASH FIRMWARE ONTO THE EACHINE PRO58 RECEIVER A window will pop up and ask you to select the .bin firmware file you want to load. Select your firmware file (which will be a .BIN file) that you downloaded previously, and click open. Now click the start button and after a few seconds the firmware should beDRONETREST BLOG
Posted. by Alex. October 24, 2019. CAA has published their latest updates to the controversial drone and model aircraft registration scheme. The annual fee has been reduced from £16.50 to £9 following an outcry from the. Posted in. Interesting. Products. TIPS FOR POWERING YOUR FLIGHT CONTROLLER Using an individual voltage reguator/BEC – Powering your flight controller via an individual BEC is an effective method since 5V voltage reguators are tiny and cheap devices. You will need to connect the inputs of the voltage regulator to the same circuit as your battery voltage, and the outputs will connect to the 5V, and ground inputs on your flight controller. HOW TO SETUP ANY BETAFLIGHT 🐝 FLIGHT Betaflight Setup Tab. The first step you should take is in the ‘Setup’ tab. Here you will find a button that says ‘Calibrate Accelerometer’ – and this is exactly what you should do. To do this right, you need to make sure your flight controller is stationary on a very level surface, then click the ‘Calibrate Accelerometer’button.
OMNIBUS F4 V5 FLIGHT CONTROLLER GUIDE The first thing to do is to enable the softserial feature on the configuration tab. In the CLI and type the resource to get a list of pins, look for TX1. In this example, TX1 is assigned to A09. This is the case for most flight controllers, but sometimes it can be different. Now we will enable softserial 1 HOW TO CONNECT QUADCOPTER MOTORS AND ESC Motors to ESC. To connect your motors to your ESC you just need to solder the 3 motor wires to the motor solder pads on the one side of the ESC. They will be 3 tabs close to each other and are usually the biggest ones on an ESC. An example connection is shown in the image below. Typical motor to ESC connection. OPERATING THE ANDROID-COMPATIBLE FPV Operating the Android-Compatible FPV Receiver. This is a short and sweet operating manual for the Android-compatible 150Ch 5.8GHz OTG FPV receiver that enables you to receive the live FPV footage from your drone directly onto your phone. It’s pretty neat and simple tooperate.
HOW-TO: TARANIS CUSTOM SPLASH SCREEN 🎮 On your computer open “OpenTX Companion” and connect to you transmitter by clicking the “Read Model and settings” icon on the left (Screen shot below) Your know your radio is connected and working when it lists your models from your radio on the computer. Now the next step is the most important when making any changes to you radio.. YUNEEC TYPHOON H FIRMWARE UPDATE V3.0 Other Important key Typhoon H functions: Return to Home Height – User Adjustable height 20m (66ft) ~ 188m (400ft); GPS On/Off – Turn GPS On/Off Mid-Flight; ST16 Internal Storage Playback – Store and view video or stills on ST16 while airborne; ST16 HDMI Out – For 2nd larger monitor or external transmission; The above updates are just a few of the recently added Camera and Flight SETTING UP BEGINNER FLIGHT MODES IN CLEANFLIGHT/BETAFLIGHT We are going to focus on two switches on the FlySky FS-i6 to cover the flight modes and the arming switch – SWA and SWC. These will be mapped to Channel 5 and 6 which correspond to AUX1 and AUX2 in BetaFlight. We first go into the Menu on the FS-i6 by pressing and holding the ‘OK’ button. You then select the ‘FunctionsSetup’.
QUADCOPTER NOT ARMING? 🐝 HOW TO SOLVE IN BETAFLIGHT An easy way to check this is with your quad connected to betaflight GUI you can go to the receiver tab, with your receiver and radio powered on you should see the bars moving when you move the sticks on your radio. If not, you need to properly connect, setup and bind your receiver. Consult your manual on how to do this.DRONETREST BLOG
Posted. by Alex. October 24, 2019. CAA has published their latest updates to the controversial drone and model aircraft registration scheme. The annual fee has been reduced from £16.50 to £9 following an outcry from the. Posted in. Interesting. Products. TIPS FOR POWERING YOUR FLIGHT CONTROLLER Using an individual voltage reguator/BEC – Powering your flight controller via an individual BEC is an effective method since 5V voltage reguators are tiny and cheap devices. You will need to connect the inputs of the voltage regulator to the same circuit as your battery voltage, and the outputs will connect to the 5V, and ground inputs on your flight controller. HOW TO SETUP ANY BETAFLIGHT 🐝 FLIGHT Betaflight Setup Tab. The first step you should take is in the ‘Setup’ tab. Here you will find a button that says ‘Calibrate Accelerometer’ – and this is exactly what you should do. To do this right, you need to make sure your flight controller is stationary on a very level surface, then click the ‘Calibrate Accelerometer’button.
OMNIBUS F4 V5 FLIGHT CONTROLLER GUIDE The first thing to do is to enable the softserial feature on the configuration tab. In the CLI and type the resource to get a list of pins, look for TX1. In this example, TX1 is assigned to A09. This is the case for most flight controllers, but sometimes it can be different. Now we will enable softserial 1 HOW TO CONNECT QUADCOPTER MOTORS AND ESC Motors to ESC. To connect your motors to your ESC you just need to solder the 3 motor wires to the motor solder pads on the one side of the ESC. They will be 3 tabs close to each other and are usually the biggest ones on an ESC. An example connection is shown in the image below. Typical motor to ESC connection. OPERATING THE ANDROID-COMPATIBLE FPV Operating the Android-Compatible FPV Receiver. This is a short and sweet operating manual for the Android-compatible 150Ch 5.8GHz OTG FPV receiver that enables you to receive the live FPV footage from your drone directly onto your phone. It’s pretty neat and simple tooperate.
HOW-TO: TARANIS CUSTOM SPLASH SCREEN 🎮 On your computer open “OpenTX Companion” and connect to you transmitter by clicking the “Read Model and settings” icon on the left (Screen shot below) Your know your radio is connected and working when it lists your models from your radio on the computer. Now the next step is the most important when making any changes to you radio.. YUNEEC TYPHOON H FIRMWARE UPDATE V3.0 Other Important key Typhoon H functions: Return to Home Height – User Adjustable height 20m (66ft) ~ 188m (400ft); GPS On/Off – Turn GPS On/Off Mid-Flight; ST16 Internal Storage Playback – Store and view video or stills on ST16 while airborne; ST16 HDMI Out – For 2nd larger monitor or external transmission; The above updates are just a few of the recently added Camera and Flight SETTING UP BEGINNER FLIGHT MODES IN CLEANFLIGHT/BETAFLIGHT We are going to focus on two switches on the FlySky FS-i6 to cover the flight modes and the arming switch – SWA and SWC. These will be mapped to Channel 5 and 6 which correspond to AUX1 and AUX2 in BetaFlight. We first go into the Menu on the FS-i6 by pressing and holding the ‘OK’ button. You then select the ‘FunctionsSetup’.
QUADCOPTER NOT ARMING? 🐝 HOW TO SOLVE IN BETAFLIGHT An easy way to check this is with your quad connected to betaflight GUI you can go to the receiver tab, with your receiver and radio powered on you should see the bars moving when you move the sticks on your radio. If not, you need to properly connect, setup and bind your receiver. Consult your manual on how to do this. HOW TO CONNECT QUADCOPTER MOTORS AND ESC Motors to ESC. To connect your motors to your ESC you just need to solder the 3 motor wires to the motor solder pads on the one side of the ESC. They will be 3 tabs close to each other and are usually the biggest ones on an ESC. An example connection is shown in the image below. Typical motor to ESC connection. FRSKY ACCESS PROTOCOL Frsky recently announced their new protocol they have been working on, called ACCESS. (Advanced Communication Control, Elevated Spread Spectrum). From what they said, this protocol is going to be be pretty awesome not only in terms of performance, but also ease of use. Read on to learn more. If you have used TBS crossfire for long range, you FETTECH – FETTECESC 4IN1 – DRONETREST BLOG The FETtecESC represents the next step forward in ESC technology utilising sine wave control technology. It supports KISS and Betaflight and runs at Dshot 2400. It supports 3-6S input and if running on 6S, it also has direct mounting options to add capacitors to ensure your circuits are running clean. Bottom line this is oneawesome ESC to get
COMPLETE LIST OF FLIGHT CONTROLLER FIRMWARE PROJECTS There are loads of different flight controller projects out there. Each usually focus on some specific hardware, technology or aims. In this article, we have composed a master list of all of the flight controller firmware and software out there, along with a few commentsabout each of them.
RADIO RECEIVER END POINT CALIBRATION IN The first thing to do is to calibrate the end points, so that each channel has a range from 1000 to 2000. This is done via your radio control menu. You find the ‘End Points’ menu on your radio and select the channel that needs to be adjusted. Here, we are using the FlySky FS-i6 radio transmitter but the principle is the same for allradios.
SETTING UP BEGINNER FLIGHT MODES IN CLEANFLIGHT/BETAFLIGHT We are going to focus on two switches on the FlySky FS-i6 to cover the flight modes and the arming switch – SWA and SWC. These will be mapped to Channel 5 and 6 which correspond to AUX1 and AUX2 in BetaFlight. We first go into the Menu on the FS-i6 by pressing and holding the ‘OK’ button. You then select the ‘FunctionsSetup’.
EV800D REVIEW
The best thing about the first generation EV800 headset was the fact that they can convert between FPV googles and a monitor giving you the best of both worlds, hence the name FPV moggle. Now there is a new release which adds DVR functionality and diversity receivers. But does having the dual use functionality mean they are just average at both? WIZARD X220S 👾 INITIAL SETUP GUIDE IN BETAFLIGHT The wizard X220s takes what we love about the standard Wizard X220 and cranks it up to 11 with impressive performance. This article will help you get your Wizard X220s into the air quickly and also tweak some settings for optimal performance.. ⚠During any configuration of your drone please ensure the propellers are removed from your quad! HOW TO BIND AND SETUP YOUR FLYSKY RADIO FOR A QUADCOPTER To setup your model, long press the OK button to access the radio main menu. Navigate to the System Setup menu, press OK. Using the Up and Down buttons, navigate to the Model select menu, in this menu, you can select various models that you have previously saved. To select and activate a model you press and hold the Cancel button (counter HOW TO FLASH FIRMWARE ONTO THE EACHINE PRO58 RECEIVER A window will pop up and ask you to select the .bin firmware file you want to load. Select your firmware file (which will be a .BIN file) that you downloaded previously, and click open. Now click the start button and after a few seconds the firmware should be__Menu
__Search
* Products
* Reviews
* Tutorials
* All Tutorials
* How To Get Started With FPV * How To Connect Gear* Buying Guides
* Interesting
* Forums
* Start Here
* __Search
__ Search for: __Search __* Products
* Reviews
* Tutorials
* All Tutorials
* How To Get Started With FPV * How To Connect Gear* Buying Guides
* Interesting
* Forums
* Start Here
* Posted _in_
*
* Tutorials
SP RACING F3 EVO FLIGHT CONTROLLER GUIDE* Posted_by_ Alex
* July 8, 2016
* 0 Comments
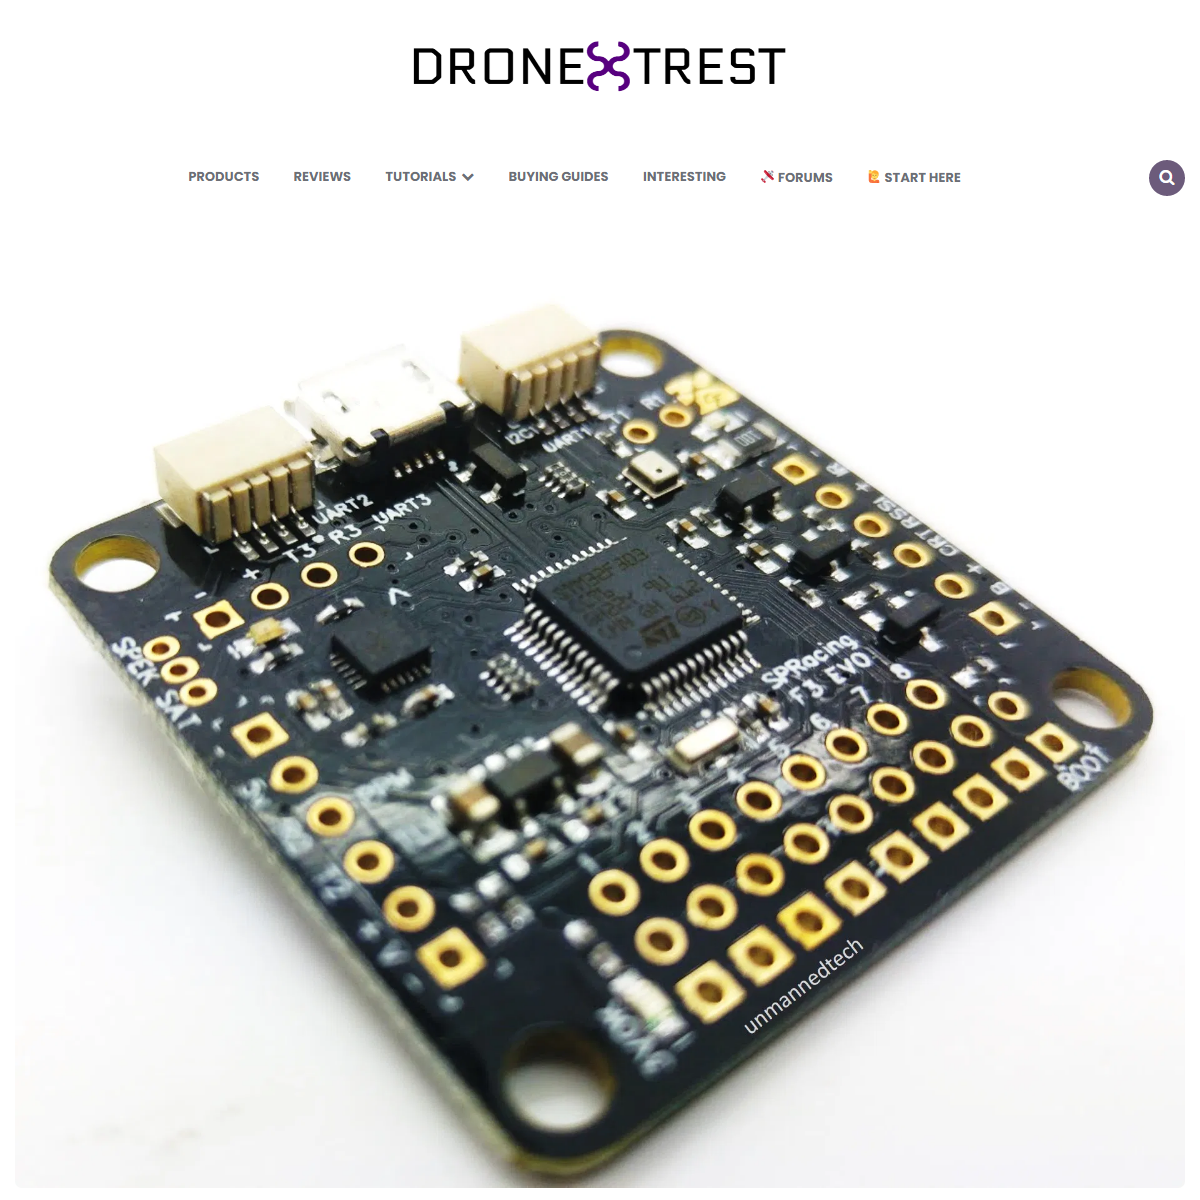
The SP Racing F3 Evo flight controller is built for FPV Racing. It is designed to use the latest and greatest hardware while keeping the board cost to a minimum, at the end of the day when pushing your FPV racer to the max you will eventually crash, so having an affordable flight controller with incredible performance means that you can push a little harder, or try something new without breaking the bank if you crash. SP RACING F3 KEY FEATURES * Micro SD card reader – can record flight data logs easily onto and SD card (not limited to 128mb like on other flight controllers) * Stackable – Can mount onto compatible PDB’s or OSD’s with just 2 through hole pins in each corner. * Next Generation CPU and Sensors – Using the ARM Cortex-M4 72Mhz CPU along with MPU9250 connected directly via SPI (8Khz sensor update rate), to ensure processing of more sensor data than ever before. SP RACING F3 EVO PINOUTTrending
BlackBox Date and Time Quick Tip The UART2 port is primarily used for R/C input, be it PPM, SBUS or Spektrum, there is a variety of connectors for each. If you connect your R/C reciver via PPM then you can still use the UART2 out to send telemetry info back to your receiver (such as an X4R, or D4R). However if using spektrum or and SBUS receiver then the UART2 out cannot beused.
On the bottom of the F3 Evo is the microSD card reader to store black box flight logs. But you will also notice two solder pad jumpers. The first is to select between using an IR LED Transponder (for race timing) or an LED RGB. The second pad is to select between your RSSI input to be analogue, or PWM (depending on your receiver). Simply solder two of the 3 pads together to enable on or the other as described on the image. TYPICAL CONNECTION DIAGRAM The diagram below is a typical connection for a FPV racing quadcopter. There are some things that you can do differently, but this is just as a guide if you have no idea on what to do. This diagram connects the receiver in PPM mode (so that you can still use the same UART port for telemetry out). Also I am using the RGB LED instead of the race timing transponder as I dont consider myself a good enough FPV pilot to raceyet
But if you are using the IR transponder (which is a good reason to get the SPracing F3 Evo flight controller) then the diagram below shows a more typical race drone setup. We are also using SBUS since its technically faster than CPPM so there is less lag between the controller detecting your signals compared to CPPM (But we are talkingabout miliseconds).
> If you have no idea what I mean by CPPM, or SBUS check out our R/C> Protocol guide
> .
PIN HEADERS
The F3 Evo flight controller includes right angle and straight pin headers with the kit which gives you the flexibility to mount the board in a variety of ways. Using right angle headers are best if you dont have much vertical space, and straight headers are best if you dont have much horizontal space. For other frames like the nighthawk X,
you might need to solder the wires directly and not use any pinheaders.
As in the photo above you need to use the tripple row headers along all the ESC connectors, and then the single row straight pin headers alon the left side where the R/C input pins are located. If you plan to use a spektrum receiver, you should rather solder the spektrum satellite connector. INSTALL DRIVERS AND CLEANFLIGHT If you have never used any cleanflight boards before the first thing is to download and stall the cleanflight GUI and the drivers for the SP racing board. Windows might install the correct drivers automatically, but its usually best to download and install themyourself.
* STM32 Virtual COM Port Driver * Cleanflight Configurator tool(chrome extension)
CONNECTING YOUR RECEIVER There are 3 main way people connect their receivers to ther flight controller (ok actually 4 if you caount PWM, but thats not an option with the F3 Evo since its 2016 and if you can avoid it, dont use PWM as there are just too many wires!). So the 3 ways you can connect your receiver to the F3 Evo is via PPM, SBUS, or Spektrum. Because we are a big fan of FRsky radio gear we will be using the XSRreceiver
in these diagrams, but you can just as easily use something like aX4R-SB
,
or D4R receivers as all of these are nice and small, making them suitable for FPV racing quads. SETUP TARANIS MIXING If you have not setup a model on your taranis check out this post which shows yo how to setup mixing on your taranisfor a basic setup
PPM RECEIVER
!(https://blog.dronetrest.com/content/images/2016/06/XSR-F3-Evo-PPM.jpg) I usualy prefer to use PPM for my recievers,because it means that you dont need to use a dedicated UART port to read the signal (like you do with SBUS). Freeing up a UART port so you can use it for other functions. But since the F3 board has 3 UART ports this is less important. In the diagram above you can see that I can use the same UART port to send telemetry back to the XSR, which I talk about later in this guide under the telemetry section.SBUS RECEIVER
If you prefer to use an SBUS receiver you still connect it to the UART2 port as shown in the diagram. However SBUS uses the entire UART port so if you also want to use telemetry you need to use another UART port. In this case I am using UART1 as that keeps the UART3 open so we can use that for an OSD. USING SMART PORT TELEMETRY Using telemetry is fairly useful on your FPV quadcopter as it lets you send some information such as your battery voltage back to your radio so you can easily see how much longer you can fly for. With the FRsky Taranis you can even set it up to use voice output to say how much voltage your battery has. You can also possibly do this with other radios but I have not used them so am not too sure how to do that. As shown in the diagrams above you will need to use a receiver compatible with telemetry (such as FRsky X4R, X6R, X8R, XSR), and simply connect one of the spare UART TX pins to the telemetry input on your receiver. In the case of a PPM receiver you can use UART2 TX, but if using SBUS/Spektrum you will need to use UART3 TX. Then in the ports section of cleanflight make sure to select SmartProt from the telemetry dropdown (dont select FRsky telemetry as that is an oldprotocol).
ENABLE TELEMETRY INVERSION With Frsky smartport telemetry you will need to invert the telemetry signal from your cleanflight controller. Fortunately since the F3 Evo uses an F3 processor that has a configurable hardware inveter so you dont need to make up any special cable. Just go to the CLI and type set telemetry_inversion = ON and hit save. Then the last thing to do is to make sure telemetry is enabled on theconfiguration tab
SETUP YOUR TARANIS
The final thing is to enable the sensor data onto your taranis. * Go to the taranis telemtry screen and select the option Discovernew sensors.
* New sensors from cleanflight should appear in the list. > Cleanflight does not send all sensor data when it is disarmed, so > its best to arm your board before searching for the sensors on your > taranis to make sure they all appear. Just make sure you remove the > propellers first! * Once you have found the sensors simply select Stop Discovery Here is a great video that walks you through the process of setting up telemetry on your taranis using an XSR receiver. CONNECTING AN RGB LED If you plan to use an RGB LED with your F3 Evo flight controller then you cant use the timing transponder at the same time, as you can only use one of the other. You select which one you want to use via the IR/LED jumper selector on the back of the board as shown below. !(https://blog.dronetrest.com/content/images/2016/06/F3-Evo-RGB-LED.jpg) In the case of the RGB LED then you need to solder the right arrow and the square pad together to enable the RGB LED mode. PROGRAMMING YOUR RGB LED’S IN CLEANFLIGHT The video below shows you how to program your RGB LED’s in cleanflight to perform various functions, the guide itself is actuallyfor a Naze32 board
,
but at far as cleanflight is concerned, its exactly the samem just connected in a different location with the F3 Evo. RACE TIMING TRANSPONDER The racing timing transponder makes this board one of the must have boards for FPV racing events, the IR transponder broadcasts a unique code that allows the iLap timing systems to record your lap times as you fly past. Unlike the F3 Mini board (which allows for 2x IR LED’s) the F3 Evo has only 1 IR LED. This means you need to check at the event which side you need to mount your LED in order for the timing system to detect your drone. In general its probably a good idea to mount the LED on some wire so you can move it to either side of your drone depending on the situation. Remember that longer leg of the LED is positve, and also remember to solder the jumper on the back of the board to select IR LED mode. SETTING UP YOUR RACING TIMING TRANSPONDER With each official SPracing F3 Evo board you will receive a QR code which is unique to that board, you simply need to enter that QR code in the race transponder screen to activate the device. Also remember to enable the transponder on config tab, in the otherfeatures box.
FLIGHT DATA LOGS (BLACK BOX) Because the F3 Evo uses a microSD card for flight log recording, you can literaly record every possible parameter as fast as possible and never worry abot running out of space! You can use microSD cards up to 32GB with this, so that sure italot of logs!
For more details check out or black box setup guideCONNECTING OSD
If you want to use a micro minim OSD, you just need to
hook it upto one of the UART ports on your F3 Evo, in this case I am using the UART3 port as it provides power for the OSD board which issuper us full.
To learn how to setup your flight controller check out this setup video, it is written of the regular F3 board, but the principles arethe same.
ANY QUESTIONS/ SUGGESTIONS? So hopefully this well help you get setup with the awesome F3 Evoflight controller
,
should you have you have any questions, comments or tips be sure to add them in the comments below. Happy flying!* Flight Controller
* Guide
POST NAVIGATION
previous post
GETTING STARTED GUIDE FOR THE EACHINE FALCON 180next post
FEIYU TECH SUMMON - A 3 AXIS GIMBAL AND 4K CAMERA IN ONERELATED ARTICLES
* Posted _in_
*
* Tutorials
WIZARD X220 BETAFLIGHT UPDATE AND INITIAL SETUP* Posted_by_ Sam
* April 6, 2017
* 8 minute read
* 2 Comments
* Posted _in_
*
* Reviews
WHY IS THE PAGODA-2 ANTENNA SO GOOD?* Posted_by_ Sam
* June 2, 2017
* 3 minute read
* 0 Comments
* Posted _in_
*
* Tutorials
FLASHING TARANIS EU-LBT FIRMWARE VIA DFU DFUSE SOFTWARE* Posted_by_ Alex
* April 14, 2016
* 2 minute read
* 0 Comments
* Interested in Drones and FPV.. this is the place to learn allabout it
*
* Home
* Forums
* How To Get Started With FPV__
Details
5