4
More Annotations


4


2
Favourite Annotations


3


6
Text
VANDOG TRAVELLER
Broken again – A list of work done on the van. February 26, 2014 27 Comments. The van has been in the garage for nearly 2 weeks now so I thought I'd do a list of all work done. It went in to get the steering box. >> SEE MORE VAN CONVERSION POSTS. VAN CONVERSION FULL GUIDE Transform any van into your beautiful off-grid home on wheels, without the overwhelm and confusion. Get the ebook now for only £14.99. 71MB PDF – Instant Download. Buy now. Get the ebook now for only £14.99. Buy now. Making a old empty van into your home can be daunting projectif
LIVING OFF THE GRID IN THE HILLS OF GREECE I’m at the end of a long dirt track, at an off-grid eco-community in the hills of Greece. I’ve been here for a couple of weeks now. Let me show you around Like living in a van, this is another tie cut from what you may call ‘normal life’. It’s independence – doingthings yourself,
PUTTING A HAMMOCK IN MY CAMPER VAN The total length is 3.2m between fixing points. I used a nylon sling folded a few times to get the right length A hammock upgrade – for abed
CAMPERVAN 12V ELECTRICAL SYSTEM I used a 16mm2 wire to ground the battery negative common rail to the van chassis. Shakeproof washers – important. I wire brushed the grounding point to get a nice electrical contact. Here is the latest picture of the electronics. 1. mains consumer unit with RCD and breakers. 2. 12v distribution. 3.MY DIY CAMPER
Features of my converted camper van: Compressor fridge/freezer (can select mode) pressurised water system with 70L fresh tank. 200W solar charging system with approx. 190Ah lead-calcium batteries. 240V mains socket from pure sine inverter. 12V power distribution board with mains hook-up. LED lighting 0.8W in ceiling and ultra-bright 4W inlamp.
HOW I FIXED MY PROPEX (COMPACT 1600) CAMPERVAN HEATER I bought a second hand Propex heater (see my other post: Heating my van. Here’s how I installed a Propex heater) but it wouldn’t ignite. This post goes over how I fixed it. If you also have a Propex heater with this problem, this post might help. Disclaimer: I’m not a gas engineer and I’m THE FRIDGE IN MY VAN BROKE. HERE’S HOW I FIXED MY WAECO Having a fridge in my van-home is essential, just like it is in a house-home. But it’s one of those things we don’t fully appreciate it until it breaks. And sometimes they break. It’s why I reckon, with appliances like this, it’s usually worth getting something thatis
CHECKING THE REAR DIFFERENTIAL OIL LEVEL AND FILLING IT UP I’d have to check my rear differential oil level often – because it leaked – and top it up when needed. It’s simple to do but If I had ignored it a gear rebuild or new differential would probably be costly. I showed you how I fixed the leak (here), now I’ll show youhow
THE CHASSIS NEEDED SOME WELDING. HERE’S HOW I GOT IT FIXED The chassis needed some welding. Here’s how I got it fixed. I noticed some rust on the chassis of my van. The chassis takes the load of the whole van and provides strength and rigidity to the whole structure. I don’t want this to be compromised in anyVANDOG TRAVELLER
Broken again – A list of work done on the van. February 26, 2014 27 Comments. The van has been in the garage for nearly 2 weeks now so I thought I'd do a list of all work done. It went in to get the steering box. >> SEE MORE VAN CONVERSION POSTS. VAN CONVERSION FULL GUIDE Transform any van into your beautiful off-grid home on wheels, without the overwhelm and confusion. Get the ebook now for only £14.99. 71MB PDF – Instant Download. Buy now. Get the ebook now for only £14.99. Buy now. Making a old empty van into your home can be daunting projectif
INSURING YOUR DIY MOTORHOME OR CAMPERVAN For a DIY motorhome or campervan, you can either get specialist motorhome insurance or just normal van insurance. Specialist motorhome insurance Here are a list of companies who offer insurance for DIY van conversions. Most of these companies will insure your vehicle whilst it is still in the process of conversion. You often get up RUST PROOFING AND UNDERSEALING THE VAN Cleaning the wheel arch. 2. Rust treatment. I used a paintbrush to apply the rust treatment just like I showed you in the post about removing rust. Appling rust treatment to wheel arch. 3. Paint. I used 2 coats of metal paint. Again, this is just the same as the previous section on treating surface rust. HOW TO LIVE IN LONDON, IN A VAN, FOR A WHOLE YEAR I’d usually get water, diesel and gas all from the same place. Nice people running it, no problem. 8. Ear plugs might be useful. You sort of get used to the noise after a while but some nights you might want some ear plugs to help shut everything out. 9. And a SOUNDPROOFING MY VAN CONVERSION Sticking bitumen sheet on door panels. 2. Cover the floor and wheel arches with mass loaded vinyl (MLV) Now the mass loaded vinyl (MLV) goes down. I used two layers on over the gearbox, at the front of the foot wells and over the wheel arches where there is the most noisefrom the engine.
FITTING THE FLOOR TO MY CAMPERVAN Gluing down the plywood floor. 3. Lay down vinyl and cut to area. The vinyl should line up with the lines of the wood effect parallel with the van walls and be roughly cut to the area of the floor. I didn’t have to do this because mine was already the right size, which saved a bit of messing about. Fitting vinyl to floor area. AN EXTENDING BED IN MY DIY VAN CONVERSION Building the main (extending) part of the bed. 1. Frame. The frame for the main part of the bed was built in the same way as for the end part–quick, simple and strong–no fancy joining techniques. I fixed the back of the frame to the cladding wall and also fixed it to the floor just like I did with the end part. EUROPE IN A CAMPERVAN. WHERE TO GO FOR WINTER South Spain. Like Portugal, it’s a popular van place for vans in winter. The Andalusian coast probably has the warmest winters out of the whole of mainland Europe. Canary islands. These islands look like paradise and the sea is warm enough to swim all HEATING MY VAN (THE PROPER WAY). HERE’S HOW I INSTALLED A There are 2 main types of heater for this purpose: the Eberspacher (runs on diesel) and the Propex (runs on lpg/propane). I chose a Propex because I already have a good amount of gas storage and I didn’t want to have to tap into the van’s fuel tank. The diesel heaters, although very efficient, can be noisier and have more thingsto go wrong.
VANDOG TRAVELLER
Broken again – A list of work done on the van. February 26, 2014 27 Comments. The van has been in the garage for nearly 2 weeks now so I thought I'd do a list of all work done. It went in to get the steering box. >> SEE MORE VAN CONVERSION POSTS. VAN CONVERSION FULL GUIDE Transform any van into your beautiful off-grid home on wheels, without the overwhelm and confusion. Get the ebook now for only £14.99. 71MB PDF – Instant Download. Buy now. Get the ebook now for only £14.99. Buy now. Making a old empty van into your home can be daunting projectif
LIVING OFF THE GRID IN THE HILLS OF GREECE I’m at the end of a long dirt track, at an off-grid eco-community in the hills of Greece. I’ve been here for a couple of weeks now. Let me show you around Like living in a van, this is another tie cut from what you may call ‘normal life’. It’s independence – doingthings yourself,
PUTTING A HAMMOCK IN MY CAMPER VAN The total length is 3.2m between fixing points. I used a nylon sling folded a few times to get the right length A hammock upgrade – for abed
CAMPERVAN 12V ELECTRICAL SYSTEM I used a 16mm2 wire to ground the battery negative common rail to the van chassis. Shakeproof washers – important. I wire brushed the grounding point to get a nice electrical contact. Here is the latest picture of the electronics. 1. mains consumer unit with RCD and breakers. 2. 12v distribution. 3. HOW I FIXED MY PROPEX (COMPACT 1600) CAMPERVAN HEATER I bought a second hand Propex heater (see my other post: Heating my van. Here’s how I installed a Propex heater) but it wouldn’t ignite. This post goes over how I fixed it. If you also have a Propex heater with this problem, this post might help. Disclaimer: I’m not a gas engineer and I’m FITTING THE FLOOR TO MY CAMPERVAN Gluing down the plywood floor. 3. Lay down vinyl and cut to area. The vinyl should line up with the lines of the wood effect parallel with the van walls and be roughly cut to the area of the floor. I didn’t have to do this because mine was already the right size, which saved a bit of messing about. Fitting vinyl to floor area. THE FRIDGE IN MY VAN BROKE. HERE’S HOW I FIXED MY WAECO Having a fridge in my van-home is essential, just like it is in a house-home. But it’s one of those things we don’t fully appreciate it until it breaks. And sometimes they break. It’s why I reckon, with appliances like this, it’s usually worth getting something thatis
THE CHASSIS NEEDED SOME WELDING. HERE’S HOW I GOT IT FIXED The chassis needed some welding. Here’s how I got it fixed. I noticed some rust on the chassis of my van. The chassis takes the load of the whole van and provides strength and rigidity to the whole structure. I don’t want this to be compromised in any CHECKING THE REAR DIFFERENTIAL OIL LEVEL AND FILLING IT UP I’d have to check my rear differential oil level often – because it leaked – and top it up when needed. It’s simple to do but If I had ignored it a gear rebuild or new differential would probably be costly. I showed you how I fixed the leak (here), now I’ll show youhow
VANDOG TRAVELLER
Broken again – A list of work done on the van. February 26, 2014 27 Comments. The van has been in the garage for nearly 2 weeks now so I thought I'd do a list of all work done. It went in to get the steering box. >> SEE MORE VAN CONVERSION POSTS. VAN CONVERSION FULL GUIDE Transform any van into your beautiful off-grid home on wheels, without the overwhelm and confusion. Get the ebook now for only £14.99. 71MB PDF – Instant Download. Buy now. Get the ebook now for only £14.99. Buy now. Making a old empty van into your home can be daunting projectif
LIVING OFF THE GRID IN THE HILLS OF GREECE I’m at the end of a long dirt track, at an off-grid eco-community in the hills of Greece. I’ve been here for a couple of weeks now. Let me show you around Like living in a van, this is another tie cut from what you may call ‘normal life’. It’s independence – doingthings yourself,
PUTTING A HAMMOCK IN MY CAMPER VAN The total length is 3.2m between fixing points. I used a nylon sling folded a few times to get the right length A hammock upgrade – for abed
CAMPERVAN 12V ELECTRICAL SYSTEM I used a 16mm2 wire to ground the battery negative common rail to the van chassis. Shakeproof washers – important. I wire brushed the grounding point to get a nice electrical contact. Here is the latest picture of the electronics. 1. mains consumer unit with RCD and breakers. 2. 12v distribution. 3.MY DIY CAMPER
Features of my converted camper van: Compressor fridge/freezer (can select mode) pressurised water system with 70L fresh tank. 200W solar charging system with approx. 190Ah lead-calcium batteries. 240V mains socket from pure sine inverter. 12V power distribution board with mains hook-up. LED lighting 0.8W in ceiling and ultra-bright 4W inlamp.
HOW I FIXED MY PROPEX (COMPACT 1600) CAMPERVAN HEATER I bought a second hand Propex heater (see my other post: Heating my van. Here’s how I installed a Propex heater) but it wouldn’t ignite. This post goes over how I fixed it. If you also have a Propex heater with this problem, this post might help. Disclaimer: I’m not a gas engineer and I’m THE FRIDGE IN MY VAN BROKE. HERE’S HOW I FIXED MY WAECO Having a fridge in my van-home is essential, just like it is in a house-home. But it’s one of those things we don’t fully appreciate it until it breaks. And sometimes they break. It’s why I reckon, with appliances like this, it’s usually worth getting something thatis
CHECKING THE REAR DIFFERENTIAL OIL LEVEL AND FILLING IT UP I’d have to check my rear differential oil level often – because it leaked – and top it up when needed. It’s simple to do but If I had ignored it a gear rebuild or new differential would probably be costly. I showed you how I fixed the leak (here), now I’ll show youhow
THE CHASSIS NEEDED SOME WELDING. HERE’S HOW I GOT IT FIXED The chassis needed some welding. Here’s how I got it fixed. I noticed some rust on the chassis of my van. The chassis takes the load of the whole van and provides strength and rigidity to the whole structure. I don’t want this to be compromised in any VAN CONVERSION FULL GUIDE Transform any van into your beautiful off-grid home on wheels, without the overwhelm and confusion. Get the ebook now for only £14.99. 71MB PDF – Instant Download. Buy now. Get the ebook now for only £14.99. Buy now. Making a old empty van into your home can be daunting projectif
MY DIY CAMPER
Features of my converted camper van: Compressor fridge/freezer (can select mode) pressurised water system with 70L fresh tank. 200W solar charging system with approx. 190Ah lead-calcium batteries. 240V mains socket from pure sine inverter. 12V power distribution board with mains hook-up. LED lighting 0.8W in ceiling and ultra-bright 4W inlamp.
INSURING YOUR DIY MOTORHOME OR CAMPERVAN For a DIY motorhome or campervan, you can either get specialist motorhome insurance or just normal van insurance. Specialist motorhome insurance Here are a list of companies who offer insurance for DIY van conversions. Most of these companies will insure your vehicle whilst it is still in the process of conversion. You often get up HOW I REMOVED AND TREATED SURFACE RUST ON MY VAN Different vans can develop rust in specific areas, but the most common problem areas to check are wheel arches, bottom of doors, sills, foot wells, the cab floor and floor panels underneath the van. Removing the rust is a straightforward job, it’s just very time consuming and messy. I took out the plywood floor and CHECKING THE REAR DIFFERENTIAL OIL LEVEL AND FILLING IT UP I’d have to check my rear differential oil level often – because it leaked – and top it up when needed. It’s simple to do but If I had ignored it a gear rebuild or new differential would probably be costly. I showed you how I fixed the leak (here), now I’ll show youhow
RUST PROOFING AND UNDERSEALING THE VAN Cleaning the wheel arch. 2. Rust treatment. I used a paintbrush to apply the rust treatment just like I showed you in the post about removing rust. Appling rust treatment to wheel arch. 3. Paint. I used 2 coats of metal paint. Again, this is just the same as the previous section on treating surface rust. HOW TO LIVE IN LONDON, IN A VAN, FOR A WHOLE YEAR I’d usually get water, diesel and gas all from the same place. Nice people running it, no problem. 8. Ear plugs might be useful. You sort of get used to the noise after a while but some nights you might want some ear plugs to help shut everything out. 9. And a HOW TO GET TO NORWAY BY CAMPERVAN Here’s what it cost. Ferry from UK to Holland: £127 – booked through Aferry.co.uk. Diesel from Hook of Holland to Hirtshals, Denmark: £142. Ferry from Demark to Norway: £93 – also booked through Aferry. Total: £361. Once you’re in mainland Europe thereare
EUROPE IN A CAMPERVAN. WHERE TO GO FOR WINTER South Spain. Like Portugal, it’s a popular van place for vans in winter. The Andalusian coast probably has the warmest winters out of the whole of mainland Europe. Canary islands. These islands look like paradise and the sea is warm enough to swim all SOUNDPROOFING MY VAN CONVERSION Sticking bitumen sheet on door panels. 2. Cover the floor and wheel arches with mass loaded vinyl (MLV) Now the mass loaded vinyl (MLV) goes down. I used two layers on over the gearbox, at the front of the foot wells and over the wheel arches where there is the most noisefrom the engine.
VANDOG TRAVELLER
Broken again – A list of work done on the van. February 26, 2014 27 Comments. The van has been in the garage for nearly 2 weeks now so I thought I'd do a list of all work done. It went in to get the steering box. >> SEE MORE VAN CONVERSION POSTS. VAN CONVERSION FULL GUIDE Transform any van into your beautiful off-grid home on wheels, without the overwhelm and confusion. Get the ebook now for only £14.99. 71MB PDF – Instant Download. Buy now. Get the ebook now for only £14.99. Buy now. Making a old empty van into your home can be daunting projectif
LIVING OFF THE GRID IN THE HILLS OF GREECE I’m at the end of a long dirt track, at an off-grid eco-community in the hills of Greece. I’ve been here for a couple of weeks now. Let me show you around Like living in a van, this is another tie cut from what you may call ‘normal life’. It’s independence – doingthings yourself,
PUTTING A HAMMOCK IN MY CAMPER VAN The total length is 3.2m between fixing points. I used a nylon sling folded a few times to get the right length A hammock upgrade – for abed
CAMPERVAN 12V ELECTRICAL SYSTEM I used a 16mm2 wire to ground the battery negative common rail to the van chassis. Shakeproof washers – important. I wire brushed the grounding point to get a nice electrical contact. Here is the latest picture of the electronics. 1. mains consumer unit with RCD and breakers. 2. 12v distribution. 3. HOW I FIXED MY PROPEX (COMPACT 1600) CAMPERVAN HEATER I bought a second hand Propex heater (see my other post: Heating my van. Here’s how I installed a Propex heater) but it wouldn’t ignite. This post goes over how I fixed it. If you also have a Propex heater with this problem, this post might help. Disclaimer: I’m not a gas engineer and I’m FITTING THE FLOOR TO MY CAMPERVAN Gluing down the plywood floor. 3. Lay down vinyl and cut to area. The vinyl should line up with the lines of the wood effect parallel with the van walls and be roughly cut to the area of the floor. I didn’t have to do this because mine was already the right size, which saved a bit of messing about. Fitting vinyl to floor area. THE FRIDGE IN MY VAN BROKE. HERE’S HOW I FIXED MY WAECO Having a fridge in my van-home is essential, just like it is in a house-home. But it’s one of those things we don’t fully appreciate it until it breaks. And sometimes they break. It’s why I reckon, with appliances like this, it’s usually worth getting something thatis
THE CHASSIS NEEDED SOME WELDING. HERE’S HOW I GOT IT FIXED The chassis needed some welding. Here’s how I got it fixed. I noticed some rust on the chassis of my van. The chassis takes the load of the whole van and provides strength and rigidity to the whole structure. I don’t want this to be compromised in any CHECKING THE REAR DIFFERENTIAL OIL LEVEL AND FILLING IT UP I’d have to check my rear differential oil level often – because it leaked – and top it up when needed. It’s simple to do but If I had ignored it a gear rebuild or new differential would probably be costly. I showed you how I fixed the leak (here), now I’ll show youhow
VANDOG TRAVELLER
Broken again – A list of work done on the van. February 26, 2014 27 Comments. The van has been in the garage for nearly 2 weeks now so I thought I'd do a list of all work done. It went in to get the steering box. >> SEE MORE VAN CONVERSION POSTS. VAN CONVERSION FULL GUIDE Transform any van into your beautiful off-grid home on wheels, without the overwhelm and confusion. Get the ebook now for only £14.99. 71MB PDF – Instant Download. Buy now. Get the ebook now for only £14.99. Buy now. Making a old empty van into your home can be daunting projectif
LIVING OFF THE GRID IN THE HILLS OF GREECE I’m at the end of a long dirt track, at an off-grid eco-community in the hills of Greece. I’ve been here for a couple of weeks now. Let me show you around Like living in a van, this is another tie cut from what you may call ‘normal life’. It’s independence – doingthings yourself,
PUTTING A HAMMOCK IN MY CAMPER VAN The total length is 3.2m between fixing points. I used a nylon sling folded a few times to get the right length A hammock upgrade – for abed
CAMPERVAN 12V ELECTRICAL SYSTEM I used a 16mm2 wire to ground the battery negative common rail to the van chassis. Shakeproof washers – important. I wire brushed the grounding point to get a nice electrical contact. Here is the latest picture of the electronics. 1. mains consumer unit with RCD and breakers. 2. 12v distribution. 3. HOW I FIXED MY PROPEX (COMPACT 1600) CAMPERVAN HEATER I bought a second hand Propex heater (see my other post: Heating my van. Here’s how I installed a Propex heater) but it wouldn’t ignite. This post goes over how I fixed it. If you also have a Propex heater with this problem, this post might help. Disclaimer: I’m not a gas engineer and I’m FITTING THE FLOOR TO MY CAMPERVAN Gluing down the plywood floor. 3. Lay down vinyl and cut to area. The vinyl should line up with the lines of the wood effect parallel with the van walls and be roughly cut to the area of the floor. I didn’t have to do this because mine was already the right size, which saved a bit of messing about. Fitting vinyl to floor area. THE FRIDGE IN MY VAN BROKE. HERE’S HOW I FIXED MY WAECO Having a fridge in my van-home is essential, just like it is in a house-home. But it’s one of those things we don’t fully appreciate it until it breaks. And sometimes they break. It’s why I reckon, with appliances like this, it’s usually worth getting something thatis
THE CHASSIS NEEDED SOME WELDING. HERE’S HOW I GOT IT FIXED The chassis needed some welding. Here’s how I got it fixed. I noticed some rust on the chassis of my van. The chassis takes the load of the whole van and provides strength and rigidity to the whole structure. I don’t want this to be compromised in any CHECKING THE REAR DIFFERENTIAL OIL LEVEL AND FILLING IT UP I’d have to check my rear differential oil level often – because it leaked – and top it up when needed. It’s simple to do but If I had ignored it a gear rebuild or new differential would probably be costly. I showed you how I fixed the leak (here), now I’ll show youhow
VAN CONVERSION FULL GUIDE Transform any van into your beautiful off-grid home on wheels, without the overwhelm and confusion. Get the ebook now for only £14.99. 71MB PDF – Instant Download. Buy now. Get the ebook now for only £14.99. Buy now. Making a old empty van into your home can be daunting projectif
MY DIY CAMPER
Features of my converted camper van: Compressor fridge/freezer (can select mode) pressurised water system with 70L fresh tank. 200W solar charging system with approx. 190Ah lead-calcium batteries. 240V mains socket from pure sine inverter. 12V power distribution board with mains hook-up. LED lighting 0.8W in ceiling and ultra-bright 4W inlamp.
INSURING YOUR DIY MOTORHOME OR CAMPERVAN For a DIY motorhome or campervan, you can either get specialist motorhome insurance or just normal van insurance. Specialist motorhome insurance Here are a list of companies who offer insurance for DIY van conversions. Most of these companies will insure your vehicle whilst it is still in the process of conversion. You often get up HOW I REMOVED AND TREATED SURFACE RUST ON MY VAN Different vans can develop rust in specific areas, but the most common problem areas to check are wheel arches, bottom of doors, sills, foot wells, the cab floor and floor panels underneath the van. Removing the rust is a straightforward job, it’s just very time consuming and messy. I took out the plywood floor and CHECKING THE REAR DIFFERENTIAL OIL LEVEL AND FILLING IT UP I’d have to check my rear differential oil level often – because it leaked – and top it up when needed. It’s simple to do but If I had ignored it a gear rebuild or new differential would probably be costly. I showed you how I fixed the leak (here), now I’ll show youhow
RUST PROOFING AND UNDERSEALING THE VAN Cleaning the wheel arch. 2. Rust treatment. I used a paintbrush to apply the rust treatment just like I showed you in the post about removing rust. Appling rust treatment to wheel arch. 3. Paint. I used 2 coats of metal paint. Again, this is just the same as the previous section on treating surface rust. HOW TO LIVE IN LONDON, IN A VAN, FOR A WHOLE YEAR I’d usually get water, diesel and gas all from the same place. Nice people running it, no problem. 8. Ear plugs might be useful. You sort of get used to the noise after a while but some nights you might want some ear plugs to help shut everything out. 9. And a HOW TO GET TO NORWAY BY CAMPERVAN Here’s what it cost. Ferry from UK to Holland: £127 – booked through Aferry.co.uk. Diesel from Hook of Holland to Hirtshals, Denmark: £142. Ferry from Demark to Norway: £93 – also booked through Aferry. Total: £361. Once you’re in mainland Europe thereare
EUROPE IN A CAMPERVAN. WHERE TO GO FOR WINTER South Spain. Like Portugal, it’s a popular van place for vans in winter. The Andalusian coast probably has the warmest winters out of the whole of mainland Europe. Canary islands. These islands look like paradise and the sea is warm enough to swim all SOUNDPROOFING MY VAN CONVERSION Sticking bitumen sheet on door panels. 2. Cover the floor and wheel arches with mass loaded vinyl (MLV) Now the mass loaded vinyl (MLV) goes down. I used two layers on over the gearbox, at the front of the foot wells and over the wheel arches where there is the most noisefrom the engine.
VANDOG TRAVELLER
Broken again – A list of work done on the van. February 26, 2014 27 Comments. The van has been in the garage for nearly 2 weeks now so I thought I'd do a list of all work done. It went in to get the steering box. >> SEE MORE VAN CONVERSION POSTS. LIVING OFF THE GRID IN THE HILLS OF GREECE I’m at the end of a long dirt track, at an off-grid eco-community in the hills of Greece. I’ve been here for a couple of weeks now. Let me show you around Like living in a van, this is another tie cut from what you may call ‘normal life’. It’s independence – doingthings yourself,
CAMPERVAN 12V ELECTRICAL SYSTEM I used a 16mm2 wire to ground the battery negative common rail to the van chassis. Shakeproof washers – important. I wire brushed the grounding point to get a nice electrical contact. Here is the latest picture of the electronics. 1. mains consumer unit with RCD and breakers. 2. 12v distribution. 3. SOUNDPROOFING MY VAN CONVERSION Sticking bitumen sheet on door panels. 2. Cover the floor and wheel arches with mass loaded vinyl (MLV) Now the mass loaded vinyl (MLV) goes down. I used two layers on over the gearbox, at the front of the foot wells and over the wheel arches where there is the most noisefrom the engine.
BUILDING THE SHOWER ENCLOSURE A stud frame was built for the bathroom enclosure and then fitted with water resistant wallboard on the inside and finished with cladding on the outside. In this post I’ll cover: Building the stud frame for the bathroom/shower enclosure fitting waterproof wallboard fitting toilet fitting shower/bathroom door 12V light Note: this was updatedon 15th May
HOW I FIXED MY PROPEX (COMPACT 1600) CAMPERVAN HEATER I bought a second hand Propex heater (see my other post: Heating my van. Here’s how I installed a Propex heater) but it wouldn’t ignite. This post goes over how I fixed it. If you also have a Propex heater with this problem, this post might help. Disclaimer: I’m not a gas engineer and I’m HOW TO GET TO NORWAY BY CAMPERVAN Here’s what it cost. Ferry from UK to Holland: £127 – booked through Aferry.co.uk. Diesel from Hook of Holland to Hirtshals, Denmark: £142. Ferry from Demark to Norway: £93 – also booked through Aferry. Total: £361. Once you’re in mainland Europe thereare
HEATING MY VAN (THE PROPER WAY). HERE’S HOW I INSTALLED A There are 2 main types of heater for this purpose: the Eberspacher (runs on diesel) and the Propex (runs on lpg/propane). I chose a Propex because I already have a good amount of gas storage and I didn’t want to have to tap into the van’s fuel tank. The diesel heaters, although very efficient, can be noisier and have more thingsto go wrong.
FITTING WOODEN CLADDING TO THE VAN INTERIOR After fitting the wooden frame for the cladding walls (), it’s time to fit the cladding. It is starting to look like a campervan now! Note: updated on 15th May 2015. This took 20 packs of 8mm pine cladding in 1.8m lengths to clad the walls and ceiling. INSTALLING THE SHURFLO WATER PUMP Today I installed my Shurflo water pump straight onto the wall of the van but when I switched it on, I couldn’t believe the noise coming from this thing! it transmitted around the full van. I realised that, ideally, these pumps should be mounted on solid floor or on any solid structural members to prevent vibrations being amplified through the rest of the structure.VANDOG TRAVELLER
Broken again – A list of work done on the van. February 26, 2014 27 Comments. The van has been in the garage for nearly 2 weeks now so I thought I'd do a list of all work done. It went in to get the steering box. >> SEE MORE VAN CONVERSION POSTS. LIVING OFF THE GRID IN THE HILLS OF GREECE I’m at the end of a long dirt track, at an off-grid eco-community in the hills of Greece. I’ve been here for a couple of weeks now. Let me show you around Like living in a van, this is another tie cut from what you may call ‘normal life’. It’s independence – doingthings yourself,
CAMPERVAN 12V ELECTRICAL SYSTEM I used a 16mm2 wire to ground the battery negative common rail to the van chassis. Shakeproof washers – important. I wire brushed the grounding point to get a nice electrical contact. Here is the latest picture of the electronics. 1. mains consumer unit with RCD and breakers. 2. 12v distribution. 3. SOUNDPROOFING MY VAN CONVERSION Sticking bitumen sheet on door panels. 2. Cover the floor and wheel arches with mass loaded vinyl (MLV) Now the mass loaded vinyl (MLV) goes down. I used two layers on over the gearbox, at the front of the foot wells and over the wheel arches where there is the most noisefrom the engine.
BUILDING THE SHOWER ENCLOSURE A stud frame was built for the bathroom enclosure and then fitted with water resistant wallboard on the inside and finished with cladding on the outside. In this post I’ll cover: Building the stud frame for the bathroom/shower enclosure fitting waterproof wallboard fitting toilet fitting shower/bathroom door 12V light Note: this was updatedon 15th May
HOW I FIXED MY PROPEX (COMPACT 1600) CAMPERVAN HEATER I bought a second hand Propex heater (see my other post: Heating my van. Here’s how I installed a Propex heater) but it wouldn’t ignite. This post goes over how I fixed it. If you also have a Propex heater with this problem, this post might help. Disclaimer: I’m not a gas engineer and I’m HOW TO GET TO NORWAY BY CAMPERVAN Here’s what it cost. Ferry from UK to Holland: £127 – booked through Aferry.co.uk. Diesel from Hook of Holland to Hirtshals, Denmark: £142. Ferry from Demark to Norway: £93 – also booked through Aferry. Total: £361. Once you’re in mainland Europe thereare
HEATING MY VAN (THE PROPER WAY). HERE’S HOW I INSTALLED A There are 2 main types of heater for this purpose: the Eberspacher (runs on diesel) and the Propex (runs on lpg/propane). I chose a Propex because I already have a good amount of gas storage and I didn’t want to have to tap into the van’s fuel tank. The diesel heaters, although very efficient, can be noisier and have more thingsto go wrong.
FITTING WOODEN CLADDING TO THE VAN INTERIOR After fitting the wooden frame for the cladding walls (), it’s time to fit the cladding. It is starting to look like a campervan now! Note: updated on 15th May 2015. This took 20 packs of 8mm pine cladding in 1.8m lengths to clad the walls and ceiling. INSTALLING THE SHURFLO WATER PUMP Today I installed my Shurflo water pump straight onto the wall of the van but when I switched it on, I couldn’t believe the noise coming from this thing! it transmitted around the full van. I realised that, ideally, these pumps should be mounted on solid floor or on any solid structural members to prevent vibrations being amplified through the rest of the structure.MY DIY CAMPER
Features of my converted camper van: Compressor fridge/freezer (can select mode) pressurised water system with 70L fresh tank. 200W solar charging system with approx. 190Ah lead-calcium batteries. 240V mains socket from pure sine inverter. 12V power distribution board with mains hook-up. LED lighting 0.8W in ceiling and ultra-bright 4W inlamp.
ONE YEAR LIVING IN A VAN In the last 6 months I’ve really tried hard to keep costs down, spending a total of 1066Euro. The previous 6 months (during summer) was a fair bit more at 2782Euro (), INSURING YOUR DIY MOTORHOME OR CAMPERVAN For a DIY motorhome or campervan, you can either get specialist motorhome insurance or just normal van insurance. Specialist motorhome insurance Here are a list of companies who offer insurance for DIY van conversions. Most of these companies will insure your vehicle whilst it is still in the process of conversion. You often get up RUST PROOFING AND UNDERSEALING THE VAN Cleaning the wheel arch. 2. Rust treatment. I used a paintbrush to apply the rust treatment just like I showed you in the post about removing rust. Appling rust treatment to wheel arch. 3. Paint. I used 2 coats of metal paint. Again, this is just the same as the previous section on treating surface rust. PUTTING A HAMMOCK IN MY CAMPER VAN The total length is 3.2m between fixing points. I used a nylon sling folded a few times to get the right length A hammock upgrade – for abed
INSTALLING CAMPERVAN WATER SYSTEM The tank will be filled using the filler cap on the back of the kitchen unit and easily accessed via the side door. The hose is 40mm food grade ‘filler hose’ which fits the filler cap neck nicely but needs a good tie wrap or two for a good fit on the water tank inlet. This is stood looking into the van with the side door open to exposethe
HEATING MY VAN (THE PROPER WAY). HERE’S HOW I INSTALLED A There are 2 main types of heater for this purpose: the Eberspacher (runs on diesel) and the Propex (runs on lpg/propane). I chose a Propex because I already have a good amount of gas storage and I didn’t want to have to tap into the van’s fuel tank. The diesel heaters, although very efficient, can be noisier and have more thingsto go wrong.
HOW I REMOVED AND TREATED SURFACE RUST ON MY VAN Different vans can develop rust in specific areas, but the most common problem areas to check are wheel arches, bottom of doors, sills, foot wells, the cab floor and floor panels underneath the van. Removing the rust is a straightforward job, it’s just very time consuming and messy. I took out the plywood floor and 3 MONTHS IN MOROCCO BY CAMPERVAN 3 months in morocco by campervan – Here’s what I did. I got to Morocco in my van and wanted to leave after one week. But then I just totally lost track of time and before I knew it my 3 month visa was up and I didn’t want to leave. Here’s what I did travelling Morocco in my van (and a round up of the Morocco posts): CHECKING THE REAR DIFFERENTIAL OIL LEVEL AND FILLING IT UP I’d have to check my rear differential oil level often – because it leaked – and top it up when needed. It’s simple to do but If I had ignored it a gear rebuild or new differential would probably be costly. I showed you how I fixed the leak (here), now I’ll show youhow
VANDOG TRAVELLER
Quit job, build campervan, travel. I quit my job in 2013 to convert an old van into my home. I now live in my van and travel Europe. LIVING OFF THE GRID IN THE HILLS OF GREECE I’m at the end of a long dirt track, at an off-grid eco-community in the hills of Greece. I’ve been here for a couple of weeks now. Let me show you around Like living in a van, this is another tie cut from what you may call ‘normal life’. It’s independence – doingthings yourself,
CAMPERVAN 12V ELECTRICAL SYSTEM Here is how I installed the electronics for my van. Includes pictures and info on wiring, crimping, fusebox, split-charge relay and mainshookup system.
HOW TO GET TO NORWAY BY CAMPERVAN My plan was to take the most direct route from the UK to Norway to catch the end of summer. OK, there was no ‘plan’. I just wanted to go to Norway in my van. So here’s how I did it. I’ll also share a few other alternative routes and options I found along the BUILDING THE SHOWER ENCLOSURE A stud frame was built for the bathroom enclosure and then fitted with water resistant wallboard on the inside and finished with cladding on the outside. In this post I’ll cover: Building the stud frame for the bathroom/shower enclosure fitting waterproof wallboard fitting toilet fitting shower/bathroom door 12V light Note: this was updatedon 15th May
HOW I FIXED MY PROPEX (COMPACT 1600) CAMPERVAN HEATER I bought a second hand Propex heater (see my other post: Heating my van. Here’s how I installed a Propex heater) but it wouldn’t ignite. This post goes over how I fixed it. If you also have a Propex heater with this problem, this post might help. Disclaimer: I’m not a gas engineer and I’m SOUNDPROOFING MY VAN CONVERSION My LDV Convoy van is very noisy! Any speed over 20MPH and the sound system becomes useless. If a sound meter is anything to go by, I measured 82dB whilst idling sat in the driving seat and well over 90dBon main roads.
FITTING WOODEN CLADDING TO THE VAN INTERIOR After fitting the wooden frame for the cladding walls (), it’s time to fit the cladding. It is starting to look like a campervan now! Note: updated on 15th May 2015. This took 20 packs of 8mm pine cladding in 1.8m lengths to clad the walls and ceiling. HEATING MY VAN (THE PROPER WAY). HERE’S HOW I INSTALLED A Last winter I didn’t need heating because I was in Morocco. But the winter before that was cold. I used to wake up in the night and have to turn the gas hobs on to warm up. But that’s all about to change. This post goes over how I fitted a Propex heater in my INSTALLING THE SHURFLO WATER PUMP Today I installed my Shurflo water pump straight onto the wall of the van but when I switched it on, I couldn’t believe the noise coming from this thing! it transmitted around the full van. I realised that, ideally, these pumps should be mounted on solid floor or on any solid structural members to prevent vibrations being amplified through the rest of the structure.VANDOG TRAVELLER
Quit job, build campervan, travel. I quit my job in 2013 to convert an old van into my home. I now live in my van and travel Europe. LIVING OFF THE GRID IN THE HILLS OF GREECE I’m at the end of a long dirt track, at an off-grid eco-community in the hills of Greece. I’ve been here for a couple of weeks now. Let me show you around Like living in a van, this is another tie cut from what you may call ‘normal life’. It’s independence – doingthings yourself,
CAMPERVAN 12V ELECTRICAL SYSTEM Here is how I installed the electronics for my van. Includes pictures and info on wiring, crimping, fusebox, split-charge relay and mainshookup system.
HOW TO GET TO NORWAY BY CAMPERVAN My plan was to take the most direct route from the UK to Norway to catch the end of summer. OK, there was no ‘plan’. I just wanted to go to Norway in my van. So here’s how I did it. I’ll also share a few other alternative routes and options I found along the BUILDING THE SHOWER ENCLOSURE A stud frame was built for the bathroom enclosure and then fitted with water resistant wallboard on the inside and finished with cladding on the outside. In this post I’ll cover: Building the stud frame for the bathroom/shower enclosure fitting waterproof wallboard fitting toilet fitting shower/bathroom door 12V light Note: this was updatedon 15th May
HOW I FIXED MY PROPEX (COMPACT 1600) CAMPERVAN HEATER I bought a second hand Propex heater (see my other post: Heating my van. Here’s how I installed a Propex heater) but it wouldn’t ignite. This post goes over how I fixed it. If you also have a Propex heater with this problem, this post might help. Disclaimer: I’m not a gas engineer and I’m SOUNDPROOFING MY VAN CONVERSION My LDV Convoy van is very noisy! Any speed over 20MPH and the sound system becomes useless. If a sound meter is anything to go by, I measured 82dB whilst idling sat in the driving seat and well over 90dBon main roads.
FITTING WOODEN CLADDING TO THE VAN INTERIOR After fitting the wooden frame for the cladding walls (), it’s time to fit the cladding. It is starting to look like a campervan now! Note: updated on 15th May 2015. This took 20 packs of 8mm pine cladding in 1.8m lengths to clad the walls and ceiling. HEATING MY VAN (THE PROPER WAY). HERE’S HOW I INSTALLED A Last winter I didn’t need heating because I was in Morocco. But the winter before that was cold. I used to wake up in the night and have to turn the gas hobs on to warm up. But that’s all about to change. This post goes over how I fitted a Propex heater in my INSTALLING THE SHURFLO WATER PUMP Today I installed my Shurflo water pump straight onto the wall of the van but when I switched it on, I couldn’t believe the noise coming from this thing! it transmitted around the full van. I realised that, ideally, these pumps should be mounted on solid floor or on any solid structural members to prevent vibrations being amplified through the rest of the structure. ONE YEAR LIVING IN A VAN I set off 12 months ago with £4500 that I had saved from my job (see one year living in my van). I estimated it would last about 10 months but I still have some left. I often get questions about costs so I thought I’d share with you what I’ve spent. Here are my diesel/fuel and livingMY DIY CAMPER
Update: My book, From Van to Home, is now available as an instant download. It covers every detail of my conversion and much more. Read more about it and get From Van to Home ebook here. I love the idea of living in a van. But I don’t really find the look and feel of most motorhomes or campers very appealing (I mean home like). INSURING YOUR DIY MOTORHOME OR CAMPERVAN For a DIY motorhome or campervan, you can either get specialist motorhome insurance or just normal van insurance. Specialist motorhome insurance Here are a list of companies who offer insurance for DIY van conversions. Most of these companies will insure your vehicle whilst it is still in the process of conversion. You often get up PUTTING A HAMMOCK IN MY CAMPER VAN The total length is 3.2m between fixing points. I used a nylon sling folded a few times to get the right length A hammock upgrade – for abed
INSTALLING CAMPERVAN WATER SYSTEM It seems like a great bit of kit – solid, heavy and sounds like it really knows what it’s doing. I did have some trouble with the noise at first but I solved it by hanging the pump rather than fixing it which I explain here – mounting the shurflo water pump.I fed the pump into an accumulator (Fiamma A20 from O’leary motorhomes) after some unsatisfactory bench (pulsating) tests with no RUST PROOFING AND UNDERSEALING THE VAN The picture probably looks worse than it actually is (although I have to think that). Most of the bad rust is on the panels–the chassis looks in great nick with only a few patches of surface rust. HEATING MY VAN (THE PROPER WAY). HERE’S HOW I INSTALLED A Last winter I didn’t need heating because I was in Morocco. But the winter before that was cold. I used to wake up in the night and have to turn the gas hobs on to warm up. But that’s all about to change. This post goes over how I fitted a Propex heater in my 3 MONTHS IN MOROCCO BY CAMPERVAN I got to Morocco in my van and wanted to leave after one week. But then I just totally lost track of time and before I knew it my 3 month visa was up and I didn’t want to leave. Here’s what I did travelling Morocco in my van (and a round up of the Morocco HOW I REMOVED AND TREATED SURFACE RUST ON MY VAN Different vans can develop rust in specific areas, but the most common problem areas to check are wheel arches, bottom of doors, sills, foot wells, the cab floor and floor panels underneath the van. Removing the rust is a straightforward job, it’s just very time consuming and messy. I took out the plywood floor and CHECKING THE REAR DIFFERENTIAL OIL LEVEL AND FILLING IT UP I’d have to check my rear differential oil level often – because it leaked – and top it up when needed. It’s simple to do but If I had ignored it a gear rebuild or new differential would probably be costly. I showed you how I fixed the leak (here), now I’ll show youhow
* Skip to primary navigation * Skip to main content * Skip to primary sidebar* Skip to footer
Menu
* Home
* About
* Contact
Quit job, build campervan, travel* Van conversion
* Van Life
* Books (NEW!)
Submenu
* Live in a Van (new)* Make a Van
* My Location
* Photos
* Forum
MAIN CONTENT
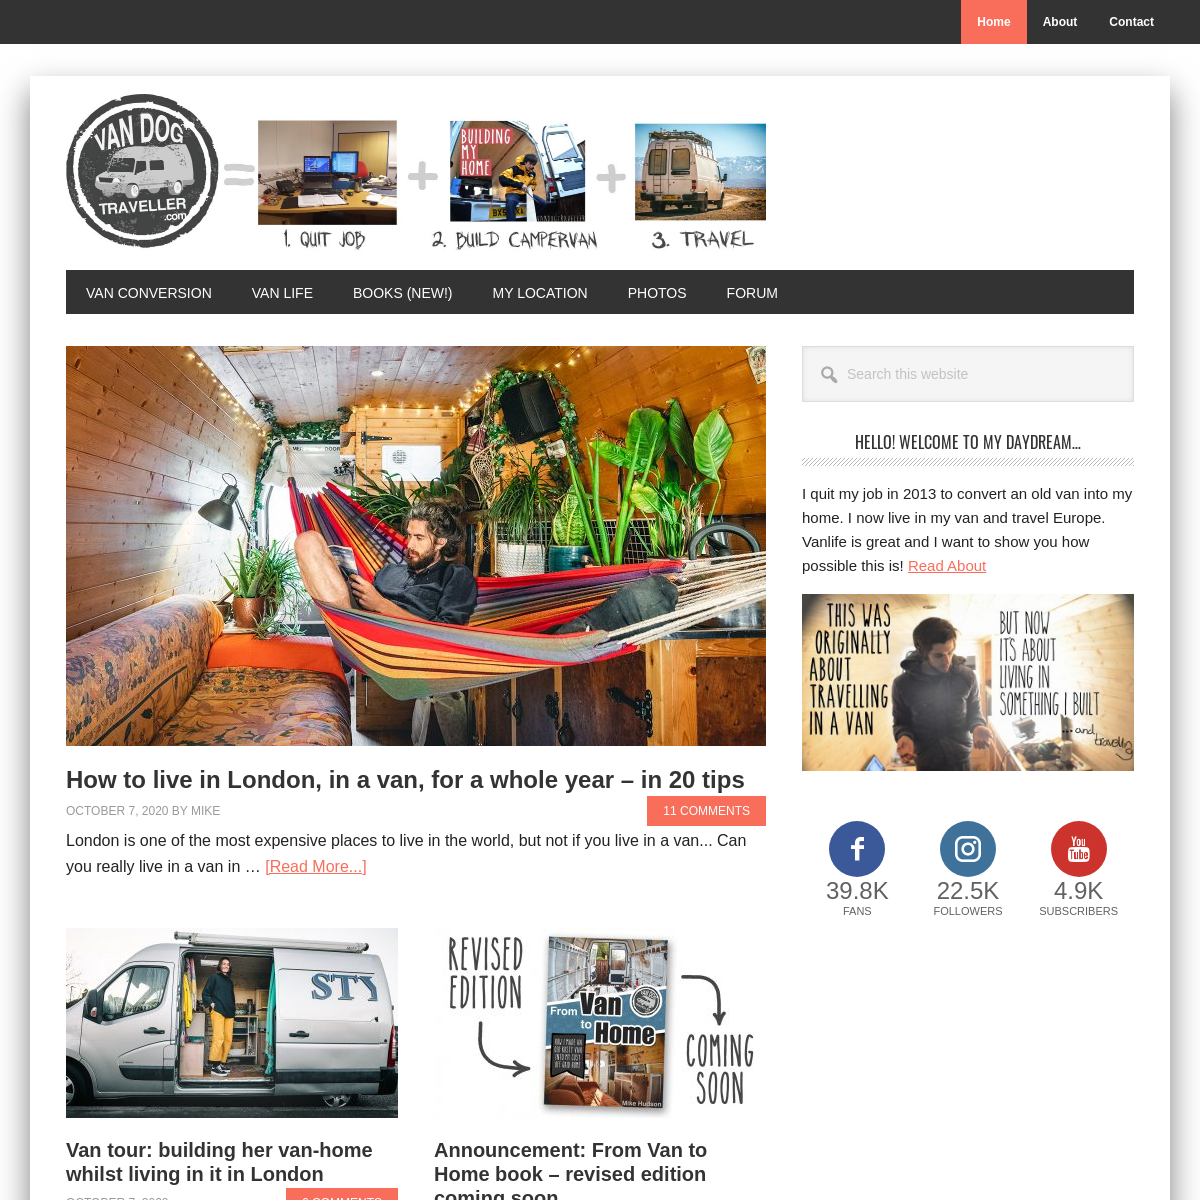
HOW TO LIVE IN LONDON, IN A VAN, FOR A WHOLE YEAR – IN 20 TIPS October 7, 2020 By Mike 11Comments
London is one of the most expensive places to live in the world, but not if you live in a van... Can you really live in a van in … about How to live in London, in a van, for a whole year –in 20 tips
VAN TOUR: BUILDING HER VAN-HOME WHILST LIVING IN IT IN LONDON October 7, 2020 6 Comments When I first met Laurel she was living in an almost empty van, in the process of making it … about Van tour: building her van-home whilst living in it in London ANNOUNCEMENT: FROM VAN TO HOME BOOK – REVISED EDITION COMING SOON March 4, 2020 8 Comments In 2015 I wrote and released my first book to the world from the back of my … about Announcement: From Van to Home book – revisededition coming soon
BOOKS TO HELP YOU… Make a van into your home… LIVE THE LIFE (NEW!)… Get _From Van to Home_ here Get _How to Live and Travel in a Van_ here LIVING AND TRAVELLING IN MY VAN NORWAY BY CAMPERVAN – THE BEST BITS December 4, 2019 14 Comments The colours, the light, the landscape, the animals. The nature in Norway is full on. It's probably one of my favourite CAMPING NEXT TO A GLACIER IN NORWAY’S JOSTEDALSBREEN NATIONAL PARK September 26, 2019 21 Comments This place is home to the largest glacier in continental Europe, and some of the best nature I’ve ever experienced If you’re in NorwayI
VIDEO: KJENNDALEN GLACIER IN NORWAY September 25, 2019 Be the first to comment See this post for more info and location: Camping next to a glacier in Norway’s Jostedalsbreen National Park > SEE MORE VANLIFE POSTSCONVERTING MY VAN
MY DIY CAMPER – FROM RUSTY VAN TO COSY HOME IN 5 MONTHS March 4, 2014 60 Comments The van conversion is finally complete. See more pictures of the complete camper conversion here Update: My book, From Van to Home, is ALL THE DETAILS OF THE VAN CONVERSION March 2, 2014 49 Comments OK not ALL the details. I'm gonna liken this post to that kitchen draw where you just throw all those batteries, screws and paperclips BROKEN AGAIN – A LIST OF WORK DONE ON THE VAN February 26, 2014 27 Comments The van has been in the garage for nearly 2 weeks now so I thought I'd do a list of all work done. It went in to get the steering box >> SEE MORE VAN CONVERSION POSTSPRIMARY SIDEBAR
Search this website
HELLO! WELCOME TO MY DAYDREAM… I quit my job in 2013 to convert an old van into my home. I now live in my van and travel Europe. Vanlife is great and I want to show you how possible this is! Read About*
__39.8kFans
*
__22.5kFollowers
*
__4.9kSubscribers
SUBSCRIBE TO UPDATES Join over 5000 people who get my email updatessubscribe
No spam. Ever. Unsubscribe easily any timeFOOTER
OLD VAN TO COSY HOME IN 3 MONTHS*
__39.8kFans
*
__22.5kFollowers
*
__4.9kSubscribers
RECENT COMMENTS
* Mike
@vandogtraveller.com Oh you're most welcome Rob. Best of luck and... Learn how to make a van into your home�
December 6, 2020
* Rob
Thanks for a great book Mike, will be very... Learn how to make a van into your home�
December 3, 2020
*
Olivia Christodoulides Hi Mike, I am wonderingwhere this is...
Living off the grid in the hills of Greece�
November 29, 2020
* Keke Millsom
Thanks for this post. Love it!What month was...
Lofoten Islands by campervan – the best bits�
November 24, 2020
TRY THE SEARCH…
Search this website
* Home
* BOOKS from Vandog
* About Vandog Traveller* Archives
* Contact
* RSS Feed
* Subscribe
� 2020 · Mike Hudson ·Privacy Policy ·
Permissions
Details
4