5
More Annotations


3


4
Favourite Annotations


1


4
Text
FURNITURE PLANS & AFFORDABLE DIY Two power tool wielding DIY queens on a mission to create beautiful and affordable furniture, turning houses into homes. Transform your home with free furniture plans & DIY woodworking projects for beds, benches, chairs, tables, barn doors, shelves, and more for inside rooms and outdoor areas. FREE FURNITURE PLANS Ashley & Whitney, two power tool-wielding DIY queens, on a mission to create beautiful and affordable wooden furniture. They have hundreds of free furniture plans with tutorial videos and trade secrets to make your next DIY furniture idea a complete success. Get started on your * facebook
* pinterest
* instagram
* twitter
__ SEARCH OUR SITE __ READER PROJECTS ON INSTAGRAM - #SHANTY2CHICFacebook
Twitter
* Pinterest
next project today!
DIY PLAY KITCHEN PLANS Because there are so many steps in this set of plans, I had to upload it in two separate .pdf files. Just click each link to print each set. Set 1 is the supply andDIY WOOD SIGN
Start by making your cuts! 4 – 1×6 at 22”. 2 – 1×4 at 22”. 2 – 1×4 at 15”. Start by lining up all of your boards side by side. Run a line of wood glue down one side like this. Next, lay one of the 22” 1×4 pieces on the edge of the sign and attach it to the boards using 1.25” brad or finish nails. DIY $50 FULL LENGTH WALL MIRRORS Attach the long frame boards to the plywood piece using 2” pocket hole screws and wood glue. The pocket holes on the longer boards will face the back and the plywood pocket holes can face up since you will be covering them with the mirror. Now attach the shorter frame boards.These are
DIY INDUSTRIAL FARMHOUSE TABLE Drill 1 1/2″ pocket holes into the boards and attach them to the planks with 2 1/2″ pocket hole screws and wood glue. To create the legs, cut the boards to size, drill 1 1/2″ pocket holes in 4 of the pieces. Then, glue two pieces together (one with pocket holes and one without), clamp and let DIY PORCH SWING: ONLY $40 FOR A FARMHOUSE The first step is building the frame of the seat of the DIY porch swing. This uses 2×4 framing lumber. We used our Kreg K5 Jig to make the pocket holes in both ends of each of our smaller boards. These are 1.5″ pocket holes. We attached those to our longer boards using wood glue and 2.5″ pocket hole screws. DIY FARMHOUSE BATHROOM VANITY DIY Farmhouse Bathroom Vanity. I started by building two sides. These are constructed out of 3/4″ Purebond Plywood. This type of plywood is sold in big 4’x8′ sheets, and we have the guys at Home Depot rip it down into smaller boards to fit in the car. Then, we cut those boards to exact size using our miter saws or table saws. DIY FARMHOUSE CLUB CHAIR DIY Farmhouse Club Chair – Attaching Side Slats. Then, attach the side slats to the inside of the side cleats with 1 1/4″ brad nails and wood glue. Start at the top and work your way down. Attach the front and back apron pieces with 2 1/2″ pocket hole screws and woodglue.
DIY BARN DOOR HARDWARE If you are building two barn doors, double the supplies. The star of the show are these Clothesline Pulleys. You will need two and you can find them HERE. These babies are only $2.38 at Home Depot. Just take them apart (watch the video to see exactly how) and FURNITURE PLANS & AFFORDABLE DIY Two power tool wielding DIY queens on a mission to create beautiful and affordable furniture, turning houses into homes. Transform your home with free furniture plans & DIY woodworking projects for beds, benches, chairs, tables, barn doors, shelves, and more for inside rooms and outdoor areas. FREE FURNITURE PLANS Ashley & Whitney, two power tool-wielding DIY queens, on a mission to create beautiful and affordable wooden furniture. They have hundreds of free furniture plans with tutorial videos and trade secrets to make your next DIY furniture idea a complete success. Get started on yournext project today!
DIY PLAY KITCHEN PLANS Because there are so many steps in this set of plans, I had to upload it in two separate .pdf files. Just click each link to print each set. Set 1 is the supply andDIY WOOD SIGN
Start by making your cuts! 4 – 1×6 at 22”. 2 – 1×4 at 22”. 2 – 1×4 at 15”. Start by lining up all of your boards side by side. Run a line of wood glue down one side like this. Next, lay one of the 22” 1×4 pieces on the edge of the sign and attach it to the boards using 1.25” brad or finish nails. DIY $50 FULL LENGTH WALL MIRRORS Attach the long frame boards to the plywood piece using 2” pocket hole screws and wood glue. The pocket holes on the longer boards will face the back and the plywood pocket holes can face up since you will be covering them with the mirror. Now attach the shorter frame boards.These are
DIY INDUSTRIAL FARMHOUSE TABLE Drill 1 1/2″ pocket holes into the boards and attach them to the planks with 2 1/2″ pocket hole screws and wood glue. To create the legs, cut the boards to size, drill 1 1/2″ pocket holes in 4 of the pieces. Then, glue two pieces together (one with pocket holes and one without), clamp and let DIY PORCH SWING: ONLY $40 FOR A FARMHOUSE The first step is building the frame of the seat of the DIY porch swing. This uses 2×4 framing lumber. We used our Kreg K5 Jig to make the pocket holes in both ends of each of our smaller boards. These are 1.5″ pocket holes. We attached those to our longer boards using wood glue and 2.5″ pocket hole screws. DIY FARMHOUSE BATHROOM VANITY DIY Farmhouse Bathroom Vanity. I started by building two sides. These are constructed out of 3/4″ Purebond Plywood. This type of plywood is sold in big 4’x8′ sheets, and we have the guys at Home Depot rip it down into smaller boards to fit in the car. Then, we cut those boards to exact size using our miter saws or table saws. DIY FARMHOUSE CLUB CHAIR DIY Farmhouse Club Chair – Attaching Side Slats. Then, attach the side slats to the inside of the side cleats with 1 1/4″ brad nails and wood glue. Start at the top and work your way down. Attach the front and back apron pieces with 2 1/2″ pocket hole screws and woodglue.
DIY BARN DOOR HARDWARE If you are building two barn doors, double the supplies. The star of the show are these Clothesline Pulleys. You will need two and you can find them HERE. These babies are only $2.38 at Home Depot. Just take them apart (watch the video to see exactly how) and DIY FARMHOUSE PANEL DINING TABLE Now attach the plywood centers to both bases. Add 3/4” pocket holes around all edges of the plywood and attach into the base using wood glue and 1.5” pocket hole screws. The panels will be set back 1 1/8” from the outside edges of the legs. Now add the top 2x board to EASY DIY PLATFORM BED This Easy DIY Platform Bed is the perfect build for beginners! Get the free plans and how-to tutorial at www.shanty-2-chic.com! I’m back to share the Easy DIY Platform Bed that I made for my son 🙂 If you missed the Free Plans for the Planked Headboard, you can check them out HERE!I saw a platform bed in a West Elm catalog and loved how chunky the base and platform were, so that was my DIY ROUND DINING TABLE Cut the apron pieces to size and drill 1 1/2″ pocket holes into both ends of the inside of the aprons and 3/4″ pocket holes along one edge. Begin by attaching the apron to the leg with 2″ brad nails and wood glue to hold them in place. Follow up by attaching the aprons with 2 1/2″ pocket hole screws. You can find our favorite 20-volt FARMHOUSE BARN DOOR DOG CRATE Attach them by using 2.5″ wood screws through the base and into the crate assembly all around. The planks for the top of the crate are 2×6 boards we ripped to 3 7/8″ wide. Cut these to size and add 1.5″ pocket holes down one side of 6 of the 7 boards. Place them DIY BARN DOOR HARDWARE If you are building two barn doors, double the supplies. The star of the show are these Clothesline Pulleys. You will need two and you can find them HERE. These babies are only $2.38 at Home Depot. Just take them apart (watch the video to see exactly how) andDIY DESK FOR $70
The design is inspired after my Dining Table that you can see HERE.. I love it so much that I decided to build a desk very similar. I hit up our friend, Jamison a.k.a. Rogue Engineer to design the plans and he did an AMAZING JOB! We created this 5 ft. long desk for only $70 inlumber – BAM 🙂
DIY BUILT-IN SPICE RACK Secure the spice rack to the studs with 2″ wood screws. I put 3 screws on each side of the spice rack. Now for the trim. Cut 2 1×4 boards the same length as the 9 shelf pieces. Apply wood glue to the back of the boards. and attach it to the top and bottom of the spicerack.
DIY WALL LOCKER
Step 5 – Paint and Stain. Attach the bench top to the frame with 1 1/4″ pocket hole screws through the pocket holes that you drilled into the front and back apron pieces of the bench frame. Because I wanted a stained bench top, I went ahead and stained the top and letit
DIY MODERN FARMHOUSE 6 DRAWER DRESSER Rip the plywood to 6” wide and then make your cross cuts. Attach the pieces together at the corners using wood glue and 1.25” brad nails. The bottom of the drawers are 1/4” hardwood plywood. Cut each to size, and then attach to the frame using wood glue and 1” staples or1.25” brad nails.
$15 OUTDOOR PLANTER BOX They only cost $15 a pop to build! Woohoo!! You can get the full plans HERE from Ana! I just wanted to share a few tips and pictures with you. I used my Kreg Jig™ to build these. I think this is a GREAT starter project for those of you considering purchasing FURNITURE PLANS & AFFORDABLE DIY Two power tool wielding DIY queens on a mission to create beautiful and affordable furniture, turning houses into homes. Transform your home with free furniture plans & DIY woodworking projects for beds, benches, chairs, tables, barn doors, shelves, and more for inside rooms and outdoor areas. DIY PLAY KITCHEN PLANS Because there are so many steps in this set of plans, I had to upload it in two separate .pdf files. Just click each link to print each set. Set 1 is the supply and FREE FURNITURE PLANS Ashley & Whitney, two power tool-wielding DIY queens, on a mission to create beautiful and affordable wooden furniture. They have hundreds of free furniture plans with tutorial videos and trade secrets to make your next DIY furniture idea a complete success. Get started on yournext project today!
DIY WOOD SIGN
Start by making your cuts! 4 – 1×6 at 22”. 2 – 1×4 at 22”. 2 – 1×4 at 15”. Start by lining up all of your boards side by side. Run a line of wood glue down one side like this. Next, lay one of the 22” 1×4 pieces on the edge of the sign and attach it to the boards using 1.25” brad or finish nails.PLANTER BOX PLANS
DIY $25 Cedar Planter and How-to Video. We love decorating our porches when fall rolls around and we thought it would be fitting, for our next How-to, video to show you how to build this super cute, super easy and super inexpensive cedar planter! You DIY BARN WOOD PLANTER BOX Hey guys! If you caught our live tour of my dining room, last week on our Periscope, you heard me promise to share a tutorial of the Barn Wood Planter Box that I built for the centerpiece of my dining table!If you aren’t familiar with Periscope, it is an app that you download to watch live video feed and interact with the accounts thatyou follow.
DIY MODERN FARMHOUSE 6 DRAWER DRESSER Rip the plywood to 6” wide and then make your cross cuts. Attach the pieces together at the corners using wood glue and 1.25” brad nails. The bottom of the drawers are 1/4” hardwood plywood. Cut each to size, and then attach to the frame using wood glue and 1” staples or1.25” brad nails.
DIY LUMBER CART
S HatY-2-CHIC.Cm DIY Lumber Cart - Page | 2 Drill pocket holes for 1-1/4” pocket hole screws on the 44” orange pieces only. Drill pocket holes for 2-1/2” pocket hole DIY BATHROOM MIRROR STORAGE CASE ShantY-2-ChIC.Com DIY Bathroom mIrror Storage CaSe - Page | 3 Assemble the door parts with glue and 1-1/4” pocket hole screws. Then attach the 1/4” plywood to the back using a WE HFLVE FL HERO -01 HIM DADDY WE HflVE fl HERO -01 HIM DADDY. WE HflVE fl HERO -01 HIM DADDY. Created Date. 3/15/2013 8:16:14 AM. FURNITURE PLANS & AFFORDABLE DIY Two power tool wielding DIY queens on a mission to create beautiful and affordable furniture, turning houses into homes. Transform your home with free furniture plans & DIY woodworking projects for beds, benches, chairs, tables, barn doors, shelves, and more for inside rooms and outdoor areas. DIY PLAY KITCHEN PLANS Because there are so many steps in this set of plans, I had to upload it in two separate .pdf files. Just click each link to print each set. Set 1 is the supply and FREE FURNITURE PLANS Ashley & Whitney, two power tool-wielding DIY queens, on a mission to create beautiful and affordable wooden furniture. They have hundreds of free furniture plans with tutorial videos and trade secrets to make your next DIY furniture idea a complete success. Get started on yournext project today!
DIY WOOD SIGN
Start by making your cuts! 4 – 1×6 at 22”. 2 – 1×4 at 22”. 2 – 1×4 at 15”. Start by lining up all of your boards side by side. Run a line of wood glue down one side like this. Next, lay one of the 22” 1×4 pieces on the edge of the sign and attach it to the boards using 1.25” brad or finish nails.PLANTER BOX PLANS
DIY $25 Cedar Planter and How-to Video. We love decorating our porches when fall rolls around and we thought it would be fitting, for our next How-to, video to show you how to build this super cute, super easy and super inexpensive cedar planter! You DIY BARN WOOD PLANTER BOX Hey guys! If you caught our live tour of my dining room, last week on our Periscope, you heard me promise to share a tutorial of the Barn Wood Planter Box that I built for the centerpiece of my dining table!If you aren’t familiar with Periscope, it is an app that you download to watch live video feed and interact with the accounts thatyou follow.
DIY MODERN FARMHOUSE 6 DRAWER DRESSER Rip the plywood to 6” wide and then make your cross cuts. Attach the pieces together at the corners using wood glue and 1.25” brad nails. The bottom of the drawers are 1/4” hardwood plywood. Cut each to size, and then attach to the frame using wood glue and 1” staples or1.25” brad nails.
DIY LUMBER CART
S HatY-2-CHIC.Cm DIY Lumber Cart - Page | 2 Drill pocket holes for 1-1/4” pocket hole screws on the 44” orange pieces only. Drill pocket holes for 2-1/2” pocket hole DIY BATHROOM MIRROR STORAGE CASE ShantY-2-ChIC.Com DIY Bathroom mIrror Storage CaSe - Page | 3 Assemble the door parts with glue and 1-1/4” pocket hole screws. Then attach the 1/4” plywood to the back using a WE HFLVE FL HERO -01 HIM DADDY WE HflVE fl HERO -01 HIM DADDY. WE HflVE fl HERO -01 HIM DADDY. Created Date. 3/15/2013 8:16:14 AM. DIY PORCH SWING: ONLY $40 FOR A FARMHOUSE The first step is building the frame of the seat of the DIY porch swing. This uses 2×4 framing lumber. We used our Kreg K5 Jig to make the pocket holes in both ends of each of our smaller boards. These are 1.5″ pocket holes. We attached those to our longer boards using wood glue and 2.5″ pocket hole screws.DIY PLAY KITCHEN
Step 9. Cut the oven door to size and cut out a 9″x8″ square with a jig saw. Cut the plexiglass, with a miter saw, to size and attach it to the back of the oven door with 3/4″ multi-use screws in each corner. You can find the Plexiglass that I used HERE. Cut the ovendoor trim to size.
DIY FARMHOUSE PANEL DINING TABLE Now attach the plywood centers to both bases. Add 3/4” pocket holes around all edges of the plywood and attach into the base using wood glue and 1.5” pocket hole screws. The panels will be set back 1 1/8” from the outside edges of the legs. Now add the top 2x board toDIY LOFT BED
Step 1. Cut the back assembly pieces to size and drill 1 1/2″ pocket holes according to the cut list. You can find our favorite Kreg Jig model here! Attach the pieces together with 2 1/2″ pocket hole screws and wood glue. Note the 2×10 board should have pocket holesfacing the back.
DIY BUILT-IN SPICE RACK Secure the spice rack to the studs with 2″ wood screws. I put 3 screws on each side of the spice rack. Now for the trim. Cut 2 1×4 boards the same length as the 9 shelf pieces. Apply wood glue to the back of the boards. and attach it to the top and bottom of the spicerack.
DIY LUMBER CART
S HatY-2-CHIC.Cm DIY Lumber Cart - Page | 4 Make the 2x3 base frame. Assemble with glue and 2-1/2” pocket hole screws. Spacing isn’t critical but mine are evenly DIY INDUSTRIAL FARMHOUSE TABLE Drill 1 1/2″ pocket holes into the boards and attach them to the planks with 2 1/2″ pocket hole screws and wood glue. To create the legs, cut the boards to size, drill 1 1/2″ pocket holes in 4 of the pieces. Then, glue two pieces together (one with pocket holes and one without), clamp and let HOW TO MAKE BUILDER GRADE CABINETS LOOK CUSTOM How to Make Builder Grade Cabinets Look Custom. 1. Cut and Glue the Craft Boards. Once we cut the frame pieces to size, we applied wood glue to the back of the craft boards. 2. Attach the Craft Boards to the Cabinet. We attached the craft boards with 5/8″ pin nails. 3. DIY FARMHOUSE BATHROOM VANITY DIY Farmhouse Bathroom Vanity. I started by building two sides. These are constructed out of 3/4″ Purebond Plywood. This type of plywood is sold in big 4’x8′ sheets, and we have the guys at Home Depot rip it down into smaller boards to fit in the car. Then, we cut those boards to exact size using our miter saws or table saws. UPDATING THE KITCHENS.... Happy Friday guys! Those of you that follow us on Instagram have probably seen the changes that both Ash and I made to our kitchens several weeks ago. We were challenged to begin updating the kitchens in a short period of time together, and it was a lot of fun (andchaos).
FURNITURE PLANS & AFFORDABLE DIY Two power tool wielding DIY queens on a mission to create beautiful and affordable furniture, turning houses into homes. Transform your home with free furniture plans & DIY woodworking projects for beds, benches, chairs, tables, barn doors, shelves, and more for inside rooms and outdoor areas. FREE FURNITURE PLANS Ashley & Whitney, two power tool-wielding DIY queens, on a mission to create beautiful and affordable wooden furniture. They have hundreds of free furniture plans with tutorial videos and trade secrets to make your next DIY furniture idea a complete success. Get started on yournext project today!
DIY PLAY KITCHEN PLANS Because there are so many steps in this set of plans, I had to upload it in two separate .pdf files. Just click each link to print each set. Set 1 is the supply and DIY TABLE HEIGHT PANTRY CABINET This board will line up in the center of the base board. Build the face frame next. The bottom board is a 1×4 and the sides and top board are 1×3. Add 3/4” pocket holes on bpth sides of the top board and to one end of each side board. Attach all pieces to form arectangle
DIY LOFT BED
Step 1. Cut the back assembly pieces to size and drill 1 1/2″ pocket holes according to the cut list. You can find our favorite Kreg Jig model here! Attach the pieces together with 2 1/2″ pocket hole screws and wood glue. Note the 2×10 board should have pocket holesfacing the back.
DIY SQUARE DINING TABLE We have built so many dining tables over the last 10 years but one thing that we get so many requests for is a DIY Square Dining Table! We drove to Houston, TX to crash our sisters new house and one of her requests was a square dining table for her kitchen! DIY BARN DOOR HARDWARE If you are building two barn doors, double the supplies. The star of the show are these Clothesline Pulleys. You will need two and you can find them HERE. These babies are only $2.38 at Home Depot. Just take them apart (watch the video to see exactly how) and FARMHOUSE BARN DOOR DOG CRATE Attach them by using 2.5″ wood screws through the base and into the crate assembly all around. The planks for the top of the crate are 2×6 boards we ripped to 3 7/8″ wide. Cut these to size and add 1.5″ pocket holes down one side of 6 of the 7 boards. Place themDIY BLANKET LADDER
Instructions. Cut List. Dill 1 1/2″ pocket holes into the 2×6 boards. Attach the 2×6 pieces to one of the 2×4 pieces according to the diagram. The top 2×6 piece is 3″ away from the top of the 2×4. The rest of the pieces are spaced 12″ apart measuring from the front most corner of each 2×6. DIY BATHROOM MIRROR STORAGE CASE ShantY-2-ChIC.Com DIY Bathroom mIrror Storage CaSe - Page | 3 Assemble the door parts with glue and 1-1/4” pocket hole screws. Then attach the 1/4” plywood to the back using a FURNITURE PLANS & AFFORDABLE DIY Two power tool wielding DIY queens on a mission to create beautiful and affordable furniture, turning houses into homes. Transform your home with free furniture plans & DIY woodworking projects for beds, benches, chairs, tables, barn doors, shelves, and more for inside rooms and outdoor areas. FREE FURNITURE PLANS Ashley & Whitney, two power tool-wielding DIY queens, on a mission to create beautiful and affordable wooden furniture. They have hundreds of free furniture plans with tutorial videos and trade secrets to make your next DIY furniture idea a complete success. Get started on yournext project today!
DIY PLAY KITCHEN PLANS Because there are so many steps in this set of plans, I had to upload it in two separate .pdf files. Just click each link to print each set. Set 1 is the supply and DIY TABLE HEIGHT PANTRY CABINET This board will line up in the center of the base board. Build the face frame next. The bottom board is a 1×4 and the sides and top board are 1×3. Add 3/4” pocket holes on bpth sides of the top board and to one end of each side board. Attach all pieces to form arectangle
DIY LOFT BED
Step 1. Cut the back assembly pieces to size and drill 1 1/2″ pocket holes according to the cut list. You can find our favorite Kreg Jig model here! Attach the pieces together with 2 1/2″ pocket hole screws and wood glue. Note the 2×10 board should have pocket holesfacing the back.
DIY SQUARE DINING TABLE We have built so many dining tables over the last 10 years but one thing that we get so many requests for is a DIY Square Dining Table! We drove to Houston, TX to crash our sisters new house and one of her requests was a square dining table for her kitchen! DIY BARN DOOR HARDWARE If you are building two barn doors, double the supplies. The star of the show are these Clothesline Pulleys. You will need two and you can find them HERE. These babies are only $2.38 at Home Depot. Just take them apart (watch the video to see exactly how) and DIY MODERN FULL SIZED BED Cut the cleats to size and drill 1 1/2″ pocket holes on each end. Attach one cleat to the inside of each side rail with 2 1/2″ wood screws and wood glue. Attach one end to the footboard with 2 1/2″ pocket hole screws. Center the final cleat on the footboard and attach it with 2 1/2″ pocket hole screws and wood glue. DIY FARMHOUSE PANEL DINING TABLE Now attach the plywood centers to both bases. Add 3/4” pocket holes around all edges of the plywood and attach into the base using wood glue and 1.5” pocket hole screws. The panels will be set back 1 1/8” from the outside edges of the legs. Now add the top 2x board toDIY WOOD SIGN
Start by making your cuts! 4 – 1×6 at 22”. 2 – 1×4 at 22”. 2 – 1×4 at 15”. Start by lining up all of your boards side by side. Run a line of wood glue down one side like this. Next, lay one of the 22” 1×4 pieces on the edge of the sign and attach it to the boards using 1.25” brad or finish nails. DIY ANGLE BASE DINING TABLE Step 1: Cut the planks to size and drill 1 1/2″ pocket holes, with a Kreg Jig, on one edge of 7 of the boards and both ends of all of the boards. Attach the planks together with 2 1/2″ pocket hole screws. You can find our favorite Kreg Jig Model here! Step 2: Measure and cut the breadboards to size. EASY DIY PLATFORM BED This Easy DIY Platform Bed is the perfect build for beginners! Get the free plans and how-to tutorial at www.shanty-2-chic.com! I’m back to share the Easy DIY Platform Bed that I made for my son 🙂 If you missed the Free Plans for the Planked Headboard, you can check them out HERE!I saw a platform bed in a West Elm catalog and loved how chunky the base and platform were, so that was my DIY $50 FULL LENGTH WALL MIRRORS Attach the long frame boards to the plywood piece using 2” pocket hole screws and wood glue. The pocket holes on the longer boards will face the back and the plywood pocket holes can face up since you will be covering them with the mirror. Now attach the shorter frame boards.These are
DIY INDUSTRIAL FARMHOUSE TABLE Drill 1 1/2″ pocket holes into the boards and attach them to the planks with 2 1/2″ pocket hole screws and wood glue. To create the legs, cut the boards to size, drill 1 1/2″ pocket holes in 4 of the pieces. Then, glue two pieces together (one with pocket holes and one without), clamp and letDIY BLANKET LADDER
Instructions. Cut List. Dill 1 1/2″ pocket holes into the 2×6 boards. Attach the 2×6 pieces to one of the 2×4 pieces according to the diagram. The top 2×6 piece is 3″ away from the top of the 2×4. The rest of the pieces are spaced 12″ apart measuring from the front most corner of each 2×6. DIY MODERN FARMHOUSE 6 DRAWER DRESSER Rip the plywood to 6” wide and then make your cross cuts. Attach the pieces together at the corners using wood glue and 1.25” brad nails. The bottom of the drawers are 1/4” hardwood plywood. Cut each to size, and then attach to the frame using wood glue and 1” staples or1.25” brad nails.
DIY RUSTIC CHIC FULL LENGTH MIRROR Attach each piece using wood glue and 3/4” brad nails. Repeat the same thing with the longer trim. Each of these trim pieces will be cut at a 45˚ angle. After adding your finish, add a large amount of mirror adhesive to the middle of the project panel. Attach the mirrorin
FURNITURE PLANS & AFFORDABLE DIY Two power tool wielding DIY queens on a mission to create beautiful and affordable furniture, turning houses into homes. Transform your home with free furniture plans & DIY woodworking projects for beds, benches, chairs, tables, barn doors, shelves, and more for inside rooms and outdoor areas. FREE FURNITURE PLANS Ashley & Whitney, two power tool-wielding DIY queens, on a mission to create beautiful and affordable wooden furniture. They have hundreds of free furniture plans with tutorial videos and trade secrets to make your next DIY furniture idea a complete success. Get started on yournext project today!
DIY PLAY KITCHEN PLANS Because there are so many steps in this set of plans, I had to upload it in two separate .pdf files. Just click each link to print each set. Set 1 is the supply and DIY FARMHOUSE PANEL DINING TABLE Now attach the plywood centers to both bases. Add 3/4” pocket holes around all edges of the plywood and attach into the base using wood glue and 1.5” pocket hole screws. The panels will be set back 1 1/8” from the outside edges of the legs. Now add the top 2x board to DIY TABLE HEIGHT PANTRY CABINET This board will line up in the center of the base board. Build the face frame next. The bottom board is a 1×4 and the sides and top board are 1×3. Add 3/4” pocket holes on bpth sides of the top board and to one end of each side board. Attach all pieces to form arectangle
DIY LOFT BED
Step 1. Cut the back assembly pieces to size and drill 1 1/2″ pocket holes according to the cut list. You can find our favorite Kreg Jig model here! Attach the pieces together with 2 1/2″ pocket hole screws and wood glue. Note the 2×10 board should have pocket holesfacing the back.
DIY BARN DOOR HARDWARE If you are building two barn doors, double the supplies. The star of the show are these Clothesline Pulleys. You will need two and you can find them HERE. These babies are only $2.38 at Home Depot. Just take them apart (watch the video to see exactly how) and DIY KING SIZE BED FREE PLANS DIY King Size Bed Free Plans. The posts of this bed are 4×4. These are untreated boards and can be found at both big hardware stores. You won’t be able to cut through a 4×4 without a 12″ miter saw. So, if yours is smaller, you can have the hardware store make these fewcuts.
FARMHOUSE BARN DOOR DOG CRATE Attach them by using 2.5″ wood screws through the base and into the crate assembly all around. The planks for the top of the crate are 2×6 boards we ripped to 3 7/8″ wide. Cut these to size and add 1.5″ pocket holes down one side of 6 of the 7 boards. Place them DIY BATHROOM MIRROR STORAGE CASE ShantY-2-ChIC.Com DIY Bathroom mIrror Storage CaSe - Page | 3 Assemble the door parts with glue and 1-1/4” pocket hole screws. Then attach the 1/4” plywood to the back using a FURNITURE PLANS & AFFORDABLE DIY Two power tool wielding DIY queens on a mission to create beautiful and affordable furniture, turning houses into homes. Transform your home with free furniture plans & DIY woodworking projects for beds, benches, chairs, tables, barn doors, shelves, and more for inside rooms and outdoor areas. FREE FURNITURE PLANS Ashley & Whitney, two power tool-wielding DIY queens, on a mission to create beautiful and affordable wooden furniture. They have hundreds of free furniture plans with tutorial videos and trade secrets to make your next DIY furniture idea a complete success. Get started on yournext project today!
DIY PLAY KITCHEN PLANS Because there are so many steps in this set of plans, I had to upload it in two separate .pdf files. Just click each link to print each set. Set 1 is the supply and DIY FARMHOUSE PANEL DINING TABLE Now attach the plywood centers to both bases. Add 3/4” pocket holes around all edges of the plywood and attach into the base using wood glue and 1.5” pocket hole screws. The panels will be set back 1 1/8” from the outside edges of the legs. Now add the top 2x board to DIY TABLE HEIGHT PANTRY CABINET This board will line up in the center of the base board. Build the face frame next. The bottom board is a 1×4 and the sides and top board are 1×3. Add 3/4” pocket holes on bpth sides of the top board and to one end of each side board. Attach all pieces to form arectangle
DIY LOFT BED
Step 1. Cut the back assembly pieces to size and drill 1 1/2″ pocket holes according to the cut list. You can find our favorite Kreg Jig model here! Attach the pieces together with 2 1/2″ pocket hole screws and wood glue. Note the 2×10 board should have pocket holesfacing the back.
DIY BARN DOOR HARDWARE If you are building two barn doors, double the supplies. The star of the show are these Clothesline Pulleys. You will need two and you can find them HERE. These babies are only $2.38 at Home Depot. Just take them apart (watch the video to see exactly how) and DIY KING SIZE BED FREE PLANS DIY King Size Bed Free Plans. The posts of this bed are 4×4. These are untreated boards and can be found at both big hardware stores. You won’t be able to cut through a 4×4 without a 12″ miter saw. So, if yours is smaller, you can have the hardware store make these fewcuts.
FARMHOUSE BARN DOOR DOG CRATE Attach them by using 2.5″ wood screws through the base and into the crate assembly all around. The planks for the top of the crate are 2×6 boards we ripped to 3 7/8″ wide. Cut these to size and add 1.5″ pocket holes down one side of 6 of the 7 boards. Place them DIY BATHROOM MIRROR STORAGE CASE ShantY-2-ChIC.Com DIY Bathroom mIrror Storage CaSe - Page | 3 Assemble the door parts with glue and 1-1/4” pocket hole screws. Then attach the 1/4” plywood to the back using a DIY MODERN FULL SIZED BED Cut the cleats to size and drill 1 1/2″ pocket holes on each end. Attach one cleat to the inside of each side rail with 2 1/2″ wood screws and wood glue. Attach one end to the footboard with 2 1/2″ pocket hole screws. Center the final cleat on the footboard and attach it with 2 1/2″ pocket hole screws and wood glue. DIY SQUARE DINING TABLE We have built so many dining tables over the last 10 years but one thing that we get so many requests for is a DIY Square Dining Table! We drove to Houston, TX to crash our sisters new house and one of her requests was a square dining table for her kitchen! DIY ROUND DINING TABLE Cut the apron pieces to size and drill 1 1/2″ pocket holes into both ends of the inside of the aprons and 3/4″ pocket holes along one edge. Begin by attaching the apron to the leg with 2″ brad nails and wood glue to hold them in place. Follow up by attaching the aprons with 2 1/2″ pocket hole screws. You can find our favorite 20-voltDIY WOOD SIGN
Start by making your cuts! 4 – 1×6 at 22”. 2 – 1×4 at 22”. 2 – 1×4 at 15”. Start by lining up all of your boards side by side. Run a line of wood glue down one side like this. Next, lay one of the 22” 1×4 pieces on the edge of the sign and attach it to the boards using 1.25” brad or finish nails. EASY DIY PLATFORM BED This Easy DIY Platform Bed is the perfect build for beginners! Get the free plans and how-to tutorial at www.shanty-2-chic.com! I’m back to share the Easy DIY Platform Bed that I made for my son 🙂 If you missed the Free Plans for the Planked Headboard, you can check them out HERE!I saw a platform bed in a West Elm catalog and loved how chunky the base and platform were, so that was my DIY ANGLE BASE DINING TABLE Step 1: Cut the planks to size and drill 1 1/2″ pocket holes, with a Kreg Jig, on one edge of 7 of the boards and both ends of all of the boards. Attach the planks together with 2 1/2″ pocket hole screws. You can find our favorite Kreg Jig Model here! Step 2: Measure and cut the breadboards to size. DIY $50 FULL LENGTH WALL MIRRORS Attach the long frame boards to the plywood piece using 2” pocket hole screws and wood glue. The pocket holes on the longer boards will face the back and the plywood pocket holes can face up since you will be covering them with the mirror. Now attach the shorter frame boards.These are
HOW TO EASILY PAINT KITCHEN CABINET! Paint Kitchen Cabinet. This really is such a simple process. The first thing we did was remove all of the cabinet doors. Next, we used a degreaser over the surface of all doors and faces and frames. This is the degreaser we used HERE! HERE is a link to the paint we used. The color we chose to use for our sister’s cabinets is called PlatinumRing.
DIY BLANKET LADDER
Instructions. Cut List. Dill 1 1/2″ pocket holes into the 2×6 boards. Attach the 2×6 pieces to one of the 2×4 pieces according to the diagram. The top 2×6 piece is 3″ away from the top of the 2×4. The rest of the pieces are spaced 12″ apart measuring from the front most corner of each 2×6. DIY MODERN FARMHOUSE 6 DRAWER DRESSER Rip the plywood to 6” wide and then make your cross cuts. Attach the pieces together at the corners using wood glue and 1.25” brad nails. The bottom of the drawers are 1/4” hardwood plywood. Cut each to size, and then attach to the frame using wood glue and 1” staples or1.25” brad nails.
FURNITURE PLANS & AFFORDABLE DIY Two power tool wielding DIY queens on a mission to create beautiful and affordable furniture, turning houses into homes. Transform your home with free furniture plans & DIY woodworking projects for beds, benches, chairs, tables, barn doors, shelves, and more for inside rooms and outdoor areas. FREE FURNITURE PLANS Ashley & Whitney, two power tool-wielding DIY queens, on a mission to create beautiful and affordable wooden furniture. They have hundreds of free furniture plans with tutorial videos and trade secrets to make your next DIY furniture idea a complete success. Get started on yournext project today!
FREE PRINTABLES ARCHIVES 🔨🍷 Hand crafted, “shanty2chic inspired” side table & wine rack for the living room!! Absolutely loved making this multi piece table top with the old horse shoe + cheers to Dad for getting the base sorted #industrialdesign .. DIY PLAY KITCHEN PLANS Because there are so many steps in this set of plans, I had to upload it in two separate .pdf files. Just click each link to print each set. Set 1 is the supply and DIY ANGLE BASE DINING TABLE Step 1: Cut the planks to size and drill 1 1/2″ pocket holes, with a Kreg Jig, on one edge of 7 of the boards and both ends of all of the boards. Attach the planks together with 2 1/2″ pocket hole screws. You can find our favorite Kreg Jig Model here! Step 2: Measure and cut the breadboards to size.DIY WOOD SIGN
Start by making your cuts! 4 – 1×6 at 22”. 2 – 1×4 at 22”. 2 – 1×4 at 15”. Start by lining up all of your boards side by side. Run a line of wood glue down one side like this. Next, lay one of the 22” 1×4 pieces on the edge of the sign and attach it to the boards using 1.25” brad or finish nails. DIY SAWHORSE BOOKCASE AND HOW-TO VIDEO With the brackets and ladders in place, we slid the shelf pieces over the rungs. Refer to the plans for proper placement. We attached shelf pieces to the rungs with 1 1/4″ brad nails. Make sure the nailer is lined up so that the nails will shoot directly into the rungs. Our final step was to add a finish! DIY INDUSTRIAL FARMHOUSE TABLE Drill 1 1/2″ pocket holes into the boards and attach them to the planks with 2 1/2″ pocket hole screws and wood glue. To create the legs, cut the boards to size, drill 1 1/2″ pocket holes in 4 of the pieces. Then, glue two pieces together (one with pocket holes and one without), clamp and let DIY FARMHOUSE CLUB CHAIR DIY Farmhouse Club Chair – Attaching Side Slats. Then, attach the side slats to the inside of the side cleats with 1 1/4″ brad nails and wood glue. Start at the top and work your way down. Attach the front and back apron pieces with 2 1/2″ pocket hole screws and woodglue.
DIY FARMHOUSE BATHROOM VANITY DIY Farmhouse Bathroom Vanity. I started by building two sides. These are constructed out of 3/4″ Purebond Plywood. This type of plywood is sold in big 4’x8′ sheets, and we have the guys at Home Depot rip it down into smaller boards to fit in the car. Then, we cut those boards to exact size using our miter saws or table saws. FURNITURE PLANS & AFFORDABLE DIY Two power tool wielding DIY queens on a mission to create beautiful and affordable furniture, turning houses into homes. Transform your home with free furniture plans & DIY woodworking projects for beds, benches, chairs, tables, barn doors, shelves, and more for inside rooms and outdoor areas. FREE FURNITURE PLANS Ashley & Whitney, two power tool-wielding DIY queens, on a mission to create beautiful and affordable wooden furniture. They have hundreds of free furniture plans with tutorial videos and trade secrets to make your next DIY furniture idea a complete success. Get started on yournext project today!
FREE PRINTABLES ARCHIVES 🔨🍷 Hand crafted, “shanty2chic inspired” side table & wine rack for the living room!! Absolutely loved making this multi piece table top with the old horse shoe + cheers to Dad for getting the base sorted #industrialdesign .. DIY PLAY KITCHEN PLANS Because there are so many steps in this set of plans, I had to upload it in two separate .pdf files. Just click each link to print each set. Set 1 is the supply and DIY ANGLE BASE DINING TABLE Step 1: Cut the planks to size and drill 1 1/2″ pocket holes, with a Kreg Jig, on one edge of 7 of the boards and both ends of all of the boards. Attach the planks together with 2 1/2″ pocket hole screws. You can find our favorite Kreg Jig Model here! Step 2: Measure and cut the breadboards to size.DIY WOOD SIGN
Start by making your cuts! 4 – 1×6 at 22”. 2 – 1×4 at 22”. 2 – 1×4 at 15”. Start by lining up all of your boards side by side. Run a line of wood glue down one side like this. Next, lay one of the 22” 1×4 pieces on the edge of the sign and attach it to the boards using 1.25” brad or finish nails. DIY SAWHORSE BOOKCASE AND HOW-TO VIDEO With the brackets and ladders in place, we slid the shelf pieces over the rungs. Refer to the plans for proper placement. We attached shelf pieces to the rungs with 1 1/4″ brad nails. Make sure the nailer is lined up so that the nails will shoot directly into the rungs. Our final step was to add a finish! DIY INDUSTRIAL FARMHOUSE TABLE Drill 1 1/2″ pocket holes into the boards and attach them to the planks with 2 1/2″ pocket hole screws and wood glue. To create the legs, cut the boards to size, drill 1 1/2″ pocket holes in 4 of the pieces. Then, glue two pieces together (one with pocket holes and one without), clamp and let DIY FARMHOUSE CLUB CHAIR DIY Farmhouse Club Chair – Attaching Side Slats. Then, attach the side slats to the inside of the side cleats with 1 1/4″ brad nails and wood glue. Start at the top and work your way down. Attach the front and back apron pieces with 2 1/2″ pocket hole screws and woodglue.
DIY FARMHOUSE BATHROOM VANITY DIY Farmhouse Bathroom Vanity. I started by building two sides. These are constructed out of 3/4″ Purebond Plywood. This type of plywood is sold in big 4’x8′ sheets, and we have the guys at Home Depot rip it down into smaller boards to fit in the car. Then, we cut those boards to exact size using our miter saws or table saws. DIY OUTDOOR LOUNGE CHAIR Learn how to build this DIY Lounge Chair with free plans and a how-to video by Shanty2Chic! I am so excited for summer! This has been quite the school year and this mom is ready for some fun and sun! WWW.SHANTY-2-CHIC.COM CHIC ©2017 WWW.SHANTY-2-CHlC.COM DIY Lounge Chair Item 1 x6x8 1 x4x8 SUPPLY LIST Ouantity Description Framing Lumber Common Board CommonBoard
DIY WORKBENCH
Build the top and bottom frame by attaching the short pieces to the long pieces with 2 1/2″ pocket hole screws and wood glue. Drill 1 1/2″ pocket holes into the 2×4 leg pieces and attach them to the 2×6 pieces with 2 1/2″ pocket hole screws and wood glue. Do this for all 4 legs. Attach the legs to the outside corners of the bottomshelf
DIY PORCH SWING: ONLY $40 FOR A FARMHOUSE The first step is building the frame of the seat of the DIY porch swing. This uses 2×4 framing lumber. We used our Kreg K5 Jig to make the pocket holes in both ends of each of our smaller boards. These are 1.5″ pocket holes. We attached those to our longer boards using wood glue and 2.5″ pocket hole screws.BEDS ARCHIVES
🔨🍷 Hand crafted, “shanty2chic inspired” side table & wine rack for the living room!! Absolutely loved making this multi piece table top with the old horse shoe + cheers to Dad for getting the base sorted #industrialdesign ..DIY FARMHOUSE CRIB
DIY Farmhouse Crib. Here it is all finished up and ready in his room! DIY Farmhouse Crib – Free Plans. Before I start, you can download and print the FREE PLANS here! First step is building the back of the crib. I used 1×6 for this part. I made all of my pocket holes usingmy Kreg K5 Jig.
DINING TABLES ARCHIVES 🔨🍷 Hand crafted, “shanty2chic inspired” side table & wine rack for the living room!! Absolutely loved making this multi piece table top with the old horse shoe + cheers to Dad for getting the base sorted #industrialdesign .. DIY CABINETS FOR A GARAGE, WORKSHOP OR CRAFT ROOM DIY Cabinets – Cabinet Doors. Set the cabinet aside and begin building the cabinet doors. Measure and cut the cabinet door trim to size and drill 3/4″ pocket holes in the ends of both vertical trim pieces. Attach them to the top and bottom pieces with 1 1/4″ pocket hole screws and wood glue. Do DIY FARMHOUSE CLUB CHAIR DIY Farmhouse Club Chair – Attaching Side Slats. Then, attach the side slats to the inside of the side cleats with 1 1/4″ brad nails and wood glue. Start at the top and work your way down. Attach the front and back apron pieces with 2 1/2″ pocket hole screws and woodglue.
DIY BARN DOOR HARDWARE If you are building two barn doors, double the supplies. The star of the show are these Clothesline Pulleys. You will need two and you can find them HERE. These babies are only $2.38 at Home Depot. Just take them apart (watch the video to see exactly how) and FURNITURE PLANS & AFFORDABLE DIY Two power tool wielding DIY queens on a mission to create beautiful and affordable furniture, turning houses into homes. Transform your home with free furniture plans & DIY woodworking projects for beds, benches, chairs, tables, barn doors, shelves, and more for inside rooms and outdoor areas. FREE FURNITURE PLANS Ashley & Whitney, two power tool-wielding DIY queens, on a mission to create beautiful and affordable wooden furniture. They have hundreds of free furniture plans with tutorial videos and trade secrets to make your next DIY furniture idea a complete success. Get started on yournext project today!
DIY PLAY KITCHEN PLANS Because there are so many steps in this set of plans, I had to upload it in two separate .pdf files. Just click each link to print each set. Set 1 is the supply and FREE PRINTABLES ARCHIVES 🔨🍷 Hand crafted, “shanty2chic inspired” side table & wine rack for the living room!! Absolutely loved making this multi piece table top with the old horse shoe + cheers to Dad for getting the base sorted #industrialdesign .. DIY ANGLE BASE DINING TABLE Learn how to build this DIY Angle Base Dining Table with free plans by Shanty2Chic! We are back with another episode of our most recent#shantyhousecrash!
DIY WOOD SIGN
🔨🍷 Hand crafted, “shanty2chic inspired” side table & wine rack for the living room!! Absolutely loved making this multi piece table top with the old horse shoe + cheers to Dad for getting the base sorted #industrialdesign .. DIY SAWHORSE BOOKCASE AND HOW-TO VIDEO Just attempted to make it. was looking great until time to stain it. Was taking forever to stain because no way to stain the whole thing under 5min or at least not for me so in between staining having to wipe of wood already stained. DIY INDUSTRIAL FARMHOUSE TABLE Build this simple DIY Industrial Farmhouse Table with only framing materials and five tools! How-to video and free plans by Shanty2Chic. We built this DIY Industrial Farmhouse Table for our friend Rachel’sShanty House Crash!
DIY FARMHOUSE CLUB CHAIR So fun!!! Make sure you download the FREE printable plans HERE and follow along with us as we build it below!. DIY Farmhouse Club Chair – The Build. Before I started, I ripped the DIY FARMHOUSE BATHROOM VANITY Learn how to build this DIY Farmhouse Bathroom Vanity with free plans by Shanty2Chic! This is an easy build that only requires a few tools! This room has been in the works longer than I care to admit, but I finally got around to finishing it and I LOVE THE RESULTS! FURNITURE PLANS & AFFORDABLE DIY Two power tool wielding DIY queens on a mission to create beautiful and affordable furniture, turning houses into homes. Transform your home with free furniture plans & DIY woodworking projects for beds, benches, chairs, tables, barn doors, shelves, and more for inside rooms and outdoor areas. FREE FURNITURE PLANS Ashley & Whitney, two power tool-wielding DIY queens, on a mission to create beautiful and affordable wooden furniture. They have hundreds of free furniture plans with tutorial videos and trade secrets to make your next DIY furniture idea a complete success. Get started on yournext project today!
DIY PLAY KITCHEN PLANS Because there are so many steps in this set of plans, I had to upload it in two separate .pdf files. Just click each link to print each set. Set 1 is the supply and FREE PRINTABLES ARCHIVES 🔨🍷 Hand crafted, “shanty2chic inspired” side table & wine rack for the living room!! Absolutely loved making this multi piece table top with the old horse shoe + cheers to Dad for getting the base sorted #industrialdesign .. DIY ANGLE BASE DINING TABLE Learn how to build this DIY Angle Base Dining Table with free plans by Shanty2Chic! We are back with another episode of our most recent#shantyhousecrash!
DIY WOOD SIGN
🔨🍷 Hand crafted, “shanty2chic inspired” side table & wine rack for the living room!! Absolutely loved making this multi piece table top with the old horse shoe + cheers to Dad for getting the base sorted #industrialdesign .. DIY SAWHORSE BOOKCASE AND HOW-TO VIDEO Just attempted to make it. was looking great until time to stain it. Was taking forever to stain because no way to stain the whole thing under 5min or at least not for me so in between staining having to wipe of wood already stained. DIY INDUSTRIAL FARMHOUSE TABLE Build this simple DIY Industrial Farmhouse Table with only framing materials and five tools! How-to video and free plans by Shanty2Chic. We built this DIY Industrial Farmhouse Table for our friend Rachel’sShanty House Crash!
DIY FARMHOUSE CLUB CHAIR So fun!!! Make sure you download the FREE printable plans HERE and follow along with us as we build it below!. DIY Farmhouse Club Chair – The Build. Before I started, I ripped the DIY FARMHOUSE BATHROOM VANITY Learn how to build this DIY Farmhouse Bathroom Vanity with free plans by Shanty2Chic! This is an easy build that only requires a few tools! This room has been in the works longer than I care to admit, but I finally got around to finishing it and I LOVE THE RESULTS! DIY OUTDOOR LOUNGE CHAIR Learn how to build this DIY Lounge Chair with free plans and a how-to video by Shanty2Chic! I am so excited for summer! This has been quite the school year and this mom is ready for some fun and sun! WWW.SHANTY-2-CHIC.COM CHIC ©2017 WWW.SHANTY-2-CHlC.COM DIY Lounge Chair Item 1 x6x8 1 x4x8 SUPPLY LIST Ouantity Description Framing Lumber Common Board CommonBoard
BEDS ARCHIVES
🔨🍷 Hand crafted, “shanty2chic inspired” side table & wine rack for the living room!! Absolutely loved making this multi piece table top with the old horse shoe + cheers to Dad for getting the base sorted #industrialdesign ..DIY WORKBENCH
We get so many emails and messages asking us what are the basics to starting a workshop! One of the first pieces we suggest is a Workbench! This DIY workbench DIY CABINETS FOR A GARAGE, WORKSHOP OR CRAFT ROOM As promised, I am back to share the free plans for my DIY Cabinets! If you missed the tour of my shop, you can check it out HERE!. We built our home about 4 years ago and one of the reasons we picked this floor plan was because it has an extra single car DINING TABLES ARCHIVES 🔨🍷 Hand crafted, “shanty2chic inspired” side table & wine rack for the living room!! Absolutely loved making this multi piece table top with the old horse shoe + cheers to Dad for getting the base sorted #industrialdesign .. DIY FARMHOUSE CLUB CHAIR So fun!!! Make sure you download the FREE printable plans HERE and follow along with us as we build it below!. DIY Farmhouse Club Chair – The Build. Before I started, I ripped the rounded edges off of DIY PORCH SWING: ONLY $40 FOR A FARMHOUSE Looked at the plans. The frame can actually be built from four (4) 2x4x8’s, not the five (5) listed. Technically, the “yellow pieces” when cut from the 4th and 5th 2×4’s will not be quite 12 inches, perhaps only 11 1/2 inches when accounting for the thin kerf cuts, but the resulting reduction in the height of the arms by 1/2 inch in unimportant.DIY FARMHOUSE CRIB
I am expecting a new little guy here in June and we are thrilled. Thankfully, the nesting phase kicked in and I have been busy building him all the things :-)Check out my DIY Tutorial and Free Plans to build your own DIY Farmhouse Crib! DIY BARN DOOR HARDWARE This is a project that is better taught in a video so, Whitney and I made a how-to video for you! Just click PLAY below to watch how easy it is to DIY your own Barn Door Hardware! FURNITURE PLANS & AFFORDABLE DIY Two power tool wielding DIY queens on a mission to create beautiful and affordable furniture, turning houses into homes. Transform your home with free furniture plans & DIY woodworking projects for beds, benches, chairs, tables, barn doors, shelves, and more for inside rooms and outdoor areas. FREE FURNITURE PLANS Ashley & Whitney, two power tool-wielding DIY queens, on a mission to create beautiful and affordable wooden furniture. They have hundreds of free furniture plans with tutorial videos and trade secrets to make your next DIY furniture idea a complete success. Get started on yournext project today!
DIY PLAY KITCHEN PLANS Because there are so many steps in this set of plans, I had to upload it in two separate .pdf files. Just click each link to print each set. Set 1 is the supply and FREE PRINTABLES ARCHIVES 🔨🍷 Hand crafted, “shanty2chic inspired” side table & wine rack for the living room!! Absolutely loved making this multi piece table top with the old horse shoe + cheers to Dad for getting the base sorted #industrialdesign .. DIY ANGLE BASE DINING TABLE Learn how to build this DIY Angle Base Dining Table with free plans by Shanty2Chic! We are back with another episode of our most recent#shantyhousecrash!
DIY WOOD SIGN
🔨🍷 Hand crafted, “shanty2chic inspired” side table & wine rack for the living room!! Absolutely loved making this multi piece table top with the old horse shoe + cheers to Dad for getting the base sorted #industrialdesign .. DIY SAWHORSE BOOKCASE AND HOW-TO VIDEO Just attempted to make it. was looking great until time to stain it. Was taking forever to stain because no way to stain the whole thing under 5min or at least not for me so in between staining having to wipe of wood already stained. DIY INDUSTRIAL FARMHOUSE TABLE Build this simple DIY Industrial Farmhouse Table with only framing materials and five tools! How-to video and free plans by Shanty2Chic. We built this DIY Industrial Farmhouse Table for our friend Rachel’sShanty House Crash!
DIY FARMHOUSE CLUB CHAIR So fun!!! Make sure you download the FREE printable plans HERE and follow along with us as we build it below!. DIY Farmhouse Club Chair – The Build. Before I started, I ripped the DIY FARMHOUSE BATHROOM VANITY Learn how to build this DIY Farmhouse Bathroom Vanity with free plans by Shanty2Chic! This is an easy build that only requires a few tools! This room has been in the works longer than I care to admit, but I finally got around to finishing it and I LOVE THE RESULTS! FURNITURE PLANS & AFFORDABLE DIY Two power tool wielding DIY queens on a mission to create beautiful and affordable furniture, turning houses into homes. Transform your home with free furniture plans & DIY woodworking projects for beds, benches, chairs, tables, barn doors, shelves, and more for inside rooms and outdoor areas. FREE FURNITURE PLANS Ashley & Whitney, two power tool-wielding DIY queens, on a mission to create beautiful and affordable wooden furniture. They have hundreds of free furniture plans with tutorial videos and trade secrets to make your next DIY furniture idea a complete success. Get started on yournext project today!
DIY PLAY KITCHEN PLANS Because there are so many steps in this set of plans, I had to upload it in two separate .pdf files. Just click each link to print each set. Set 1 is the supply and FREE PRINTABLES ARCHIVES 🔨🍷 Hand crafted, “shanty2chic inspired” side table & wine rack for the living room!! Absolutely loved making this multi piece table top with the old horse shoe + cheers to Dad for getting the base sorted #industrialdesign .. DIY ANGLE BASE DINING TABLE Learn how to build this DIY Angle Base Dining Table with free plans by Shanty2Chic! We are back with another episode of our most recent#shantyhousecrash!
DIY WOOD SIGN
🔨🍷 Hand crafted, “shanty2chic inspired” side table & wine rack for the living room!! Absolutely loved making this multi piece table top with the old horse shoe + cheers to Dad for getting the base sorted #industrialdesign .. DIY SAWHORSE BOOKCASE AND HOW-TO VIDEO Just attempted to make it. was looking great until time to stain it. Was taking forever to stain because no way to stain the whole thing under 5min or at least not for me so in between staining having to wipe of wood already stained. DIY INDUSTRIAL FARMHOUSE TABLE Build this simple DIY Industrial Farmhouse Table with only framing materials and five tools! How-to video and free plans by Shanty2Chic. We built this DIY Industrial Farmhouse Table for our friend Rachel’sShanty House Crash!
DIY FARMHOUSE CLUB CHAIR So fun!!! Make sure you download the FREE printable plans HERE and follow along with us as we build it below!. DIY Farmhouse Club Chair – The Build. Before I started, I ripped the DIY FARMHOUSE BATHROOM VANITY Learn how to build this DIY Farmhouse Bathroom Vanity with free plans by Shanty2Chic! This is an easy build that only requires a few tools! This room has been in the works longer than I care to admit, but I finally got around to finishing it and I LOVE THE RESULTS! DIY OUTDOOR LOUNGE CHAIR Learn how to build this DIY Lounge Chair with free plans and a how-to video by Shanty2Chic! I am so excited for summer! This has been quite the school year and this mom is ready for some fun and sun! WWW.SHANTY-2-CHIC.COM CHIC ©2017 WWW.SHANTY-2-CHlC.COM DIY Lounge Chair Item 1 x6x8 1 x4x8 SUPPLY LIST Ouantity Description Framing Lumber Common Board CommonBoard
BEDS ARCHIVES
🔨🍷 Hand crafted, “shanty2chic inspired” side table & wine rack for the living room!! Absolutely loved making this multi piece table top with the old horse shoe + cheers to Dad for getting the base sorted #industrialdesign ..DIY WORKBENCH
We get so many emails and messages asking us what are the basics to starting a workshop! One of the first pieces we suggest is a Workbench! This DIY workbench DIY CABINETS FOR A GARAGE, WORKSHOP OR CRAFT ROOM As promised, I am back to share the free plans for my DIY Cabinets! If you missed the tour of my shop, you can check it out HERE!. We built our home about 4 years ago and one of the reasons we picked this floor plan was because it has an extra single car DINING TABLES ARCHIVES 🔨🍷 Hand crafted, “shanty2chic inspired” side table & wine rack for the living room!! Absolutely loved making this multi piece table top with the old horse shoe + cheers to Dad for getting the base sorted #industrialdesign .. DIY FARMHOUSE CLUB CHAIR So fun!!! Make sure you download the FREE printable plans HERE and follow along with us as we build it below!. DIY Farmhouse Club Chair – The Build. Before I started, I ripped the rounded edges off of DIY PORCH SWING: ONLY $40 FOR A FARMHOUSE Looked at the plans. The frame can actually be built from four (4) 2x4x8’s, not the five (5) listed. Technically, the “yellow pieces” when cut from the 4th and 5th 2×4’s will not be quite 12 inches, perhaps only 11 1/2 inches when accounting for the thin kerf cuts, but the resulting reduction in the height of the arms by 1/2 inch in unimportant.DIY FARMHOUSE CRIB
I am expecting a new little guy here in June and we are thrilled. Thankfully, the nesting phase kicked in and I have been busy building him all the things :-)Check out my DIY Tutorial and Free Plans to build your own DIY Farmhouse Crib! DIY BARN DOOR HARDWARE This is a project that is better taught in a video so, Whitney and I made a how-to video for you! Just click PLAY below to watch how easy it is to DIY your own Barn Door Hardware!* About
* Free Furniture Plans* Free Printables
* Videos
* Q&A
* Room Tours
* Shop
* Shop Our Furniture * Shop Our Favorite Finds* Shop By Room
* Shanty Style
* Tools
* Drill
* Kreg Jig
* Miter Saw
* Table Saw
* Nailer
* Jig Saw
* Reader Projects
SIGN UP TO BECOME A VIP! Leave this field empty if you're human:*
*
*
*
*
__ MENU
* About
* Free Furniture Plans* Free Printables
* Videos
* Q&A
* Room Tours
* Shop
* Shop Our Furniture * Shop Our Favorite Finds* Shop By Room
* Shanty Style
* Tools
* Drill
* Kreg Jig
* Miter Saw
* Table Saw
* Nailer
* Jig Saw
* Reader Projects
VIP ACCESS
SIGN UP AND GET ACCESS TO NEW POSTS Leave this field empty if you're human:OUR LATEST PROJECTS
I GAVE MY HALLWAY A BIG MAKEOVER!April 10, 2020
DIY TV CONSOLE
March 30, 2020
DIY MODERN FARMHOUSE COFFEE CABINETMarch 20, 2020
DIY ANGLED CONSOLE TABLEMarch 6, 2020
$20 X BACK PORCH SWINGMay 13, 2020
EASY DIY BARN DOORS
April 24, 2020
I GAVE MY HALLWAY A BIG MAKEOVER!April 10, 2020
DIY TV CONSOLE
March 30, 2020
DIY MODERN FARMHOUSE COFFEE CABINETMarch 20, 2020
DIY ANGLED CONSOLE TABLEMarch 6, 2020
$20 X BACK PORCH SWINGMay 13, 2020
EASY DIY BARN DOORS
April 24, 2020
I GAVE MY HALLWAY A BIG MAKEOVER!April 10, 2020
DIY TV CONSOLE
March 30, 2020
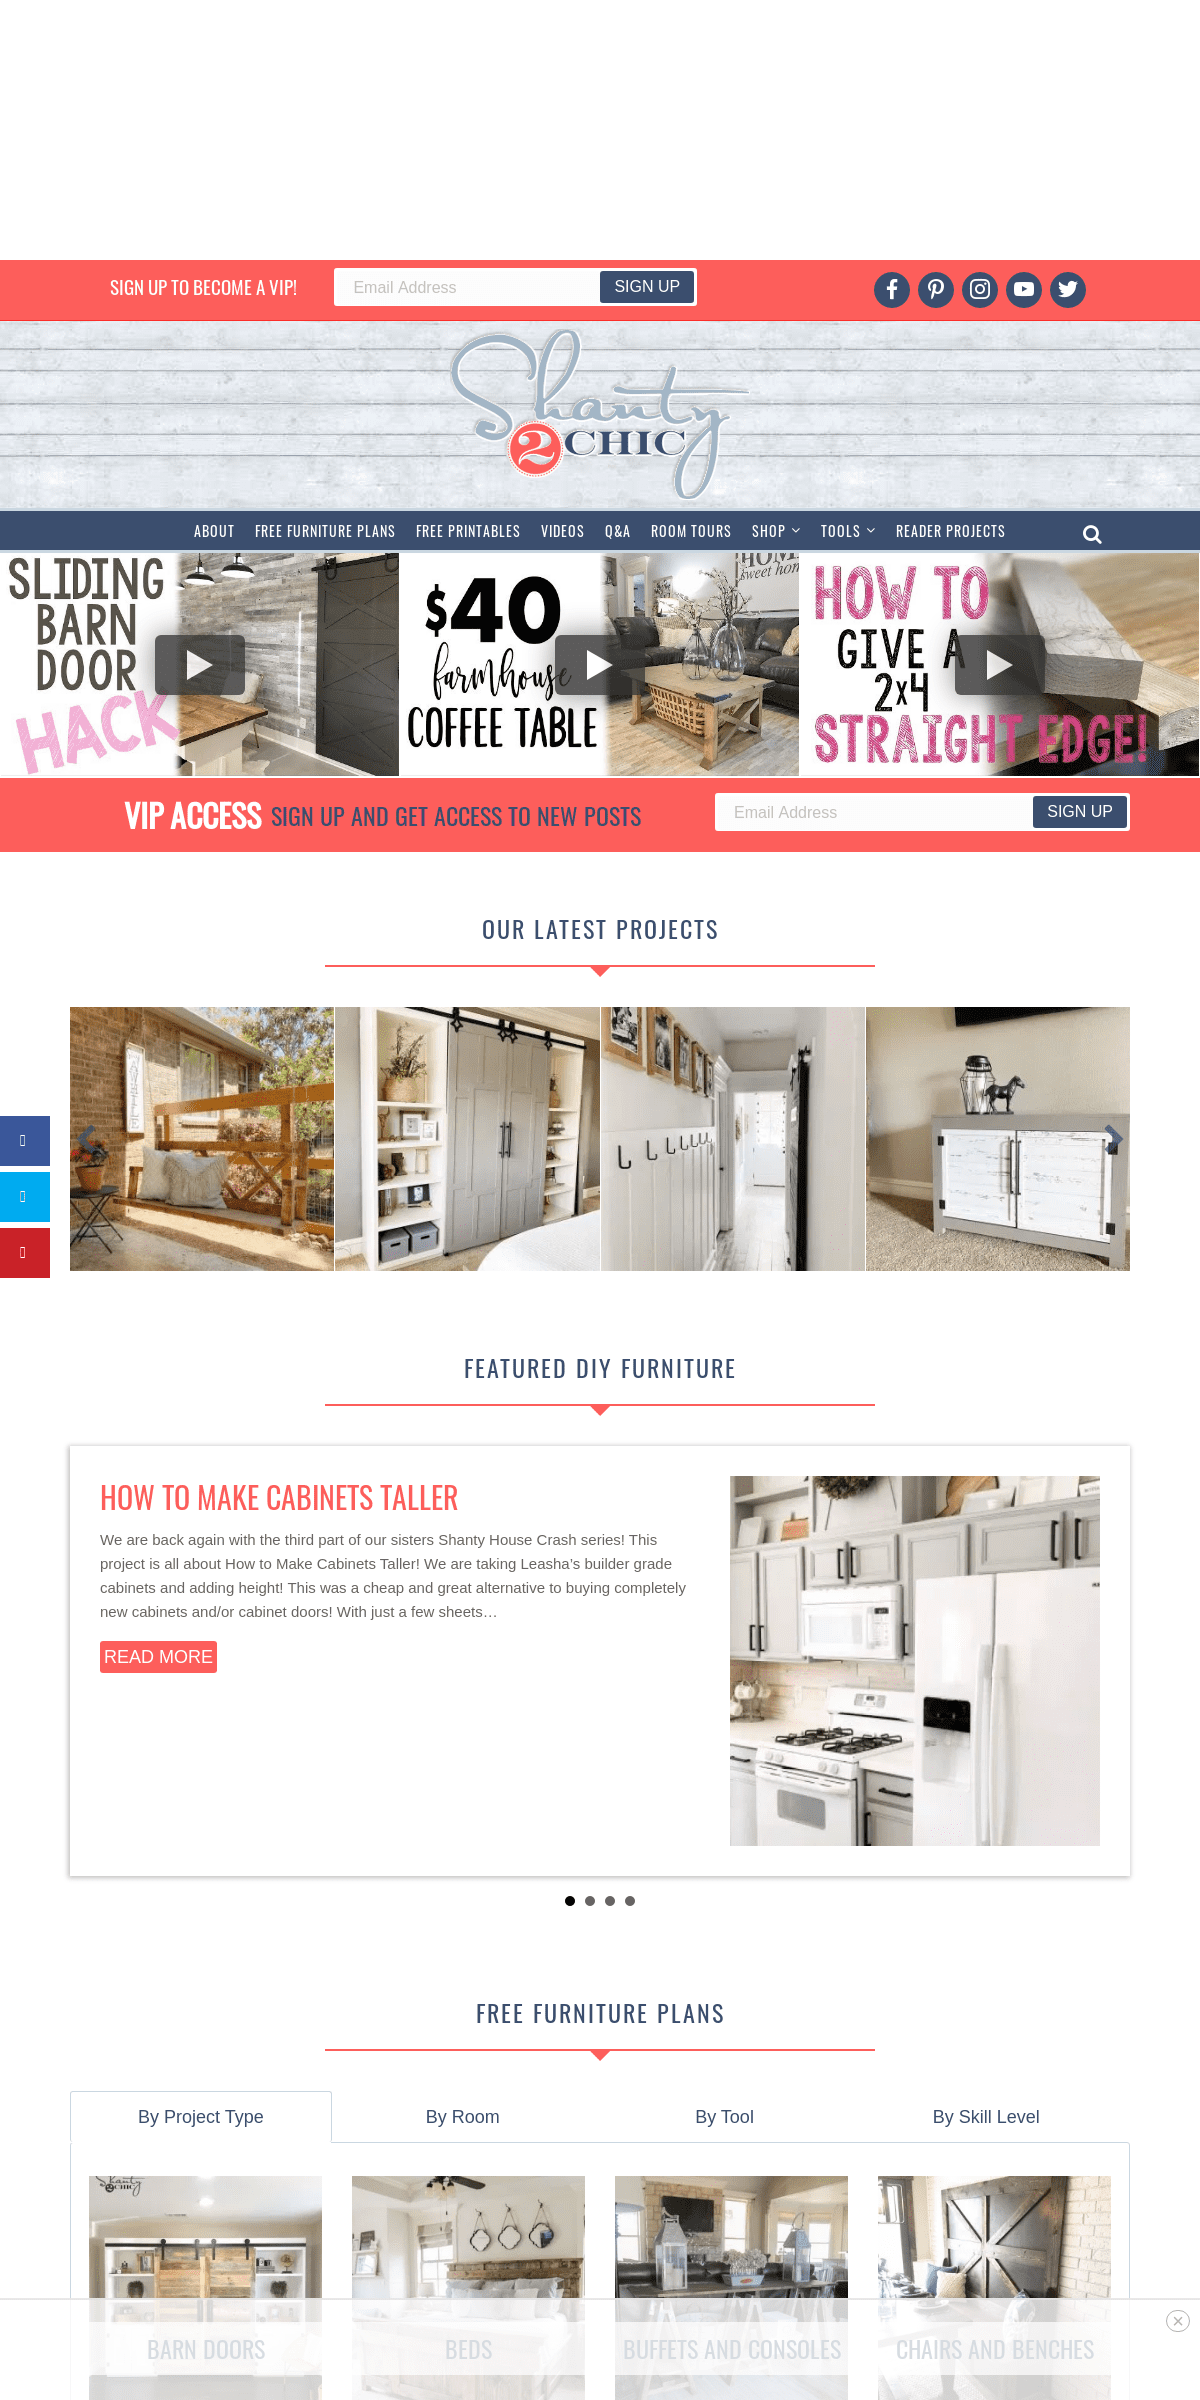
FEATURED DIY FURNITURE HOW TO MAKE CABINETS TALLER We are back again with the third part of our sisters Shanty House Crash series! This project is all about How to Make Cabinets Taller! We are taking Leasha’s builder grade cabinets and adding height! This was a cheap and great alternative to buying completely new cabinets and/or cabinet doors! With just a few sheets…READ MORE
DIY KITCHEN ISLAND
This DIY Kitchen Island might be one of our favorite builds yet! Not only is it one of our favorites, it’s also one of the largest pieces we have built together! The homeowners wanted a giant island to fill their new kitchen space. So, we got busy designing and building! You can watch the how-to…READ MORE
DIY $7 RUSTIC BLANKET LADDER If you are looking for an easy, beginner project, that will give you a lot of bang for your buck, look no further! All you need to build this guy is 3 boards, 2 tools and less than $10! You can download the FREE Printable Plans HERE and then grab a coffee and come build…READ MORE
SLIDING BARN DOOR NIGHTSTAND – DIY We are back to share the free plans for the DIY Sliding Barn Door Nightstand that we built with our $20 DIY Barn Door Hardware. If you missed that tutorial, you can find it HERE. I built a new Rustic Modern King Bed and I wanted something fun for my nightstands. I havealways thought…
READ MORE
1
2
3
4
FREE FURNITURE PLANSBy Project Type
By Room
By Tool
By Skill Level
By Project Type __
BARN DOORS
BEDS
BUFFETS AND CONSOLESCHAIRS AND BENCHES
CLOSET ORGANIZATION
COFFEE AND BAR FURNITURECOFFEE TABLES
DESKS
DINING TABLES
KIDS FURNITURE
LEASHA'S HOUSE CRASH NIGHTSTANDS AND DRESSERSOUTDOOR
PETS
SEASONAL
SHELVES
STORAGE SOLUTIONS
TABLETOP
WALLS AND MIRRORS
By Room __
BATHROOM
BEDROOM
CLOSET
DINING ROOM AND KITCHENENTRYWAY
LAUNDRY/MUDROOM
LIVING ROOM
OFFICE
PANTRY
PLAYROOM/GAMEROOM
WORKSHOP
By Tool __
DRILL
JIG SAW
KREG JIG
MITER SAW
NAILER
TABLE SAW
By Skill Level __
ADVANCED
BEGINNER
INTERMEDIATE
SHOP WITH US
SHOP BY ROOM
SHOP OUR FURNITURE
SHOP OUR FAVORITE FINDS*
AS SEEN IN
*
MAKE SURE TO FOLLOW US HERE __* youtube
0 0
DIY LADDER SHELF | A wood-working project I did along with my husband a few days ago. We wanted to give a home to our house plants and came across this Shelf somewhere on the web & finally made it. Never thought I’d enjoy woodworking so much . . . . Thank you shanty2chic for the easiest instructions. This is by far our favorite woodworking project. ❣️ 🔨 . . . #quarantineactivities #woodworkingproject #diyladdershelf #shanty2chic #houseplants #homedepot #quarentinelife #woodworkingcommunity #diyhomedecor #diyprojects #creativeminds #interiordecorating #readerdigest #interiormagazine #condenast #elledecor #houseplantsofinstagram #houseplantsclub #tinyhouseView on Instagram
0 1 Link to display lightbox Instagram post 18048460654243136 🔨🍷 Hand crafted, “shanty2chic inspired” side table & wine rack for the living room!! Absolutely loved making this multi piece table top with the old horse shoe + cheers to Dad for getting the base sorted #industrialdesign .. Ana and I had an awesome time using some bits of barn wood & Mum’s old horse reins to make our own lil wine rack too😅👏🏽 They’re not perfect by any means, but was an awesome use of iso spare time & learning new skills as we go ✅🤙🏽 #shanty2chic #diyhomedecor #rustic #girlswhobuild #oratleasttry #mistakesarelessons #woodworking #winerack #horseshoe#saddlery
View on Instagram
0 6 Link to display lightbox Instagram post 17853616927924971 🔨🍷 Hand crafted, “shanty2chic inspired” side table & wine rack for the living room!! Absolutely loved making this multi piece table top with the old horse shoe + cheers to Dad for getting the base sorted #industrialdesign .. Ana and I had an awesome time using some bits of barn wood & Mum’s old horse reins to make our own lil wine rack too😅👏🏽 They’re not perfect by any means, but was an awesome use of iso spare time & learning new skills as we go ✅🤙🏽 #shanty2chic #diyhomedecor #rustic #girlswhobuild #oratleasttry #mistakesarelessons #woodworking #winerack #horseshoe#saddlery
View on Instagram
0 6 Link to display lightbox Instagram post 17853616927924971 This error message is only visible to WordPress admins ERROR: ACCESS TOKEN FOR SHANTY2CHIC IS NOT VALID OR HAS EXPIRED. FEEDWILL NOT UPDATE.
There's an issue with the Instagram Access Token that you are using. Please obtain a new Access Token on the plugin's Settings page. __ VIP ACCESS - SIGN UP TO GET THE SCOOP FIRST! Leave this field empty if you're human:__ QUICK LINKS
* Home
* About Us
* Free Plans
* Videos
* Tools
* Reader Projects
* Questions & Answers* Privacy Policy
SHANTY 2 CHIC © 2018. ALL RIGHTS RESERVED. DESIGN AND HOSTING BYEVENPAR SOLUTIONS
__
*
*
×
An Elite CafeMedia Home/DIY PublisherPrevious Slide
Next Slide
__
__Share
Facebook__Twitter__Google Plus__Linkedin__Pinterest__Email____Instagram
__Hide photo (admin) Add ID to the HIDE SPECIFIC PHOTOS setting:__
Details
6