4
More Annotations


6


6
Favourite Annotations


1


5
Text
LETSCONTROLITMAINWIKIESPEASY The RFLink Gateway is the most versatile device with sophisticated AI technology offering a bridge between wireless devices and your home automation controller. Many RF devices are supported, like switches, wall sockets, door, window, temperature, wind and rain sensors, electricity meters, etc.. You can build your own low-cost RFLink
Gateway
EASYFORMULA
ESP Easy can use a simple formula to change the sensor value before it is send to the Home Automation controller. (In most cases this is not needed and in most cases this can also be accomplished within the Home Automation software)TUTORIAL RULES
Test As described in the trigger section the test is a check done by checking if the DeviceName#ValueName is meeting a criteria: Where the value must be a float value with a dot as decimal sign.EASYPROTOCOLS
Domoticz HTTP. This is the protocol that we have used to start building ESP Easy. And probably the most widely used in combination with ESP Easy. The protocol is supported by Domoticz out of the box so you don't need a special setup. The ESP communicates with Domoticz on it's default port 8080, but of course that can be changed. SLEEPMODE - LET'S CONTROL IT Temporary disable Deep Sleep via jumper setting. If 30 seconds is too short for you, you can use this method. Disconnect GPIO-16 from RST and connect it to GND. Restart your ESP if neccesary. Now deep sleep will be disabled and your ESP will function normally, until you connect GPIO-16 to RST again. This requires ESPEasy v2.0.0-dev6 ornewer.
BASICS: CONNECTING AND FLASHING THE ESP8266 Connect a 10 KOhm resistor between 3.3V (Vcc) and GPIO0. This sets the ESP8266 into run mode. Now you may connect the GPIO0 directly to ground for flashing. The fourth is the "reset" pin. It should be on "high", so put a 10 KOhm resistor between Vcc and reset pin. LCDDISPLAY - LET'S CONTROL IT Introduction. The ESP8266 module can be used to control an I2C LCD Display. Mainly to display sensor values locally. Hardware. Connect the LCD Display to the I2C interface.NEXTIONDISPLAY
TUTORIAL ARDUINO FIRMWARE UPLOAD 1 Download and installing the Arduino IDE. 2 Download ESP Easy Firmware. 2.1 Install libraries. 2.2 Compile and upload. 2.2.1 Selecting the plugin sets. 2.2.2 Selecting the correct board. 2.2.3 Selecting the correct flash size. 2.2.4 Select comport and upload. 3 Updating source files.DALLAS DS18B20
LETSCONTROLITMAINWIKIESPEASY The RFLink Gateway is the most versatile device with sophisticated AI technology offering a bridge between wireless devices and your home automation controller. Many RF devices are supported, like switches, wall sockets, door, window, temperature, wind and rain sensors, electricity meters, etc.. You can build your own low-cost RFLinkGateway
EASYFORMULA
ESP Easy can use a simple formula to change the sensor value before it is send to the Home Automation controller. (In most cases this is not needed and in most cases this can also be accomplished within the Home Automation software)TUTORIAL RULES
Test As described in the trigger section the test is a check done by checking if the DeviceName#ValueName is meeting a criteria: Where the value must be a float value with a dot as decimal sign.EASYPROTOCOLS
Domoticz HTTP. This is the protocol that we have used to start building ESP Easy. And probably the most widely used in combination with ESP Easy. The protocol is supported by Domoticz out of the box so you don't need a special setup. The ESP communicates with Domoticz on it's default port 8080, but of course that can be changed. SLEEPMODE - LET'S CONTROL IT Temporary disable Deep Sleep via jumper setting. If 30 seconds is too short for you, you can use this method. Disconnect GPIO-16 from RST and connect it to GND. Restart your ESP if neccesary. Now deep sleep will be disabled and your ESP will function normally, until you connect GPIO-16 to RST again. This requires ESPEasy v2.0.0-dev6 ornewer.
BASICS: CONNECTING AND FLASHING THE ESP8266 Connect a 10 KOhm resistor between 3.3V (Vcc) and GPIO0. This sets the ESP8266 into run mode. Now you may connect the GPIO0 directly to ground for flashing. The fourth is the "reset" pin. It should be on "high", so put a 10 KOhm resistor between Vcc and reset pin. LCDDISPLAY - LET'S CONTROL IT Introduction. The ESP8266 module can be used to control an I2C LCD Display. Mainly to display sensor values locally. Hardware. Connect the LCD Display to the I2C interface.NEXTIONDISPLAY
TUTORIAL ARDUINO FIRMWARE UPLOAD 1 Download and installing the Arduino IDE. 2 Download ESP Easy Firmware. 2.1 Install libraries. 2.2 Compile and upload. 2.2.1 Selecting the plugin sets. 2.2.2 Selecting the correct board. 2.2.3 Selecting the correct flash size. 2.2.4 Select comport and upload. 3 Updating source files.DALLAS DS18B20
DEVICES - LET'S CONTROL IT Temperature (-55 to +125°C) 3.3V - 5V. 1 digital GPIO for multiple sensors. 1wire bus. N/A. no. (yes if you use 5V logic and the ESP unit can't handle that voltage on GPIO) None but could be placed in a metal "pipe"/protective sleeve. Ø4.6mm x L4.6mm. BASICS: CALIBRATION AND ACCURACY Fill the thermos jug half with water and put some ice cubes into it, put your sensor into the ice/water mix and wait - at least 1530 minutes. Just stir or shake the jug now and then to avoid different layers of temperature. Now note the temperature you read from the sensor. Let's say it is 0.3° C for an example.OLEDDISPLAY
ESP Easy. Use the device tab on the ESP Easy webinterface and create a new task by editing one of the available tasks. Select "Display - OLED 1306" from the dropdown box. Enter template texts into lines 1 to 8. Plain text will be shown on the display exactly as entered. If you want to show a value, enclose and betweenNEXTIONDISPLAY
The Nextion software module provides the use of a software serial port. So, it is not required to use the 'native'Tx and Rx ports of the controller. This display works with 5V and can be connected directly to the ESP module. The Tx pin of the Nextion is regulated to 3.3v making it safe to directly connect. BASICS: CONNECTING AND FLASHING THE ESP8266 Connect a 10 KOhm resistor between 3.3V (Vcc) and GPIO0. This sets the ESP8266 into run mode. Now you may connect the GPIO0 directly to ground for flashing. The fourth is the "reset" pin. It should be on "high", so put a 10 KOhm resistor between Vcc and reset pin. BASICS: THE I²C BUS I²C was developed by Philips Semiconductors (Today named NXP) as a bus for the internal communication between parts of a device, mainly a controller and it's peripherals. Originally it was used to control the electronics of TV sets and CD players. from a central controller boardinside the box.
ESP EASY WEB INTERFACE ESP Easy web interface. The ESP Easy has a user-friendly web interface for all configuration settings. They are locally stored in flash memory and retained on power-off. Do NOT expose the ESP Easy web interface directly to the internet, always make sure that the web interface is only reachable from "trusted/local" networks! We willexplain all
WIEGAND-26 - LET'S CONTROL IT The Wiegand-26 RFID TAG Reader can be found on eBay. Please note that the outputs uses 5 volts signals and they should not directly be connected to the ESP. Use a level shifter! This is just a sample of an RFID reader using the Wiegand-26 protocol. This Wiegand-26 RFID Reader works with tags compliant with EM4001 ISO standard, on a frequentieDALLAS DS18B20
The DS18B20 manufactured by Dallas and Maxxim is a very simple to use temperature sensor with a tolerance of +/- 0.5°C. (Remember: Cheap remakes from chinese market might have bigger tolerance and also might have different pinouts) It's advantages: Very simple to use due to "One Wire" data protocol. Chainable, it is possible to chain up to 100 ESPEASY COMMAND REFERENCE Commands are divided into several classes: . Internal - Can be run from serial and rules engine Rules - Can be run from serial and rules engine Plugin - Can be run from serial, rules engine, HTTP, MQTT Special - This can be used from any source . If you want to use internal or rules commands using HTTP/MQTT, setup an event within the rules section and remotely launch the "event" command. LETSCONTROLITMAINWIKIESPEASY The RFLink Gateway is the most versatile device with sophisticated AI technology offering a bridge between wireless devices and your home automation controller. Many RF devices are supported, like switches, wall sockets, door, window, temperature, wind and rain sensors, electricity meters, etc.. You can build your own low-cost RFLinkGateway
TUTORIAL RULES
Test As described in the trigger section the test is a check done by checking if the DeviceName#ValueName is meeting a criteria: Where the value must be a float value with a dot as decimal sign. BASICS: CALIBRATION AND ACCURACY Fill the thermos jug half with water and put some ice cubes into it, put your sensor into the ice/water mix and wait - at least 1530 minutes. Just stir or shake the jug now and then to avoid different layers of temperature. Now note the temperature you read from the sensor. Let's say it is 0.3° C for an example.EASYPROTOCOLS
Domoticz HTTP. This is the protocol that we have used to start building ESP Easy. And probably the most widely used in combination with ESP Easy. The protocol is supported by Domoticz out of the box so you don't need a special setup. The ESP communicates with Domoticz on it's default port 8080, but of course that can be changed.OLEDDISPLAY
ESP Easy. Use the device tab on the ESP Easy webinterface and create a new task by editing one of the available tasks. Select "Display - OLED 1306" from the dropdown box. Enter template texts into lines 1 to 8. Plain text will be shown on the display exactly as entered. If you want to show a value, enclose and between SLEEPMODE - LET'S CONTROL IT Temporary disable Deep Sleep via jumper setting. If 30 seconds is too short for you, you can use this method. Disconnect GPIO-16 from RST and connect it to GND. Restart your ESP if neccesary. Now deep sleep will be disabled and your ESP will function normally, until you connect GPIO-16 to RST again. This requires ESPEasy v2.0.0-dev6 ornewer.
LCDDISPLAY - LET'S CONTROL IT Introduction. The ESP8266 module can be used to control an I2C LCD Display. Mainly to display sensor values locally. Hardware. Connect the LCD Display to the I2C interface. BASICS: CONNECTING AND FLASHING THE ESP8266 Connect a 10 KOhm resistor between 3.3V (Vcc) and GPIO0. This sets the ESP8266 into run mode. Now you may connect the GPIO0 directly to ground for flashing. The fourth is the "reset" pin. It should be on "high", so put a 10 KOhm resistor between Vcc and reset pin.NEXTIONDISPLAY
TUTORIAL ARDUINO FIRMWARE UPLOAD 1 Download and installing the Arduino IDE. 2 Download ESP Easy Firmware. 2.1 Install libraries. 2.2 Compile and upload. 2.2.1 Selecting the plugin sets. 2.2.2 Selecting the correct board. 2.2.3 Selecting the correct flash size. 2.2.4 Select comport and upload. 3 Updating source files. LETSCONTROLITMAINWIKIESPEASY The RFLink Gateway is the most versatile device with sophisticated AI technology offering a bridge between wireless devices and your home automation controller. Many RF devices are supported, like switches, wall sockets, door, window, temperature, wind and rain sensors, electricity meters, etc.. You can build your own low-cost RFLinkGateway
TUTORIAL RULES
Test As described in the trigger section the test is a check done by checking if the DeviceName#ValueName is meeting a criteria: Where the value must be a float value with a dot as decimal sign. BASICS: CALIBRATION AND ACCURACY Fill the thermos jug half with water and put some ice cubes into it, put your sensor into the ice/water mix and wait - at least 1530 minutes. Just stir or shake the jug now and then to avoid different layers of temperature. Now note the temperature you read from the sensor. Let's say it is 0.3° C for an example.EASYPROTOCOLS
Domoticz HTTP. This is the protocol that we have used to start building ESP Easy. And probably the most widely used in combination with ESP Easy. The protocol is supported by Domoticz out of the box so you don't need a special setup. The ESP communicates with Domoticz on it's default port 8080, but of course that can be changed.OLEDDISPLAY
ESP Easy. Use the device tab on the ESP Easy webinterface and create a new task by editing one of the available tasks. Select "Display - OLED 1306" from the dropdown box. Enter template texts into lines 1 to 8. Plain text will be shown on the display exactly as entered. If you want to show a value, enclose and between SLEEPMODE - LET'S CONTROL IT Temporary disable Deep Sleep via jumper setting. If 30 seconds is too short for you, you can use this method. Disconnect GPIO-16 from RST and connect it to GND. Restart your ESP if neccesary. Now deep sleep will be disabled and your ESP will function normally, until you connect GPIO-16 to RST again. This requires ESPEasy v2.0.0-dev6 ornewer.
LCDDISPLAY - LET'S CONTROL IT Introduction. The ESP8266 module can be used to control an I2C LCD Display. Mainly to display sensor values locally. Hardware. Connect the LCD Display to the I2C interface. BASICS: CONNECTING AND FLASHING THE ESP8266 Connect a 10 KOhm resistor between 3.3V (Vcc) and GPIO0. This sets the ESP8266 into run mode. Now you may connect the GPIO0 directly to ground for flashing. The fourth is the "reset" pin. It should be on "high", so put a 10 KOhm resistor between Vcc and reset pin.NEXTIONDISPLAY
TUTORIAL ARDUINO FIRMWARE UPLOAD 1 Download and installing the Arduino IDE. 2 Download ESP Easy Firmware. 2.1 Install libraries. 2.2 Compile and upload. 2.2.1 Selecting the plugin sets. 2.2.2 Selecting the correct board. 2.2.3 Selecting the correct flash size. 2.2.4 Select comport and upload. 3 Updating source files. DEVICES - LET'S CONTROL IT Temperature (-55 to +125°C) 3.3V - 5V. 1 digital GPIO for multiple sensors. 1wire bus. N/A. no. (yes if you use 5V logic and the ESP unit can't handle that voltage on GPIO) None but could be placed in a metal "pipe"/protective sleeve. Ø4.6mm x L4.6mm.LET'S CONTROL IT
Who is online. In total there are 82 users online :: 2 registered, 0 hidden and 80 guests (based on users active over the past 5 minutes) Most users ever online was 1571 on 17 Mar 2020, 22:48. Registered users: Bing , Google Legend: Administrators, Globalmoderators.
BASICS: CALIBRATION AND ACCURACY Fill the thermos jug half with water and put some ice cubes into it, put your sensor into the ice/water mix and wait - at least 1530 minutes. Just stir or shake the jug now and then to avoid different layers of temperature. Now note the temperature you read from the sensor. Let's say it is 0.3° C for an example. EASYSETUP - LET'S CONTROL IT Select your own Access Point and enter the WPA key in the password field. Click the connect button. The ESP will try to connect to your private Wifi network. If the connection succeeded, you will see the following screen, listing it's new local IP address. You can now reconnect your laptop or other device back to your private Wifinetwork.
OLEDDISPLAY
ESP Easy. Use the device tab on the ESP Easy webinterface and create a new task by editing one of the available tasks. Select "Display - OLED 1306" from the dropdown box. Enter template texts into lines 1 to 8. Plain text will be shown on the display exactly as entered. If you want to show a value, enclose and between BASICS: CONNECTING AND FLASHING THE ESP8266 Connect a 10 KOhm resistor between 3.3V (Vcc) and GPIO0. This sets the ESP8266 into run mode. Now you may connect the GPIO0 directly to ground for flashing. The fourth is the "reset" pin. It should be on "high", so put a 10 KOhm resistor between Vcc and reset pin. ESP EASY WEB INTERFACE ESP Easy web interface. The ESP Easy has a user-friendly web interface for all configuration settings. They are locally stored in flash memory and retained on power-off. Do NOT expose the ESP Easy web interface directly to the internet, always make sure that the web interface is only reachable from "trusted/local" networks! We willexplain all
WIEGAND-26 - LET'S CONTROL IT The Wiegand-26 RFID TAG Reader can be found on eBay. Please note that the outputs uses 5 volts signals and they should not directly be connected to the ESP. Use a level shifter! This is just a sample of an RFID reader using the Wiegand-26 protocol. This Wiegand-26 RFID Reader works with tags compliant with EM4001 ISO standard, on a frequentie ESPEASY COMMAND REFERENCE Commands are divided into several classes: . Internal - Can be run from serial and rules engine Rules - Can be run from serial and rules engine Plugin - Can be run from serial, rules engine, HTTP, MQTT Special - This can be used from any source . If you want to use internal or rules commands using HTTP/MQTT, setup an event within the rules section and remotely launch the "event" command.DALLAS DS18B20
The DS18B20 manufactured by Dallas and Maxxim is a very simple to use temperature sensor with a tolerance of +/- 0.5°C. (Remember: Cheap remakes from chinese market might have bigger tolerance and also might have different pinouts) It's advantages: Very simple to use due to "One Wire" data protocol. Chainable, it is possible to chain up to 100 LETSCONTROLITMAINWIKIESPEASY The RFLink Gateway is the most versatile device with sophisticated AI technology offering a bridge between wireless devices and your home automation controller. Many RF devices are supported, like switches, wall sockets, door, window, temperature, wind and rain sensors, electricity meters, etc.. You can build your own low-cost RFLinkGateway
TUTORIAL RULES
Test As described in the trigger section the test is a check done by checking if the DeviceName#ValueName is meeting a criteria: Where the value must be a float value with a dot as decimal sign. BASICS: CALIBRATION AND ACCURACY Fill the thermos jug half with water and put some ice cubes into it, put your sensor into the ice/water mix and wait - at least 1530 minutes. Just stir or shake the jug now and then to avoid different layers of temperature. Now note the temperature you read from the sensor. Let's say it is 0.3° C for an example.EASYPROTOCOLS
Domoticz HTTP. This is the protocol that we have used to start building ESP Easy. And probably the most widely used in combination with ESP Easy. The protocol is supported by Domoticz out of the box so you don't need a special setup. The ESP communicates with Domoticz on it's default port 8080, but of course that can be changed.OLEDDISPLAY
ESP Easy. Use the device tab on the ESP Easy webinterface and create a new task by editing one of the available tasks. Select "Display - OLED 1306" from the dropdown box. Enter template texts into lines 1 to 8. Plain text will be shown on the display exactly as entered. If you want to show a value, enclose and between SLEEPMODE - LET'S CONTROL IT Temporary disable Deep Sleep via jumper setting. If 30 seconds is too short for you, you can use this method. Disconnect GPIO-16 from RST and connect it to GND. Restart your ESP if neccesary. Now deep sleep will be disabled and your ESP will function normally, until you connect GPIO-16 to RST again. This requires ESPEasy v2.0.0-dev6 ornewer.
LCDDISPLAY - LET'S CONTROL IT Introduction. The ESP8266 module can be used to control an I2C LCD Display. Mainly to display sensor values locally. Hardware. Connect the LCD Display to the I2C interface. BASICS: CONNECTING AND FLASHING THE ESP8266 Connect a 10 KOhm resistor between 3.3V (Vcc) and GPIO0. This sets the ESP8266 into run mode. Now you may connect the GPIO0 directly to ground for flashing. The fourth is the "reset" pin. It should be on "high", so put a 10 KOhm resistor between Vcc and reset pin.NEXTIONDISPLAY
TUTORIAL ARDUINO FIRMWARE UPLOAD 1 Download and installing the Arduino IDE. 2 Download ESP Easy Firmware. 2.1 Install libraries. 2.2 Compile and upload. 2.2.1 Selecting the plugin sets. 2.2.2 Selecting the correct board. 2.2.3 Selecting the correct flash size. 2.2.4 Select comport and upload. 3 Updating source files. LETSCONTROLITMAINWIKIESPEASY The RFLink Gateway is the most versatile device with sophisticated AI technology offering a bridge between wireless devices and your home automation controller. Many RF devices are supported, like switches, wall sockets, door, window, temperature, wind and rain sensors, electricity meters, etc.. You can build your own low-cost RFLinkGateway
TUTORIAL RULES
Test As described in the trigger section the test is a check done by checking if the DeviceName#ValueName is meeting a criteria: Where the value must be a float value with a dot as decimal sign. BASICS: CALIBRATION AND ACCURACY Fill the thermos jug half with water and put some ice cubes into it, put your sensor into the ice/water mix and wait - at least 1530 minutes. Just stir or shake the jug now and then to avoid different layers of temperature. Now note the temperature you read from the sensor. Let's say it is 0.3° C for an example.EASYPROTOCOLS
Domoticz HTTP. This is the protocol that we have used to start building ESP Easy. And probably the most widely used in combination with ESP Easy. The protocol is supported by Domoticz out of the box so you don't need a special setup. The ESP communicates with Domoticz on it's default port 8080, but of course that can be changed.OLEDDISPLAY
ESP Easy. Use the device tab on the ESP Easy webinterface and create a new task by editing one of the available tasks. Select "Display - OLED 1306" from the dropdown box. Enter template texts into lines 1 to 8. Plain text will be shown on the display exactly as entered. If you want to show a value, enclose and between SLEEPMODE - LET'S CONTROL IT Temporary disable Deep Sleep via jumper setting. If 30 seconds is too short for you, you can use this method. Disconnect GPIO-16 from RST and connect it to GND. Restart your ESP if neccesary. Now deep sleep will be disabled and your ESP will function normally, until you connect GPIO-16 to RST again. This requires ESPEasy v2.0.0-dev6 ornewer.
LCDDISPLAY - LET'S CONTROL IT Introduction. The ESP8266 module can be used to control an I2C LCD Display. Mainly to display sensor values locally. Hardware. Connect the LCD Display to the I2C interface. BASICS: CONNECTING AND FLASHING THE ESP8266 Connect a 10 KOhm resistor between 3.3V (Vcc) and GPIO0. This sets the ESP8266 into run mode. Now you may connect the GPIO0 directly to ground for flashing. The fourth is the "reset" pin. It should be on "high", so put a 10 KOhm resistor between Vcc and reset pin.NEXTIONDISPLAY
TUTORIAL ARDUINO FIRMWARE UPLOAD 1 Download and installing the Arduino IDE. 2 Download ESP Easy Firmware. 2.1 Install libraries. 2.2 Compile and upload. 2.2.1 Selecting the plugin sets. 2.2.2 Selecting the correct board. 2.2.3 Selecting the correct flash size. 2.2.4 Select comport and upload. 3 Updating source files. DEVICES - LET'S CONTROL IT Temperature (-55 to +125°C) 3.3V - 5V. 1 digital GPIO for multiple sensors. 1wire bus. N/A. no. (yes if you use 5V logic and the ESP unit can't handle that voltage on GPIO) None but could be placed in a metal "pipe"/protective sleeve. Ø4.6mm x L4.6mm.LET'S CONTROL IT
Who is online. In total there are 82 users online :: 2 registered, 0 hidden and 80 guests (based on users active over the past 5 minutes) Most users ever online was 1571 on 17 Mar 2020, 22:48. Registered users: Bing , Google Legend: Administrators, Globalmoderators.
BASICS: CALIBRATION AND ACCURACY Fill the thermos jug half with water and put some ice cubes into it, put your sensor into the ice/water mix and wait - at least 1530 minutes. Just stir or shake the jug now and then to avoid different layers of temperature. Now note the temperature you read from the sensor. Let's say it is 0.3° C for an example. EASYSETUP - LET'S CONTROL IT Select your own Access Point and enter the WPA key in the password field. Click the connect button. The ESP will try to connect to your private Wifi network. If the connection succeeded, you will see the following screen, listing it's new local IP address. You can now reconnect your laptop or other device back to your private Wifinetwork.
OLEDDISPLAY
ESP Easy. Use the device tab on the ESP Easy webinterface and create a new task by editing one of the available tasks. Select "Display - OLED 1306" from the dropdown box. Enter template texts into lines 1 to 8. Plain text will be shown on the display exactly as entered. If you want to show a value, enclose and between BASICS: CONNECTING AND FLASHING THE ESP8266 Connect a 10 KOhm resistor between 3.3V (Vcc) and GPIO0. This sets the ESP8266 into run mode. Now you may connect the GPIO0 directly to ground for flashing. The fourth is the "reset" pin. It should be on "high", so put a 10 KOhm resistor between Vcc and reset pin. ESP EASY WEB INTERFACE ESP Easy web interface. The ESP Easy has a user-friendly web interface for all configuration settings. They are locally stored in flash memory and retained on power-off. Do NOT expose the ESP Easy web interface directly to the internet, always make sure that the web interface is only reachable from "trusted/local" networks! We willexplain all
WIEGAND-26 - LET'S CONTROL IT The Wiegand-26 RFID TAG Reader can be found on eBay. Please note that the outputs uses 5 volts signals and they should not directly be connected to the ESP. Use a level shifter! This is just a sample of an RFID reader using the Wiegand-26 protocol. This Wiegand-26 RFID Reader works with tags compliant with EM4001 ISO standard, on a frequentie ESPEASY COMMAND REFERENCE Commands are divided into several classes: . Internal - Can be run from serial and rules engine Rules - Can be run from serial and rules engine Plugin - Can be run from serial, rules engine, HTTP, MQTT Special - This can be used from any source . If you want to use internal or rules commands using HTTP/MQTT, setup an event within the rules section and remotely launch the "event" command.DALLAS DS18B20
The DS18B20 manufactured by Dallas and Maxxim is a very simple to use temperature sensor with a tolerance of +/- 0.5°C. (Remember: Cheap remakes from chinese market might have bigger tolerance and also might have different pinouts) It's advantages: Very simple to use due to "One Wire" data protocol. Chainable, it is possible to chain up to 100 BASICS: CALIBRATION AND ACCURACY Fill the thermos jug half with water and put some ice cubes into it, put your sensor into the ice/water mix and wait - at least 1530 minutes. Just stir or shake the jug now and then to avoid different layers of temperature. Now note the temperature you read from the sensor. Let's say it is 0.3° C for an example.TUTORIAL RULES
Test As described in the trigger section the test is a check done by checking if the DeviceName#ValueName is meeting a criteria: Where the value must be a float value with a dot as decimal sign.OLEDDISPLAY
ESP Easy. Use the device tab on the ESP Easy webinterface and create a new task by editing one of the available tasks. Select "Display - OLED 1306" from the dropdown box. Enter template texts into lines 1 to 8. Plain text will be shown on the display exactly as entered. If you want to show a value, enclose and between WIEGAND-26 - LET'S CONTROL IT The Wiegand-26 RFID TAG Reader can be found on eBay. Please note that the outputs uses 5 volts signals and they should not directly be connected to the ESP. Use a level shifter! This is just a sample of an RFID reader using the Wiegand-26 protocol. This Wiegand-26 RFID Reader works with tags compliant with EM4001 ISO standard, on a frequentie SLEEPMODE - LET'S CONTROL IT Temporary disable Deep Sleep via jumper setting. If 30 seconds is too short for you, you can use this method. Disconnect GPIO-16 from RST and connect it to GND. Restart your ESP if neccesary. Now deep sleep will be disabled and your ESP will function normally, until you connect GPIO-16 to RST again. This requires ESPEasy v2.0.0-dev6 ornewer.
NEXTIONDISPLAY
7 SEGMENT DISPLAY
BASICS: TAMING FALSE POSITIVES "SOIL MOISTURE SENSOR" ESP Easy. Use the device tab on the ESP Easy webinterface and create a new task by editing one of the available tasks. Select "Moisture & Temperature & Light I2C Soil moisture sensor" from the dropdown box. Enter the i2c address of you sensor, default value 0x20. RCWL-0516 MICROWAVE MOTION SENSOR Introduction. Similiar to PIR sensors a microwave sensor can be used to detect moving persons. The sensor works based on the same function as a radar, just smaller. BASICS: CALIBRATION AND ACCURACY Fill the thermos jug half with water and put some ice cubes into it, put your sensor into the ice/water mix and wait - at least 1530 minutes. Just stir or shake the jug now and then to avoid different layers of temperature. Now note the temperature you read from the sensor. Let's say it is 0.3° C for an example.TUTORIAL RULES
Test As described in the trigger section the test is a check done by checking if the DeviceName#ValueName is meeting a criteria: Where the value must be a float value with a dot as decimal sign.OLEDDISPLAY
ESP Easy. Use the device tab on the ESP Easy webinterface and create a new task by editing one of the available tasks. Select "Display - OLED 1306" from the dropdown box. Enter template texts into lines 1 to 8. Plain text will be shown on the display exactly as entered. If you want to show a value, enclose and between WIEGAND-26 - LET'S CONTROL IT The Wiegand-26 RFID TAG Reader can be found on eBay. Please note that the outputs uses 5 volts signals and they should not directly be connected to the ESP. Use a level shifter! This is just a sample of an RFID reader using the Wiegand-26 protocol. This Wiegand-26 RFID Reader works with tags compliant with EM4001 ISO standard, on a frequentie SLEEPMODE - LET'S CONTROL IT Temporary disable Deep Sleep via jumper setting. If 30 seconds is too short for you, you can use this method. Disconnect GPIO-16 from RST and connect it to GND. Restart your ESP if neccesary. Now deep sleep will be disabled and your ESP will function normally, until you connect GPIO-16 to RST again. This requires ESPEasy v2.0.0-dev6 ornewer.
NEXTIONDISPLAY
7 SEGMENT DISPLAY
BASICS: TAMING FALSE POSITIVES "SOIL MOISTURE SENSOR" ESP Easy. Use the device tab on the ESP Easy webinterface and create a new task by editing one of the available tasks. Select "Moisture & Temperature & Light I2C Soil moisture sensor" from the dropdown box. Enter the i2c address of you sensor, default value 0x20. RCWL-0516 MICROWAVE MOTION SENSOR Introduction. Similiar to PIR sensors a microwave sensor can be used to detect moving persons. The sensor works based on the same function as a radar, just smaller.LETSCONTROLIT
The RFLink Gateway is the most versatile device with sophisticated AI technology offering a bridge between wireless devices and your home automation controller. Many RF devices are supported, like switches, wall sockets, door, window, temperature, wind and rain sensors, electricity meters, etc.. You can build your own low-cost RFLinkGateway
BASICS: CALIBRATION AND ACCURACY Fill the thermos jug half with water and put some ice cubes into it, put your sensor into the ice/water mix and wait - at least 1530 minutes. Just stir or shake the jug now and then to avoid different layers of temperature. Now note the temperature you read from the sensor. Let's say it is 0.3° C for an example. EASYSETUP - LET'S CONTROL IT Select your own Access Point and enter the WPA key in the password field. Click the connect button. The ESP will try to connect to your private Wifi network. If the connection succeeded, you will see the following screen, listing it's new local IP address. You can now reconnect your laptop or other device back to your private Wifinetwork.
EASYPROTOCOLS
Domoticz HTTP. This is the protocol that we have used to start building ESP Easy. And probably the most widely used in combination with ESP Easy. The protocol is supported by Domoticz out of the box so you don't need a special setup. The ESP communicates with Domoticz on it's default port 8080, but of course that can be changed. LCDDISPLAY - LET'S CONTROL IT Introduction. The ESP8266 module can be used to control an I2C LCD Display. Mainly to display sensor values locally. Hardware. Connect the LCD Display to the I2C interface.NEXTIONDISPLAY
The Nextion software module provides the use of a software serial port. So, it is not required to use the 'native'Tx and Rx ports of the controller. This display works with 5V and can be connected directly to the ESP module. The Tx pin of the Nextion is regulated to 3.3v making it safe to directly connect. BASICS: TAMING FALSE POSITIVES No false positive, just badly placed sensor. It is possible to "shield" a microwave sensor with aluminium foil in the case or to use a case partly made of metal. The sensor will detect only to the directions where no foil or metal resides. Keep at least 35 centimeters of distance between shielding and sensor. "SOIL MOISTURE SENSOR" ESP Easy. Use the device tab on the ESP Easy webinterface and create a new task by editing one of the available tasks. Select "Moisture & Temperature & Light I2C Soil moisture sensor" from the dropdown box. Enter the i2c address of you sensor, default value 0x20. MP3 PLAYER - LET'S CONTROL IT The ESP module can control the MP3-player module "DRPlayer Mini (DFR0299/YX5200)" and the "YX5300" module with 3.5mm output for speaker (s). Other than MP3 (sampling frequencies up to 48kHz) WAV files are also supported. The file names can be whatever but if you would like to be sure to play the correct file you should use thefollowing name
ADS1115 - LET'S CONTROL IT Use the device tab on the ESP Easy webinterface and create a new task by editing one of the available tasks. Select "Analog input - ADS1115" from the dropdown box. Enter the IDX found in the Domoticz device page. Also select the port on the ADS1115 that you want to read(Numbered 0 -
BASICS: CALIBRATION AND ACCURACY Fill the thermos jug half with water and put some ice cubes into it, put your sensor into the ice/water mix and wait - at least 1530 minutes. Just stir or shake the jug now and then to avoid different layers of temperature. Now note the temperature you read from the sensor. Let's say it is 0.3° C for an example.TUTORIAL RULES
Test As described in the trigger section the test is a check done by checking if the DeviceName#ValueName is meeting a criteria: Where the value must be a float value with a dot as decimal sign.OLEDDISPLAY
ESP Easy. Use the device tab on the ESP Easy webinterface and create a new task by editing one of the available tasks. Select "Display - OLED 1306" from the dropdown box. Enter template texts into lines 1 to 8. Plain text will be shown on the display exactly as entered. If you want to show a value, enclose and betweenEASYPROTOCOLS
Domoticz HTTP. This is the protocol that we have used to start building ESP Easy. And probably the most widely used in combination with ESP Easy. The protocol is supported by Domoticz out of the box so you don't need a special setup. The ESP communicates with Domoticz on it's default port 8080, but of course that can be changed. LCDDISPLAY - LET'S CONTROL IT Introduction. The ESP8266 module can be used to control an I2C LCD Display. Mainly to display sensor values locally. Hardware. Connect the LCD Display to the I2C interface. WIEGAND-26 - LET'S CONTROL IT The Wiegand-26 RFID TAG Reader can be found on eBay. Please note that the outputs uses 5 volts signals and they should not directly be connected to the ESP. Use a level shifter! This is just a sample of an RFID reader using the Wiegand-26 protocol. This Wiegand-26 RFID Reader works with tags compliant with EM4001 ISO standard, on a frequentie SLEEPMODE - LET'S CONTROL IT Temporary disable Deep Sleep via jumper setting. If 30 seconds is too short for you, you can use this method. Disconnect GPIO-16 from RST and connect it to GND. Restart your ESP if neccesary. Now deep sleep will be disabled and your ESP will function normally, until you connect GPIO-16 to RST again. This requires ESPEasy v2.0.0-dev6 ornewer.
7 SEGMENT DISPLAY
BASICS: TAMING FALSE POSITIVES "SOIL MOISTURE SENSOR" ESP Easy. Use the device tab on the ESP Easy webinterface and create a new task by editing one of the available tasks. Select "Moisture & Temperature & Light I2C Soil moisture sensor" from the dropdown box. Enter the i2c address of you sensor, default value 0x20. BASICS: CALIBRATION AND ACCURACY Fill the thermos jug half with water and put some ice cubes into it, put your sensor into the ice/water mix and wait - at least 1530 minutes. Just stir or shake the jug now and then to avoid different layers of temperature. Now note the temperature you read from the sensor. Let's say it is 0.3° C for an example.TUTORIAL RULES
Test As described in the trigger section the test is a check done by checking if the DeviceName#ValueName is meeting a criteria: Where the value must be a float value with a dot as decimal sign.OLEDDISPLAY
ESP Easy. Use the device tab on the ESP Easy webinterface and create a new task by editing one of the available tasks. Select "Display - OLED 1306" from the dropdown box. Enter template texts into lines 1 to 8. Plain text will be shown on the display exactly as entered. If you want to show a value, enclose and betweenEASYPROTOCOLS
Domoticz HTTP. This is the protocol that we have used to start building ESP Easy. And probably the most widely used in combination with ESP Easy. The protocol is supported by Domoticz out of the box so you don't need a special setup. The ESP communicates with Domoticz on it's default port 8080, but of course that can be changed. LCDDISPLAY - LET'S CONTROL IT Introduction. The ESP8266 module can be used to control an I2C LCD Display. Mainly to display sensor values locally. Hardware. Connect the LCD Display to the I2C interface. WIEGAND-26 - LET'S CONTROL IT The Wiegand-26 RFID TAG Reader can be found on eBay. Please note that the outputs uses 5 volts signals and they should not directly be connected to the ESP. Use a level shifter! This is just a sample of an RFID reader using the Wiegand-26 protocol. This Wiegand-26 RFID Reader works with tags compliant with EM4001 ISO standard, on a frequentie SLEEPMODE - LET'S CONTROL IT Temporary disable Deep Sleep via jumper setting. If 30 seconds is too short for you, you can use this method. Disconnect GPIO-16 from RST and connect it to GND. Restart your ESP if neccesary. Now deep sleep will be disabled and your ESP will function normally, until you connect GPIO-16 to RST again. This requires ESPEasy v2.0.0-dev6 ornewer.
7 SEGMENT DISPLAY
BASICS: TAMING FALSE POSITIVES "SOIL MOISTURE SENSOR" ESP Easy. Use the device tab on the ESP Easy webinterface and create a new task by editing one of the available tasks. Select "Moisture & Temperature & Light I2C Soil moisture sensor" from the dropdown box. Enter the i2c address of you sensor, default value 0x20. DEVICES - LET'S CONTROL IT Temperature (-55 to +125°C) 3.3V - 5V. 1 digital GPIO for multiple sensors. 1wire bus. N/A. no. (yes if you use 5V logic and the ESP unit can't handle that voltage on GPIO) None but could be placed in a metal "pipe"/protective sleeve. Ø4.6mm x L4.6mm. BASICS: CALIBRATION AND ACCURACY Fill the thermos jug half with water and put some ice cubes into it, put your sensor into the ice/water mix and wait - at least 1530 minutes. Just stir or shake the jug now and then to avoid different layers of temperature. Now note the temperature you read from the sensor. Let's say it is 0.3° C for an example.EASYPROTOCOLS
Domoticz HTTP. This is the protocol that we have used to start building ESP Easy. And probably the most widely used in combination with ESP Easy. The protocol is supported by Domoticz out of the box so you don't need a special setup. The ESP communicates with Domoticz on it's default port 8080, but of course that can be changed. SLEEPMODE - LET'S CONTROL IT Temporary disable Deep Sleep via jumper setting. If 30 seconds is too short for you, you can use this method. Disconnect GPIO-16 from RST and connect it to GND. Restart your ESP if neccesary. Now deep sleep will be disabled and your ESP will function normally, until you connect GPIO-16 to RST again. This requires ESPEasy v2.0.0-dev6 ornewer.
NEXTIONDISPLAY
The Nextion software module provides the use of a software serial port. So, it is not required to use the 'native'Tx and Rx ports of the controller. This display works with 5V and can be connected directly to the ESP module. The Tx pin of the Nextion is regulated to 3.3v making it safe to directly connect. BASICS: TAMING FALSE POSITIVES No false positive, just badly placed sensor. It is possible to "shield" a microwave sensor with aluminium foil in the case or to use a case partly made of metal. The sensor will detect only to the directions where no foil or metal resides. Keep at least 35 centimeters of distance between shielding and sensor. ADS1115 - LET'S CONTROL IT Use the device tab on the ESP Easy webinterface and create a new task by editing one of the available tasks. Select "Analog input - ADS1115" from the dropdown box. Enter the IDX found in the Domoticz device page. Also select the port on the ADS1115 that you want to read(Numbered 0 -
"SOIL MOISTURE SENSOR" ESP Easy. Use the device tab on the ESP Easy webinterface and create a new task by editing one of the available tasks. Select "Moisture & Temperature & Light I2C Soil moisture sensor" from the dropdown box. Enter the i2c address of you sensor, default value 0x20.WEMOSMOTORSHIELD
Those of you who want to do this using Window's 8/10: Window Command Prompt cd to the directory. 1) 'stm32flash.exe COM9' replace COM9 with your COM port number. 2) 'stm32flash.exe -k COM9' This will unlock your shield. 3) 'stm32flash.exe -f -v -w motor_shield.bin COM9' This will flash the bin and re TUTORIAL ARDUINO FIRMWARE UPLOAD 1 Download and installing the Arduino IDE. 2 Download ESP Easy Firmware. 2.1 Install libraries. 2.2 Compile and upload. 2.2.1 Selecting the plugin sets. 2.2.2 Selecting the correct board. 2.2.3 Selecting the correct flash size. 2.2.4 Select comport and upload. 3 Updating source files. BASICS: CALIBRATION AND ACCURACY Fill the thermos jug half with water and put some ice cubes into it, put your sensor into the ice/water mix and wait - at least 1530 minutes. Just stir or shake the jug now and then to avoid different layers of temperature. Now note the temperature you read from the sensor. Let's say it is 0.3° C for an example.TUTORIAL RULES
Test As described in the trigger section the test is a check done by checking if the DeviceName#ValueName is meeting a criteria: Where the value must be a float value with a dot as decimal sign.OLEDDISPLAY
ESP Easy. Use the device tab on the ESP Easy webinterface and create a new task by editing one of the available tasks. Select "Display - OLED 1306" from the dropdown box. Enter template texts into lines 1 to 8. Plain text will be shown on the display exactly as entered. If you want to show a value, enclose and betweenEASYPROTOCOLS
Domoticz HTTP. This is the protocol that we have used to start building ESP Easy. And probably the most widely used in combination with ESP Easy. The protocol is supported by Domoticz out of the box so you don't need a special setup. The ESP communicates with Domoticz on it's default port 8080, but of course that can be changed. LCDDISPLAY - LET'S CONTROL IT Introduction. The ESP8266 module can be used to control an I2C LCD Display. Mainly to display sensor values locally. Hardware. Connect the LCD Display to the I2C interface. WIEGAND-26 - LET'S CONTROL IT The Wiegand-26 RFID TAG Reader can be found on eBay. Please note that the outputs uses 5 volts signals and they should not directly be connected to the ESP. Use a level shifter! This is just a sample of an RFID reader using the Wiegand-26 protocol. This Wiegand-26 RFID Reader works with tags compliant with EM4001 ISO standard, on a frequentie SLEEPMODE - LET'S CONTROL IT Temporary disable Deep Sleep via jumper setting. If 30 seconds is too short for you, you can use this method. Disconnect GPIO-16 from RST and connect it to GND. Restart your ESP if neccesary. Now deep sleep will be disabled and your ESP will function normally, until you connect GPIO-16 to RST again. This requires ESPEasy v2.0.0-dev6 ornewer.
7 SEGMENT DISPLAY
BASICS: TAMING FALSE POSITIVES "SOIL MOISTURE SENSOR" ESP Easy. Use the device tab on the ESP Easy webinterface and create a new task by editing one of the available tasks. Select "Moisture & Temperature & Light I2C Soil moisture sensor" from the dropdown box. Enter the i2c address of you sensor, default value 0x20. BASICS: CALIBRATION AND ACCURACY Fill the thermos jug half with water and put some ice cubes into it, put your sensor into the ice/water mix and wait - at least 1530 minutes. Just stir or shake the jug now and then to avoid different layers of temperature. Now note the temperature you read from the sensor. Let's say it is 0.3° C for an example.TUTORIAL RULES
Test As described in the trigger section the test is a check done by checking if the DeviceName#ValueName is meeting a criteria: Where the value must be a float value with a dot as decimal sign.OLEDDISPLAY
ESP Easy. Use the device tab on the ESP Easy webinterface and create a new task by editing one of the available tasks. Select "Display - OLED 1306" from the dropdown box. Enter template texts into lines 1 to 8. Plain text will be shown on the display exactly as entered. If you want to show a value, enclose and betweenEASYPROTOCOLS
Domoticz HTTP. This is the protocol that we have used to start building ESP Easy. And probably the most widely used in combination with ESP Easy. The protocol is supported by Domoticz out of the box so you don't need a special setup. The ESP communicates with Domoticz on it's default port 8080, but of course that can be changed. LCDDISPLAY - LET'S CONTROL IT Introduction. The ESP8266 module can be used to control an I2C LCD Display. Mainly to display sensor values locally. Hardware. Connect the LCD Display to the I2C interface. WIEGAND-26 - LET'S CONTROL IT The Wiegand-26 RFID TAG Reader can be found on eBay. Please note that the outputs uses 5 volts signals and they should not directly be connected to the ESP. Use a level shifter! This is just a sample of an RFID reader using the Wiegand-26 protocol. This Wiegand-26 RFID Reader works with tags compliant with EM4001 ISO standard, on a frequentie SLEEPMODE - LET'S CONTROL IT Temporary disable Deep Sleep via jumper setting. If 30 seconds is too short for you, you can use this method. Disconnect GPIO-16 from RST and connect it to GND. Restart your ESP if neccesary. Now deep sleep will be disabled and your ESP will function normally, until you connect GPIO-16 to RST again. This requires ESPEasy v2.0.0-dev6 ornewer.
7 SEGMENT DISPLAY
BASICS: TAMING FALSE POSITIVES "SOIL MOISTURE SENSOR" ESP Easy. Use the device tab on the ESP Easy webinterface and create a new task by editing one of the available tasks. Select "Moisture & Temperature & Light I2C Soil moisture sensor" from the dropdown box. Enter the i2c address of you sensor, default value 0x20. DEVICES - LET'S CONTROL IT Temperature (-55 to +125°C) 3.3V - 5V. 1 digital GPIO for multiple sensors. 1wire bus. N/A. no. (yes if you use 5V logic and the ESP unit can't handle that voltage on GPIO) None but could be placed in a metal "pipe"/protective sleeve. Ø4.6mm x L4.6mm. BASICS: CALIBRATION AND ACCURACY Fill the thermos jug half with water and put some ice cubes into it, put your sensor into the ice/water mix and wait - at least 1530 minutes. Just stir or shake the jug now and then to avoid different layers of temperature. Now note the temperature you read from the sensor. Let's say it is 0.3° C for an example.EASYPROTOCOLS
Domoticz HTTP. This is the protocol that we have used to start building ESP Easy. And probably the most widely used in combination with ESP Easy. The protocol is supported by Domoticz out of the box so you don't need a special setup. The ESP communicates with Domoticz on it's default port 8080, but of course that can be changed. SLEEPMODE - LET'S CONTROL IT Temporary disable Deep Sleep via jumper setting. If 30 seconds is too short for you, you can use this method. Disconnect GPIO-16 from RST and connect it to GND. Restart your ESP if neccesary. Now deep sleep will be disabled and your ESP will function normally, until you connect GPIO-16 to RST again. This requires ESPEasy v2.0.0-dev6 ornewer.
NEXTIONDISPLAY
The Nextion software module provides the use of a software serial port. So, it is not required to use the 'native'Tx and Rx ports of the controller. This display works with 5V and can be connected directly to the ESP module. The Tx pin of the Nextion is regulated to 3.3v making it safe to directly connect. BASICS: TAMING FALSE POSITIVES No false positive, just badly placed sensor. It is possible to "shield" a microwave sensor with aluminium foil in the case or to use a case partly made of metal. The sensor will detect only to the directions where no foil or metal resides. Keep at least 35 centimeters of distance between shielding and sensor. ADS1115 - LET'S CONTROL IT Use the device tab on the ESP Easy webinterface and create a new task by editing one of the available tasks. Select "Analog input - ADS1115" from the dropdown box. Enter the IDX found in the Domoticz device page. Also select the port on the ADS1115 that you want to read(Numbered 0 -
"SOIL MOISTURE SENSOR" ESP Easy. Use the device tab on the ESP Easy webinterface and create a new task by editing one of the available tasks. Select "Moisture & Temperature & Light I2C Soil moisture sensor" from the dropdown box. Enter the i2c address of you sensor, default value 0x20.WEMOSMOTORSHIELD
Those of you who want to do this using Window's 8/10: Window Command Prompt cd to the directory. 1) 'stm32flash.exe COM9' replace COM9 with your COM port number. 2) 'stm32flash.exe -k COM9' This will unlock your shield. 3) 'stm32flash.exe -f -v -w motor_shield.bin COM9' This will flash the bin and re TUTORIAL ARDUINO FIRMWARE UPLOAD 1 Download and installing the Arduino IDE. 2 Download ESP Easy Firmware. 2.1 Install libraries. 2.2 Compile and upload. 2.2.1 Selecting the plugin sets. 2.2.2 Selecting the correct board. 2.2.3 Selecting the correct flash size. 2.2.4 Select comport and upload. 3 Updating source files. LETSCONTROLITMAINWIKIESPEASY The RFLink Gateway is the most versatile device with sophisticated AI technology offering a bridge between wireless devices and your home automation controller. Many RF devices are supported, like switches, wall sockets, door, window, temperature, wind and rain sensors, electricity meters, etc.. You can build your own low-cost RFLinkGateway
DEVICES - LET'S CONTROL IT Temperature (-55 to +125°C) 3.3V - 5V. 1 digital GPIO for multiple sensors. 1wire bus. N/A. no. (yes if you use 5V logic and the ESP unit can't handle that voltage on GPIO) None but could be placed in a metal "pipe"/protective sleeve. Ø4.6mm x L4.6mm.TUTORIAL RULES
Test As described in the trigger section the test is a check done by checking if the DeviceName#ValueName is meeting a criteria: Where the value must be a float value with a dot as decimal sign.EASYPROTOCOLS
Domoticz HTTP. This is the protocol that we have used to start building ESP Easy. And probably the most widely used in combination with ESP Easy. The protocol is supported by Domoticz out of the box so you don't need a special setup. The ESP communicates with Domoticz on it's default port 8080, but of course that can be changed. LCDDISPLAY - LET'S CONTROL ITESP EASY DOWNLOADESP EASY FLASHERESP EASY GITHUBESP EASY TUTORIALSCREEN DISPLAY CONTROL WINDOWS 10ESP EASY MEGA Introduction. The ESP8266 module can be used to control an I2C LCD Display. Mainly to display sensor values locally. Hardware. Connect the LCD Display to the I2C interface.OLEDDISPLAY
ESP Easy. Use the device tab on the ESP Easy webinterface and create a new task by editing one of the available tasks. Select "Display - OLED 1306" from the dropdown box. Enter template texts into lines 1 to 8. Plain text will be shown on the display exactly as entered. If you want to show a value, enclose and between SLEEPMODE - LET'S CONTROL IT Temporary disable Deep Sleep via jumper setting. If 30 seconds is too short for you, you can use this method. Disconnect GPIO-16 from RST and connect it to GND. Restart your ESP if neccesary. Now deep sleep will be disabled and your ESP will function normally, until you connect GPIO-16 to RST again. This requires ESPEasy v2.0.0-dev6 ornewer.
BASICS: CONNECTING AND FLASHING THE ESP8266 Connect a 10 KOhm resistor between 3.3V (Vcc) and GPIO0. This sets the ESP8266 into run mode. Now you may connect the GPIO0 directly to ground for flashing. The fourth is the "reset" pin. It should be on "high", so put a 10 KOhm resistor between Vcc and reset pin. ESP EASY WEB INTERFACE WIEGAND-26 - LET'S CONTROL IT The Wiegand-26 RFID TAG Reader can be found on eBay. Please note that the outputs uses 5 volts signals and they should not directly be connected to the ESP. Use a level shifter! This is just a sample of an RFID reader using the Wiegand-26 protocol. This Wiegand-26 RFID Reader works with tags compliant with EM4001 ISO standard, on a frequentie LETSCONTROLITMAINWIKIESPEASY The RFLink Gateway is the most versatile device with sophisticated AI technology offering a bridge between wireless devices and your home automation controller. Many RF devices are supported, like switches, wall sockets, door, window, temperature, wind and rain sensors, electricity meters, etc.. You can build your own low-cost RFLinkGateway
DEVICES - LET'S CONTROL IT Temperature (-55 to +125°C) 3.3V - 5V. 1 digital GPIO for multiple sensors. 1wire bus. N/A. no. (yes if you use 5V logic and the ESP unit can't handle that voltage on GPIO) None but could be placed in a metal "pipe"/protective sleeve. Ø4.6mm x L4.6mm.TUTORIAL RULES
Test As described in the trigger section the test is a check done by checking if the DeviceName#ValueName is meeting a criteria: Where the value must be a float value with a dot as decimal sign.EASYPROTOCOLS
Domoticz HTTP. This is the protocol that we have used to start building ESP Easy. And probably the most widely used in combination with ESP Easy. The protocol is supported by Domoticz out of the box so you don't need a special setup. The ESP communicates with Domoticz on it's default port 8080, but of course that can be changed. LCDDISPLAY - LET'S CONTROL ITESP EASY DOWNLOADESP EASY FLASHERESP EASY GITHUBESP EASY TUTORIALSCREEN DISPLAY CONTROL WINDOWS 10ESP EASY MEGA Introduction. The ESP8266 module can be used to control an I2C LCD Display. Mainly to display sensor values locally. Hardware. Connect the LCD Display to the I2C interface.OLEDDISPLAY
ESP Easy. Use the device tab on the ESP Easy webinterface and create a new task by editing one of the available tasks. Select "Display - OLED 1306" from the dropdown box. Enter template texts into lines 1 to 8. Plain text will be shown on the display exactly as entered. If you want to show a value, enclose and between SLEEPMODE - LET'S CONTROL IT Temporary disable Deep Sleep via jumper setting. If 30 seconds is too short for you, you can use this method. Disconnect GPIO-16 from RST and connect it to GND. Restart your ESP if neccesary. Now deep sleep will be disabled and your ESP will function normally, until you connect GPIO-16 to RST again. This requires ESPEasy v2.0.0-dev6 ornewer.
BASICS: CONNECTING AND FLASHING THE ESP8266 Connect a 10 KOhm resistor between 3.3V (Vcc) and GPIO0. This sets the ESP8266 into run mode. Now you may connect the GPIO0 directly to ground for flashing. The fourth is the "reset" pin. It should be on "high", so put a 10 KOhm resistor between Vcc and reset pin. ESP EASY WEB INTERFACE WIEGAND-26 - LET'S CONTROL IT The Wiegand-26 RFID TAG Reader can be found on eBay. Please note that the outputs uses 5 volts signals and they should not directly be connected to the ESP. Use a level shifter! This is just a sample of an RFID reader using the Wiegand-26 protocol. This Wiegand-26 RFID Reader works with tags compliant with EM4001 ISO standard, on a frequentie EASYSETUP - LET'S CONTROL IT Select your own Access Point and enter the WPA key in the password field. Click the connect button. The ESP will try to connect to your private Wifi network. If the connection succeeded, you will see the following screen, listing it's new local IP address. You can now reconnect your laptop or other device back to your private Wifinetwork.
ESP EASY WEB INTERFACE ESP Easy web interface. The ESP Easy has a user-friendly web interface for all configuration settings. They are locally stored in flash memory and retained on power-off. Do NOT expose the ESP Easy web interface directly to the internet, always make sure that the web interface is only reachable from "trusted/local" networks! We willexplain all
BASICS: CALIBRATION AND ACCURACY Fill the thermos jug half with water and put some ice cubes into it, put your sensor into the ice/water mix and wait - at least 1530 minutes. Just stir or shake the jug now and then to avoid different layers of temperature. Now note the temperature you read from the sensor. Let's say it is 0.3° C for an example. WIEGAND-26 - LET'S CONTROL IT The Wiegand-26 RFID TAG Reader can be found on eBay. Please note that the outputs uses 5 volts signals and they should not directly be connected to the ESP. Use a level shifter! This is just a sample of an RFID reader using the Wiegand-26 protocol. This Wiegand-26 RFID Reader works with tags compliant with EM4001 ISO standard, on a frequentie GPIO - LET'S CONTROL IT The ESP8266 is a small chip with a lots of possibilities. The GPIO16 (D0) is a good example: Besides GPIO it is used for waking up fromdeep sleep.
WEMOSMOTORSHIELD
Those of you who want to do this using Window's 8/10: Window Command Prompt cd to the directory. 1) 'stm32flash.exe COM9' replace COM9 with your COM port number. 2) 'stm32flash.exe -k COM9' This will unlock your shield. 3) 'stm32flash.exe -f -v -w motor_shield.bin COM9' This will flash the bin and reSONOFF BASIC
The Sonoff Basic is a relay unit to be used as retrofit. It is based on the ESP8266 chip and can control one relay. A small green LED is onboard which can be controlled using PWM or GPIO commands. Other than normal controlling on and off (of what ever you control with the relay) you can use PWM to control the LED to shine less during thenight
ESPEASY COMMAND REFERENCE Commands are divided into several classes: . Internal - Can be run from serial and rules engine Rules - Can be run from serial and rules engine Plugin - Can be run from serial, rules engine, HTTP, MQTT Special - This can be used from any source . If you want to use internal or rules commands using HTTP/MQTT, setup an event within the rules section and remotely launch the "event" command.DALLAS DS18B20
The DS18B20 manufactured by Dallas and Maxxim is a very simple to use temperature sensor with a tolerance of +/- 0.5°C. (Remember: Cheap remakes from chinese market might have bigger tolerance and also might have different pinouts) It's advantages: Very simple to use due to "One Wire" data protocol. Chainable, it is possible to chain up to 100 BASICS: TAMING FALSE POSITIVES No false positive, just badly placed sensor. It is possible to "shield" a microwave sensor with aluminium foil in the case or to use a case partly made of metal. The sensor will detect only to the directions where no foil or metal resides. Keep at least 35 centimeters of distance between shielding and sensor.__
Toggle navigation
* Main
* Concept
* ESP Easy
* RFLink Gateway
* Nodo
* Forum
* Webshop
*
__
*
*
*
CONCEPT
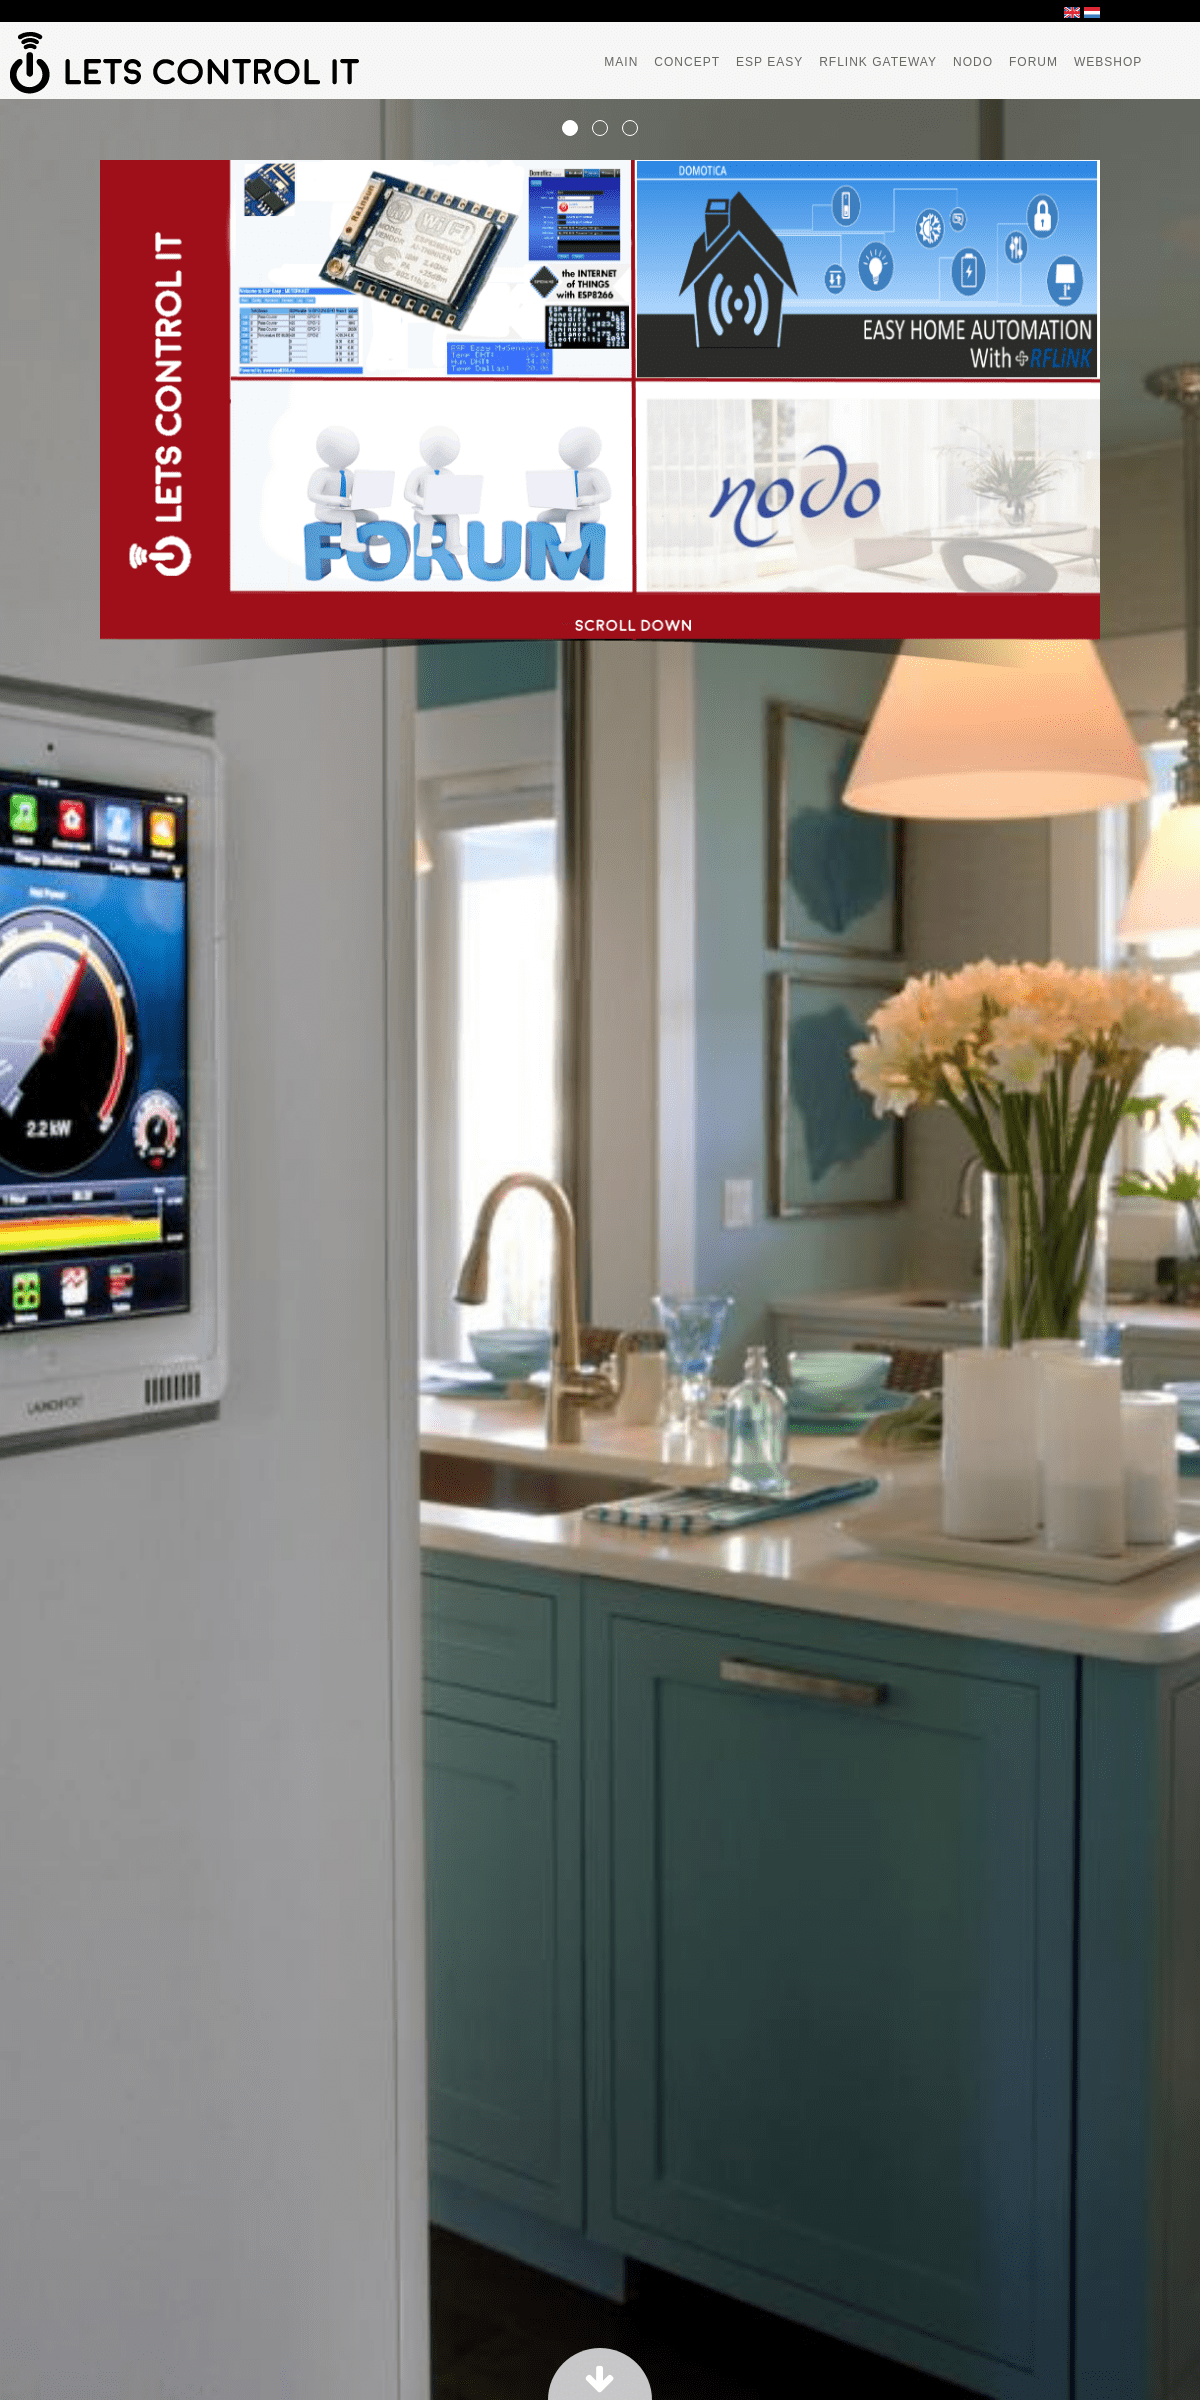
We are combining several Home Automation solutions into one single place to make it easier for you to find information and share your thoughts and experiences. To help you with creating the ultimate Home Automation experience, we have combined all information about the ESP Easy, RFLink Gateway and Nodo into one comfortable place. _Let's Control It..._ Simply create Wifi enabled sensors with the marvellous "ESP Easy" and receive and control existing RF sensors with the world leading "RFlinkGateway".
ESP EASY
Welcome to our ESP8266 website. We have launched this website to demonstrate some things that we are doing with the ESP8266 module. We're just a few Home Automation enthousiasts with some spare time to experiment on things like this. So we're not a professional organisation or business and we have no plans in that direction. You're welcome to join us on our journeys and maybe help with development and testing. But if you just want to use the things that we have build it's also ok. We started out by investigating NodeMCU with LUA, but we have more or less dropped that and we switched to Native Arduino development on the ESP. Currently we are only working on one track: ESP Easy, a web configurable multisensor (with some actuator things in progress) But our focus is not limited to software only. Within the Nodo project a lot of dedicated hardware has been build and we may start to do sofor the ESP.
REMEMBER THAT OUR PRIMARY DIRECTIVE IS TO ENJOY PROTOTYPING WITH STUFF LIKE THE ESP. FEEL FREE TO JOIN IN... Visit the ESP Wiki for more informationRFLINK GATEWAY
The RFLink Gateway is the most versatile device with sophisticated AI technology offering a bridge between wireless devices and your home automation controller. Many RF devices are supported, like switches, wall sockets, door, window, temperature, wind and rain sensors, electricity meters, etc.. You can build your own low-cost RFLink Gateway (Arduino Mega + RF transceiver) and you can even help with development and proposeupdates and fixes..
The RFLink Gateway could work with a mixture of frequencies like 315 Mhz, 433 Mhz, 868Mhz, 915 Mhz and 2.4Ghz (depending on frequencies used in your region). To find out more about the RFLink Gateway, visit the RFLink web page by clicking the link below.NODO DOMOTICA
The “Nodo” is a home automation controller that can be used to automate tasks around your home or office.Some examples:
- Wireless turn lights on/off with a remote control, phone or tablet. - Catch wireless data from devices like weather stations and sensors. - Measure and report energy use. - Automatic and/or wireless control of sunscreens/windows/etc.- etc. etc.
In combination with a webapp that is specially designed for the Nodo, you can see and control everything through an easy interface. Available for smartphone, tablet or webpage. You can see things like temperature, air pressure, energy use, wherever you are. The Nodo itself consist of a number of parts that can be assembled easily by yourself. The Nodo is supplied with extensive manual and it can be extended with all kinds of electronics to create the ultimate solution for your specific situation. More information is available on the Wiki and forum where you also can ask questions and get support. Nodo parts are available via the webshop. Note: Nodo is an older system for which developed started some years ago and there are nearly no new developments. BEWARE: The Nodo website and forum are in Dutch!COMMUNITY FORUM
We have an active community forum where you can fine more information about the various aspects of home automation, the Internet of Things and all related matters. Of course the forum holds more information about ESPEasy, RFLinkGateway and Nodo
It is also the place to be if you need help with your projects. ------------------------- LetsControlIt Team: (alphabetical order) Bert - Forum moderator, Tester, Wiki contributor Hans - Forum moderator, Tester, Wiki contributor John - PCB design, Hardware testing and development Martinus - ESP Easy development, Forum moderator, Wiki contributor Remco - Sponsor, Webshop owner, Fascilitating wiki and forum websites Richard - Forum moderator, Tester, Plugin development Stuntteam - RFLink Gateway development Team, Forum administrator Voyager - Forum administrator, software testing and development Copyright LetsControlIt 2016. All Rights Reserved.Details
6