5
More Annotations


2


4
Favourite Annotations


2

6
Text
SYNFIG – FREE AND OPEN-SOURCE ANIMATION SOFTWAREDOCUMENTATIONNEWSFORUMSDONATETUTORIALSANIMATION BASICS Development version. A good opportunity to try latest (experimental) features and bugfixes. Synfig is a free and open-source software licensed under GNU GPL v3. The sources are available on GitHub. DOWNLOAD DEVELOPMENT VERSION Download. Synfig is a FREE software and you are not obligated to pay for this download – just enter “0” (zero) in the “Price” field above to download for free. Alternatively, you can use this private link. Our order process is conducted by our online reseller Paddle.com. Paddle.com is the Merchant of Record for all our orders. INTERFACE - SYNFIG ANIMATION STUDIO 3 The other panels. 3.1 The Navigator, Tool Options and Layers Panel. 3.2 The Parameter and Time Track Panel. Synfig Studio start in one window, and dock a number of individual panels into that window. The default layout of user interface is divided in three parts : the toolbox, the canvas and the other panels. SynfigStudio - User
Interface.
CUT-OUT ANIMATION
BRUSH TOOL - SYNFIG ANIMATION STUDIO - SYNFIG STUDIO The "Brush Tool" allows you to draw freehand over the top of a raster image using the MyPaint brushes. Combined with Switch Group Layer you can create frame by frame animations. It is possible to paint on the Image Layer. Basic pressure sensitivity is supported. Image size is automatically expanded when you paint outside of image boundaries.GROUP LAYER
REALISTIC RAIN ANIMATION Start with a blank Synfig file, any size will do. To match a good-looking widescreen ratio this tutorial uses 360x203. 1. Add a new black & white Noise Gradient Layer, name it gr-nsClouds and change these values/parameters for the clouds: . Gradient to 00002e,ffffff; Random Seed to 1274099207; Size to 84,44 pt 'Interpolation to Cubic; Animation Speed to 0.5; step 2: An object under the rainROTATE TOOL
Usage. Select multiple Handles, by either: Pressing Control A to select all Handles. Dragging a rectangle around a group of Handles. Holding the Control key while clicking Handles to toggle their selected status. Then drag one of the selected Handles. All the selected Handles will move, rotating about the center of the selectedhandles group.
OUTLINE LAYER
Outline Layers are used to hold strokes or edges of filled shapes. They give a cartoon look to an animation when added as the edge of the filled shapes. Also standalone Outlines (strokes) are used to define fold of 3D drawings and used together with shadows (created using gradients or feathering) are the basis of an artist's work.BASIC BONE MORPHING
SYNFIG – FREE AND OPEN-SOURCE ANIMATION SOFTWAREDOCUMENTATIONNEWSFORUMSDONATETUTORIALSANIMATION BASICS Development version. A good opportunity to try latest (experimental) features and bugfixes. Synfig is a free and open-source software licensed under GNU GPL v3. The sources are available on GitHub. DOWNLOAD DEVELOPMENT VERSION Download. Synfig is a FREE software and you are not obligated to pay for this download – just enter “0” (zero) in the “Price” field above to download for free. Alternatively, you can use this private link. Our order process is conducted by our online reseller Paddle.com. Paddle.com is the Merchant of Record for all our orders. INTERFACE - SYNFIG ANIMATION STUDIO 3 The other panels. 3.1 The Navigator, Tool Options and Layers Panel. 3.2 The Parameter and Time Track Panel. Synfig Studio start in one window, and dock a number of individual panels into that window. The default layout of user interface is divided in three parts : the toolbox, the canvas and the other panels. SynfigStudio - UserInterface.
CUT-OUT ANIMATION
BRUSH TOOL - SYNFIG ANIMATION STUDIO - SYNFIG STUDIO The "Brush Tool" allows you to draw freehand over the top of a raster image using the MyPaint brushes. Combined with Switch Group Layer you can create frame by frame animations. It is possible to paint on the Image Layer. Basic pressure sensitivity is supported. Image size is automatically expanded when you paint outside of image boundaries.GROUP LAYER
REALISTIC RAIN ANIMATION Start with a blank Synfig file, any size will do. To match a good-looking widescreen ratio this tutorial uses 360x203. 1. Add a new black & white Noise Gradient Layer, name it gr-nsClouds and change these values/parameters for the clouds: . Gradient to 00002e,ffffff; Random Seed to 1274099207; Size to 84,44 pt 'Interpolation to Cubic; Animation Speed to 0.5; step 2: An object under the rainROTATE TOOL
Usage. Select multiple Handles, by either: Pressing Control A to select all Handles. Dragging a rectangle around a group of Handles. Holding the Control key while clicking Handles to toggle their selected status. Then drag one of the selected Handles. All the selected Handles will move, rotating about the center of the selectedhandles group.
OUTLINE LAYER
Outline Layers are used to hold strokes or edges of filled shapes. They give a cartoon look to an animation when added as the edge of the filled shapes. Also standalone Outlines (strokes) are used to define fold of 3D drawings and used together with shadows (created using gradients or feathering) are the basis of an artist's work.BASIC BONE MORPHING
TOOLS - SYNFIG ANIMATION STUDIO - SYNFIG STUDIO All they toggle buttons. It means that once you click on any of them its state remains available until you click into another tool or perform another operation. The default tool state is the Transform Tool. That's the tool that is toggled to when you do other operation (like for example select other layer or Group the selected). BrushTool.
SYNFIG STUDIO :: DOCUMENTATION Welcome to the Synfig wiki! This wiki is the main documentation for the Synfig Project, a 2D animation and design program.The wiki documentation is divided in three main sections: User Documentation (for the users of the animation program), Developer Documentation (for the people developing the code of the program) and Writer Documentation (for the people that wish to keep this wiki up to date). LAYERS - SYNFIG ANIMATION STUDIO - SYNFIG STUDIO Description. Position. The center (or axis) of the distortion. Radius. Defines the radious of the distortion (spherize) or a half of the bar (vertical or horizontal bar) Amount. Defines how much convex (positive) or concave (negative) the distortion is. Clip. When checked it only distorts inside the Radious area.GROUP LAYER
About Group Layer. The "Group Layer" is a special layer that can hold other layers. It is generated via the Group command accessed via the context menu in the {l|Layers Panel}} or through the Layer Menu in the Canvas Menu Caret.. As well as grouping a set of layers, it can also apply transformations to the contained layers like translation, scaling, and even modify their time offset. EXAMPLES - SYNFIG ANIMATION STUDIO Examples. Examples of Synfig-made animations and stills can be found in various places, including our website, and in a dedicated examples package released under the terms of GPL V3. Many topics, techniques and ideas have been explored over time by the community of Synfig users. Many creators were keen enough to share the source files oftheir
REFERENCE - SYNFIG ANIMATION STUDIO Noise Distort Layer. Skeleton Deformation LayerSkeleton Deformation Layer. Spherize Layer. Stretch Layer. Twirl Layer. Warp Layer Layer. Example. Filled Rectangle Layer. Metaballs Layer.BASIC BONE MORPHING
Linking bones to members. Then select your puppet, in the "Layers panel" and then make a Ctrl A in the canvas to select all vertices.. Then selected the layer "skeleton" We have create earlier, making Ctrl Clic, in the layers panel.In the "canvas" now right-click on one of the handles of the skeleton and make "Link to the skeleton".. You just have to create your animation.RENDER OPTIONS
Rendering to Video. Rendering to video directly from Synfig under Windows Operating Systems presents some challenges. If you want to render to anything other than .mpg with "ffmpeg", you'll want to save a series of images that represent your animation, to a still format that ffmpeg can read.I recommend "png".Whilst you can render to any size image, if you're going to show your video on Youtube SCALE TOOL - SYNFIG ANIMATION STUDIO The Tool Options Panel allows you to specify: . Lock Aspect Ratio : Prevent from changing the ratio x:y of the bounding box of the selected Handles.; Usage. Select multiple Handles, by either: . Pressing Control A to select all Handles; Dragging a rectangle around a group of Handles; Holding the Control key while clicking Handles to toggle their selected statusPREFERENCES DIALOG
Purpose of the Preferences Dialog. The Preferences Dialog allows the user set certain properties and preferences that are globally adopted by the application and used by all the Documents opened or to be opened. The Preferences Dialog is organized in Tabs allowing modify the properties or preferences by meaningful groups. SYNFIG – FREE AND OPEN-SOURCE ANIMATION SOFTWAREDOWNLOAD STABLE VERSIONDOCUMENTATIONNEWSFORUMSDONATEDOWNLOAD DEVELOPMENT VERSION Development version. A good opportunity to try latest (experimental) features and bugfixes. Synfig is a free and open-source software licensed under GNU GPL v3. The sources are available on GitHub. DOWNLOAD DEVELOPMENT VERSION Download. Synfig is a FREE software and you are not obligated to pay for this download – just enter “0” (zero) in the “Price” field above to download for free. Alternatively, you can use this private link. Our order process is conducted by our online reseller Paddle.com. Paddle.com is the Merchant of Record for all our orders. INTERFACE - SYNFIG ANIMATION STUDIO 3 The other panels. 3.1 The Navigator, Tool Options and Layers Panel. 3.2 The Parameter and Time Track Panel. Synfig Studio start in one window, and dock a number of individual panels into that window. The default layout of user interface is divided in three parts : the toolbox, the canvas and the other panels. SynfigStudio - UserInterface.
EXAMPLES - SYNFIG ANIMATION STUDIO - SYNFIG STUDIO Examples. Examples of Synfig-made animations and stills can be found in various places, including our website, and in a dedicated examples package released under the terms of GPL V3. Many topics, techniques and ideas have been explored over time by the community of Synfig users. Many creators were keen enough to share the source files oftheir
TOOLBOX FILE MENU
The Toolbox File Menu has the following options: . New (Ctrl N): Create a new file.Its default name is Synfig Animation # where # starts from 1 and increases by 1 for each new file you create in a Synfigstudio session. It starts editing the "Root" canvas. Open (Ctrl O): Pops up a choose file dialog to select the sifz file you want to open.; Open Recent: It gives a dynamic menu list with theGROUP LAYER
CUT-OUT ANIMATION
ROTATE TOOL
Usage. Select multiple Handles, by either: Pressing Control A to select all Handles. Dragging a rectangle around a group of Handles. Holding the Control key while clicking Handles to toggle their selected status. Then drag one of the selected Handles. All the selected Handles will move, rotating about the center of the selectedhandles group.
ROTATE LAYER
About Rotate Layers. A "Rotate Layer" change the position of any primitive layers below it in the layer hierarchy.It apply an "Angle" from his "Origin" to the resulting calculated points to render the shape, it doesn't modify the values of the underlying layers."Rotate Layer" is part of Transform Layers category. Parameters of Rotate Layers. The parameters of the rotate layers are:FILTER LAYER
Filter Layer. There are two types of layers : Primitive and "Filters" (or effect layer). Filter layers, such as Blur and Rotate layers, produce content based on their own parameters and on the context of the layer (the context of a layer is the rendered result of the layers that are stacked behind it) SYNFIG – FREE AND OPEN-SOURCE ANIMATION SOFTWAREDOWNLOAD STABLE VERSIONDOCUMENTATIONNEWSFORUMSDONATEDOWNLOAD DEVELOPMENT VERSION Development version. A good opportunity to try latest (experimental) features and bugfixes. Synfig is a free and open-source software licensed under GNU GPL v3. The sources are available on GitHub. DOWNLOAD DEVELOPMENT VERSION Download. Synfig is a FREE software and you are not obligated to pay for this download – just enter “0” (zero) in the “Price” field above to download for free. Alternatively, you can use this private link. Our order process is conducted by our online reseller Paddle.com. Paddle.com is the Merchant of Record for all our orders. INTERFACE - SYNFIG ANIMATION STUDIO 3 The other panels. 3.1 The Navigator, Tool Options and Layers Panel. 3.2 The Parameter and Time Track Panel. Synfig Studio start in one window, and dock a number of individual panels into that window. The default layout of user interface is divided in three parts : the toolbox, the canvas and the other panels. SynfigStudio - UserInterface.
EXAMPLES - SYNFIG ANIMATION STUDIO - SYNFIG STUDIO Examples. Examples of Synfig-made animations and stills can be found in various places, including our website, and in a dedicated examples package released under the terms of GPL V3. Many topics, techniques and ideas have been explored over time by the community of Synfig users. Many creators were keen enough to share the source files oftheir
TOOLBOX FILE MENU
The Toolbox File Menu has the following options: . New (Ctrl N): Create a new file.Its default name is Synfig Animation # where # starts from 1 and increases by 1 for each new file you create in a Synfigstudio session. It starts editing the "Root" canvas. Open (Ctrl O): Pops up a choose file dialog to select the sifz file you want to open.; Open Recent: It gives a dynamic menu list with theGROUP LAYER
CUT-OUT ANIMATION
ROTATE TOOL
Usage. Select multiple Handles, by either: Pressing Control A to select all Handles. Dragging a rectangle around a group of Handles. Holding the Control key while clicking Handles to toggle their selected status. Then drag one of the selected Handles. All the selected Handles will move, rotating about the center of the selectedhandles group.
ROTATE LAYER
About Rotate Layers. A "Rotate Layer" change the position of any primitive layers below it in the layer hierarchy.It apply an "Angle" from his "Origin" to the resulting calculated points to render the shape, it doesn't modify the values of the underlying layers."Rotate Layer" is part of Transform Layers category. Parameters of Rotate Layers. The parameters of the rotate layers are:FILTER LAYER
Filter Layer. There are two types of layers : Primitive and "Filters" (or effect layer). Filter layers, such as Blur and Rotate layers, produce content based on their own parameters and on the context of the layer (the context of a layer is the rendered result of the layers that are stacked behind it) SYNFIG STUDIO 1.4.1 RELEASED Synfig Studio 1.4.1 released. New stable release of Synfig Studio is available for download now! This version adds the possibility to export videos with sound and also delivers many critical bugfixes. Please read Release Notes for complete list of changes. This release is made possible thanks to many people who supported Synfigdevelopment with
WHAT’S COMING TO SYNFIG 1.4.0 (PART 2) What’s coming to Synfig 1.4.0 (part 2) The release of next stable version of Synfig is approaching fast and we have a lot to add to our previous sneak peek at upcoming features. In this post I will focus on new features implemented as part of Google Summer of Code program. We had two students working on Synfig with summer thanks to Google’s SYNFIG STUDIO 1.3.11 RELEASED Synfig Studio 1.3.11 released. The new development release of Synfig Studio is here! This build provides a preview of our work towards the next stable version (1.4.0), at its current state. Please consider that many features are still work-in-progress and can behave not asexpected.
TOOLS - SYNFIG ANIMATION STUDIO - SYNFIG STUDIO All they toggle buttons. It means that once you click on any of them its state remains available until you click into another tool or perform another operation. The default tool state is the Transform Tool. That's the tool that is toggled to when you do other operation (like for example select other layer or Group the selected). BrushTool.
EXAMPLES - SYNFIG ANIMATION STUDIO Examples of Synfig-made animations and stills can be found in various places, including our website, and in a dedicated examples package released under the terms of GPL V3.. Many topics, techniques and ideas have been explored over time by the community of Synfig users. REFERENCE - SYNFIG ANIMATION STUDIO Noise Distort Layer. Skeleton Deformation LayerSkeleton Deformation Layer. Spherize Layer. Stretch Layer. Twirl Layer. Warp Layer Layer. Example. Filled Rectangle Layer. Metaballs Layer. BRUSH TOOL - SYNFIG ANIMATION STUDIO The "Brush Tool" allows you to draw freehand over the top of a raster image using the MyPaint brushes. Combined with Switch Group Layer you can create frame by frame animations. It is possible to paint on the Image Layer. Basic pressure sensitivity is supported. Image size is automatically expanded when you paint outside of image boundaries.PARAMETERS PANEL
The Parameters Panel is in many ways the heart of the Synfig interface. This is where all the parameters of the layers you create are edited, and in some less obvious ways. The layout of the Parameters Panel is quite simple - it is a table. The first column, named "Name", is simply an expandable tree listing of the parametersof the selected
FILTER LAYER
Filter Layer. There are two types of layers : Primitive and "Filters" (or effect layer). Filter layers, such as Blur and Rotate layers, produce content based on their own parameters and on the context of the layer (the context of a layer is the rendered result of the layers that are stacked behind it)TIME LOOP LAYER
The "Time Loop layer" is used to repeat an animation over and over. It loops a section of the layers below and within the same canvas over and over. See also the Time Loop ValueNode conversion, which can be used to loop the value of a single parameter, rather than an entire layer or group of layers. SYNFIG – FREE AND OPEN-SOURCE ANIMATION SOFTWAREDOWNLOAD STABLE VERSIONDOCUMENTATIONNEWSFORUMSDONATEDOWNLOAD DEVELOPMENT VERSION Development version. A good opportunity to try latest (experimental) features and bugfixes. Synfig is a free and open-source software licensed under GNU GPL v3. The sources are available on GitHub. DOWNLOAD DEVELOPMENT VERSION Download. Synfig is a FREE software and you are not obligated to pay for this download – just enter “0” (zero) in the “Price” field above to download for free. Alternatively, you can use this private link. Our order process is conducted by our online reseller Paddle.com. Paddle.com is the Merchant of Record for all our orders. INTERFACE - SYNFIG ANIMATION STUDIO 3 The other panels. 3.1 The Navigator, Tool Options and Layers Panel. 3.2 The Parameter and Time Track Panel. Synfig Studio start in one window, and dock a number of individual panels into that window. The default layout of user interface is divided in three parts : the toolbox, the canvas and the other panels. SynfigStudio - UserInterface.
EXAMPLES - SYNFIG ANIMATION STUDIO - SYNFIG STUDIO Examples. Examples of Synfig-made animations and stills can be found in various places, including our website, and in a dedicated examples package released under the terms of GPL V3. Many topics, techniques and ideas have been explored over time by the community of Synfig users. Many creators were keen enough to share the source files oftheir
TOOLBOX FILE MENU
The Toolbox File Menu has the following options: . New (Ctrl N): Create a new file.Its default name is Synfig Animation # where # starts from 1 and increases by 1 for each new file you create in a Synfigstudio session. It starts editing the "Root" canvas. Open (Ctrl O): Pops up a choose file dialog to select the sifz file you want to open.; Open Recent: It gives a dynamic menu list with theGROUP LAYER
CUT-OUT ANIMATION
ROTATE LAYER
About Rotate Layers. A "Rotate Layer" change the position of any primitive layers below it in the layer hierarchy.It apply an "Angle" from his "Origin" to the resulting calculated points to render the shape, it doesn't modify the values of the underlying layers."Rotate Layer" is part of Transform Layers category. Parameters of Rotate Layers. The parameters of the rotate layers are:FILTER LAYER
Filter Layer. There are two types of layers : Primitive and "Filters" (or effect layer). Filter layers, such as Blur and Rotate layers, produce content based on their own parameters and on the context of the layer (the context of a layer is the rendered result of the layers that are stacked behind it)PREFERENCES DIALOG
Purpose of the Preferences Dialog. The Preferences Dialog allows the user set certain properties and preferences that are globally adopted by the application and used by all the Documents opened or to be opened. The Preferences Dialog is organized in Tabs allowing modify the properties or preferences by meaningful groups. SYNFIG – FREE AND OPEN-SOURCE ANIMATION SOFTWAREDOWNLOAD STABLE VERSIONDOCUMENTATIONNEWSFORUMSDONATEDOWNLOAD DEVELOPMENT VERSION Development version. A good opportunity to try latest (experimental) features and bugfixes. Synfig is a free and open-source software licensed under GNU GPL v3. The sources are available on GitHub. DOWNLOAD DEVELOPMENT VERSION Download. Synfig is a FREE software and you are not obligated to pay for this download – just enter “0” (zero) in the “Price” field above to download for free. Alternatively, you can use this private link. Our order process is conducted by our online reseller Paddle.com. Paddle.com is the Merchant of Record for all our orders. INTERFACE - SYNFIG ANIMATION STUDIO 3 The other panels. 3.1 The Navigator, Tool Options and Layers Panel. 3.2 The Parameter and Time Track Panel. Synfig Studio start in one window, and dock a number of individual panels into that window. The default layout of user interface is divided in three parts : the toolbox, the canvas and the other panels. SynfigStudio - UserInterface.
EXAMPLES - SYNFIG ANIMATION STUDIO - SYNFIG STUDIO Examples. Examples of Synfig-made animations and stills can be found in various places, including our website, and in a dedicated examples package released under the terms of GPL V3. Many topics, techniques and ideas have been explored over time by the community of Synfig users. Many creators were keen enough to share the source files oftheir
TOOLBOX FILE MENU
The Toolbox File Menu has the following options: . New (Ctrl N): Create a new file.Its default name is Synfig Animation # where # starts from 1 and increases by 1 for each new file you create in a Synfigstudio session. It starts editing the "Root" canvas. Open (Ctrl O): Pops up a choose file dialog to select the sifz file you want to open.; Open Recent: It gives a dynamic menu list with theGROUP LAYER
CUT-OUT ANIMATION
ROTATE LAYER
About Rotate Layers. A "Rotate Layer" change the position of any primitive layers below it in the layer hierarchy.It apply an "Angle" from his "Origin" to the resulting calculated points to render the shape, it doesn't modify the values of the underlying layers."Rotate Layer" is part of Transform Layers category. Parameters of Rotate Layers. The parameters of the rotate layers are:FILTER LAYER
Filter Layer. There are two types of layers : Primitive and "Filters" (or effect layer). Filter layers, such as Blur and Rotate layers, produce content based on their own parameters and on the context of the layer (the context of a layer is the rendered result of the layers that are stacked behind it)PREFERENCES DIALOG
Purpose of the Preferences Dialog. The Preferences Dialog allows the user set certain properties and preferences that are globally adopted by the application and used by all the Documents opened or to be opened. The Preferences Dialog is organized in Tabs allowing modify the properties or preferences by meaningful groups. SYNFIG STUDIO 1.4.1 RELEASED Synfig Studio 1.4.1 released. New stable release of Synfig Studio is available for download now! This version adds the possibility to export videos with sound and also delivers many critical bugfixes. Please read Release Notes for complete list of changes. This release is made possible thanks to many people who supported Synfigdevelopment with
DOWNLOAD STABLE VERSION Download. Synfig is a FREE software and you are not obligated to pay for this download – just enter “0” (zero) in the “Price” field above to download for free. Alternatively, you can use this private link. Our order process is conducted by our online reseller Paddle.com. Paddle.com is WHAT’S COMING TO SYNFIG 1.4.0 (PART 2) What’s coming to Synfig 1.4.0 (part 2) The release of next stable version of Synfig is approaching fast and we have a lot to add to our previous sneak peek at upcoming features. In this post I will focus on new features implemented as part of Google Summer of Code program. We had two students working on Synfig with summer thanks to Google’s EXAMPLES - SYNFIG ANIMATION STUDIO Examples of Synfig-made animations and stills can be found in various places, including our website, and in a dedicated examples package released under the terms of GPL V3.. Many topics, techniques and ideas have been explored over time by the community of Synfig users. REFERENCE - SYNFIG ANIMATION STUDIO Noise Distort Layer. Skeleton Deformation LayerSkeleton Deformation Layer. Spherize Layer. Stretch Layer. Twirl Layer. Warp Layer Layer. Example. Filled Rectangle Layer. Metaballs Layer.TIME LOOP LAYER
About Time Loop Layers. The "Time Loop layer" is used to repeat an animation over and over. It loops a section of the layers below and within the same canvas over and over. See also the Time Loop ValueNode conversion, which can be used to loop the value of a single parameter, rather than an entire layer or group of layers.. Parameters of TimeLoop Layers
BRUSH TOOL - SYNFIG ANIMATION STUDIO The "Brush Tool" allows you to draw freehand over the top of a raster image using the MyPaint brushes. Combined with Switch Group Layer you can create frame by frame animations. It is possible to paint on the Image Layer. Basic pressure sensitivity is supported. Image size is automatically expanded when you paint outside of image boundaries. REALISTIC RAIN ANIMATION Start with a blank Synfig file, any size will do. To match a good-looking widescreen ratio this tutorial uses 360x203. 1. Add a new black & white Noise Gradient Layer, name it gr-nsClouds and change these values/parameters for the clouds: . Gradient to 00002e,ffffff; Random Seed to 1274099207; Size to 84,44 pt 'Interpolation to Cubic; Animation Speed to 0.5; step 2: An object under the rainPARAMETERS PANEL
The Parameters Panel is in many ways the heart of the Synfig interface. This is where all the parameters of the layers you create are edited, and in some less obvious ways. The layout of the Parameters Panel is quite simple - it is a table. The first column, named "Name", is simply an expandable tree listing of the parametersof the selected
FILTER LAYER
Filter Layer. There are two types of layers : Primitive and "Filters" (or effect layer). Filter layers, such as Blur and Rotate layers, produce content based on their own parameters and on the context of the layer (the context of a layer is the rendered result of the layers that are stacked behind it) SYNFIG – FREE AND OPEN-SOURCE ANIMATION SOFTWAREDOWNLOAD STABLE VERSIONDOCUMENTATIONNEWSFORUMSDONATEDOWNLOAD DEVELOPMENT VERSION Development version. A good opportunity to try latest (experimental) features and bugfixes. Synfig is a free and open-source software licensed under GNU GPL v3. The sources are available on GitHub. INTERFACE - SYNFIG ANIMATION STUDIO 3 The other panels. 3.1 The Navigator, Tool Options and Layers Panel. 3.2 The Parameter and Time Track Panel. Synfig Studio start in one window, and dock a number of individual panels into that window. The default layout of user interface is divided in three parts : the toolbox, the canvas and the other panels. SynfigStudio - UserInterface.
SYNFIG STUDIO :: DOCUMENTATION Welcome to the Synfig wiki! This wiki is the main documentation for the Synfig Project, a 2D animation and design program.The wiki documentation is divided in three main sections: User Documentation (for the users of the animation program), Developer Documentation (for the people developing the code of the program) and Writer Documentation (for the people that wish to keep this wiki up to date).CUT-OUT ANIMATION
GROUP LAYER
RENDER OPTIONS
2) Just before rendering, in canvas property->Other->Locks and links, set checkboxes for Image Aspect and Image Span, and uncheck Pixel Aspect (Depending on synfig version, this may possibly be the options dialog for File|Render, at least it is for me) 3) Change back to the Image settings. 4) Change resolution to 720x576 for PAL, 720*480 forNTSC.
DOC:BASIC MASKING
BASIC BONE TUTORIAL
In this tutorial we are going to rig an arm with fixed joints using the Skeleton Layer and three bones. The arm consists of three parts: the upperArm, the lowerArm and the hand. (pic.1) Each part is grouped in its own layer and the three groups are again grouped in a layer REALISTIC RAIN ANIMATION Start with a blank Synfig file, any size will do. To match a good-looking widescreen ratio this tutorial uses 360x203. 1. Add a new black & white Noise Gradient Layer, name it gr-nsClouds and change these values/parameters for the clouds: . Gradient to 00002e,ffffff; Random Seed to 1274099207; Size to 84,44 pt 'Interpolation to Cubic; Animation Speed to 0.5; step 2: An object under the rainBASIC BONE MORPHING
SYNFIG – FREE AND OPEN-SOURCE ANIMATION SOFTWAREDOWNLOAD STABLE VERSIONDOCUMENTATIONNEWSFORUMSDONATEDOWNLOAD DEVELOPMENT VERSION Development version. A good opportunity to try latest (experimental) features and bugfixes. Synfig is a free and open-source software licensed under GNU GPL v3. The sources are available on GitHub. INTERFACE - SYNFIG ANIMATION STUDIO 3 The other panels. 3.1 The Navigator, Tool Options and Layers Panel. 3.2 The Parameter and Time Track Panel. Synfig Studio start in one window, and dock a number of individual panels into that window. The default layout of user interface is divided in three parts : the toolbox, the canvas and the other panels. SynfigStudio - UserInterface.
SYNFIG STUDIO :: DOCUMENTATION Welcome to the Synfig wiki! This wiki is the main documentation for the Synfig Project, a 2D animation and design program.The wiki documentation is divided in three main sections: User Documentation (for the users of the animation program), Developer Documentation (for the people developing the code of the program) and Writer Documentation (for the people that wish to keep this wiki up to date).CUT-OUT ANIMATION
GROUP LAYER
RENDER OPTIONS
2) Just before rendering, in canvas property->Other->Locks and links, set checkboxes for Image Aspect and Image Span, and uncheck Pixel Aspect (Depending on synfig version, this may possibly be the options dialog for File|Render, at least it is for me) 3) Change back to the Image settings. 4) Change resolution to 720x576 for PAL, 720*480 forNTSC.
DOC:BASIC MASKING
BASIC BONE TUTORIAL
In this tutorial we are going to rig an arm with fixed joints using the Skeleton Layer and three bones. The arm consists of three parts: the upperArm, the lowerArm and the hand. (pic.1) Each part is grouped in its own layer and the three groups are again grouped in a layer REALISTIC RAIN ANIMATION Start with a blank Synfig file, any size will do. To match a good-looking widescreen ratio this tutorial uses 360x203. 1. Add a new black & white Noise Gradient Layer, name it gr-nsClouds and change these values/parameters for the clouds: . Gradient to 00002e,ffffff; Random Seed to 1274099207; Size to 84,44 pt 'Interpolation to Cubic; Animation Speed to 0.5; step 2: An object under the rainBASIC BONE MORPHING
DOWNLOAD DEVELOPMENT VERSION Download. Synfig is a FREE software and you are not obligated to pay for this download – just enter “0” (zero) in the “Price” field above to download for free. Alternatively, you can use this private link. Our order process is conducted by our online reseller Paddle.com. Paddle.com isGETTING STARTED
The center of the window is the Canvas Window.A new Canvas Window appears each time Synfig Studio starts. The window represents the Root Canvas, not that it means much to you at the moment, but that's OK — we're just trying to show you around.In the upper left corner of the Canvas Window, you'll see a button with a caret.If you click on this caret button, the canvas window menu will pop up.BASIC BONE MORPHING
Linking bones to members. Then select your puppet, in the "Layers panel" and then make a Ctrl A in the canvas to select all vertices.. Then selected the layer "skeleton" We have create earlier, making Ctrl Clic, in the layers panel.In the "canvas" now right-click on one of the handles of the skeleton and make "Link to the skeleton".. You just have to create your animation. LAYERS - SYNFIG ANIMATION STUDIO - SYNFIG STUDIO Description. Position. The center (or axis) of the distortion. Radius. Defines the radious of the distortion (spherize) or a half of the bar (vertical or horizontal bar) Amount. Defines how much convex (positive) or concave (negative) the distortion is. Clip. When checked it only distorts inside the Radious area.CREATING SHAPES
Editing Splines. Ok, we now have a nice pretty white region with a thick black outline. Since we checked "Create Region" and "Create Outline" in previous steps, you'll notice that there are two layers that we have created — the Outline and the Region in the Layers Panel. Despite the fact that they are two separate layers, their vertices parameter has already been linked — so you can select PANELS - SYNFIG ANIMATION STUDIO - SYNFIG STUDIO Just drag and drop by the Panel tab and put it down on another dock or place it using the Placement Widget. This way, you can arrange the workspace of Synfig Studio to a SDI, MDI or TDI application, single or multiple windows allowing easily configure Synfig Studio in dual screen environment . The panels list and predefined workspaces can be SCALE TOOL - SYNFIG ANIMATION STUDIO The Tool Options Panel allows you to specify: . Lock Aspect Ratio : Prevent from changing the ratio x:y of the bounding box of the selected Handles.; Usage. Select multiple Handles, by either: . Pressing Control A to select all Handles; Dragging a rectangle around a group of Handles; Holding the Control key while clicking Handles to toggle their selected statusADDING LAYERS
Introduction. In the previous tutorial, you made your first simple animation by changing the attributes of primitive objects, such as: position, color, and size. These simple types, however, are seldom sufficient to create advanced characters and objects. To do so, Synfig uses layers.They are similar to layers used in other drawing applications in that they are used to separate differentCATEGORY:MANUAL
Pages in category "Manual" The following 53 pages are in this category, out of 53 total.PREFERENCES DIALOG
Purpose of the Preferences Dialog. The Preferences Dialog allows the user set certain properties and preferences that are globally adopted by the application and used by all the Documents opened or to be opened. The Preferences Dialog is organized in Tabs allowing modify the properties or preferences by meaningful groups. SYNFIG – FREE AND OPEN-SOURCE ANIMATION SOFTWAREDOWNLOAD STABLE VERSIONDOCUMENTATIONNEWSFORUMSDONATEDOWNLOAD DEVELOPMENT VERSION Development version. A good opportunity to try latest (experimental) features and bugfixes. Synfig is a free and open-source software licensed under GNU GPL v3. The sources are available on GitHub. INTERFACE - SYNFIG ANIMATION STUDIO 3 The other panels. 3.1 The Navigator, Tool Options and Layers Panel. 3.2 The Parameter and Time Track Panel. Synfig Studio start in one window, and dock a number of individual panels into that window. The default layout of user interface is divided in three parts : the toolbox, the canvas and the other panels. SynfigStudio - UserInterface.
SYNFIG STUDIO :: DOCUMENTATION Welcome to the Synfig wiki! This wiki is the main documentation for the Synfig Project, a 2D animation and design program.The wiki documentation is divided in three main sections: User Documentation (for the users of the animation program), Developer Documentation (for the people developing the code of the program) and Writer Documentation (for the people that wish to keep this wiki up to date).CUT-OUT ANIMATION
GROUP LAYER
RENDER OPTIONS
2) Just before rendering, in canvas property->Other->Locks and links, set checkboxes for Image Aspect and Image Span, and uncheck Pixel Aspect (Depending on synfig version, this may possibly be the options dialog for File|Render, at least it is for me) 3) Change back to the Image settings. 4) Change resolution to 720x576 for PAL, 720*480 forNTSC.
DOC:BASIC MASKING
BASIC BONE TUTORIAL
In this tutorial we are going to rig an arm with fixed joints using the Skeleton Layer and three bones. The arm consists of three parts: the upperArm, the lowerArm and the hand. (pic.1) Each part is grouped in its own layer and the three groups are again grouped in a layer REALISTIC RAIN ANIMATION Start with a blank Synfig file, any size will do. To match a good-looking widescreen ratio this tutorial uses 360x203. 1. Add a new black & white Noise Gradient Layer, name it gr-nsClouds and change these values/parameters for the clouds: . Gradient to 00002e,ffffff; Random Seed to 1274099207; Size to 84,44 pt 'Interpolation to Cubic; Animation Speed to 0.5; step 2: An object under the rainBASIC BONE MORPHING
SYNFIG – FREE AND OPEN-SOURCE ANIMATION SOFTWAREDOWNLOAD STABLE VERSIONDOCUMENTATIONNEWSFORUMSDONATEDOWNLOAD DEVELOPMENT VERSION Development version. A good opportunity to try latest (experimental) features and bugfixes. Synfig is a free and open-source software licensed under GNU GPL v3. The sources are available on GitHub. INTERFACE - SYNFIG ANIMATION STUDIO 3 The other panels. 3.1 The Navigator, Tool Options and Layers Panel. 3.2 The Parameter and Time Track Panel. Synfig Studio start in one window, and dock a number of individual panels into that window. The default layout of user interface is divided in three parts : the toolbox, the canvas and the other panels. SynfigStudio - UserInterface.
SYNFIG STUDIO :: DOCUMENTATION Welcome to the Synfig wiki! This wiki is the main documentation for the Synfig Project, a 2D animation and design program.The wiki documentation is divided in three main sections: User Documentation (for the users of the animation program), Developer Documentation (for the people developing the code of the program) and Writer Documentation (for the people that wish to keep this wiki up to date).CUT-OUT ANIMATION
GROUP LAYER
RENDER OPTIONS
2) Just before rendering, in canvas property->Other->Locks and links, set checkboxes for Image Aspect and Image Span, and uncheck Pixel Aspect (Depending on synfig version, this may possibly be the options dialog for File|Render, at least it is for me) 3) Change back to the Image settings. 4) Change resolution to 720x576 for PAL, 720*480 forNTSC.
DOC:BASIC MASKING
BASIC BONE TUTORIAL
In this tutorial we are going to rig an arm with fixed joints using the Skeleton Layer and three bones. The arm consists of three parts: the upperArm, the lowerArm and the hand. (pic.1) Each part is grouped in its own layer and the three groups are again grouped in a layer REALISTIC RAIN ANIMATION Start with a blank Synfig file, any size will do. To match a good-looking widescreen ratio this tutorial uses 360x203. 1. Add a new black & white Noise Gradient Layer, name it gr-nsClouds and change these values/parameters for the clouds: . Gradient to 00002e,ffffff; Random Seed to 1274099207; Size to 84,44 pt 'Interpolation to Cubic; Animation Speed to 0.5; step 2: An object under the rainBASIC BONE MORPHING
DOWNLOAD DEVELOPMENT VERSION Download. Synfig is a FREE software and you are not obligated to pay for this download – just enter “0” (zero) in the “Price” field above to download for free. Alternatively, you can use this private link. Our order process is conducted by our online reseller Paddle.com. Paddle.com isGETTING STARTED
The center of the window is the Canvas Window.A new Canvas Window appears each time Synfig Studio starts. The window represents the Root Canvas, not that it means much to you at the moment, but that's OK — we're just trying to show you around.In the upper left corner of the Canvas Window, you'll see a button with a caret.If you click on this caret button, the canvas window menu will pop up.BASIC BONE MORPHING
Linking bones to members. Then select your puppet, in the "Layers panel" and then make a Ctrl A in the canvas to select all vertices.. Then selected the layer "skeleton" We have create earlier, making Ctrl Clic, in the layers panel.In the "canvas" now right-click on one of the handles of the skeleton and make "Link to the skeleton".. You just have to create your animation. LAYERS - SYNFIG ANIMATION STUDIO - SYNFIG STUDIO Description. Position. The center (or axis) of the distortion. Radius. Defines the radious of the distortion (spherize) or a half of the bar (vertical or horizontal bar) Amount. Defines how much convex (positive) or concave (negative) the distortion is. Clip. When checked it only distorts inside the Radious area.CREATING SHAPES
Editing Splines. Ok, we now have a nice pretty white region with a thick black outline. Since we checked "Create Region" and "Create Outline" in previous steps, you'll notice that there are two layers that we have created — the Outline and the Region in the Layers Panel. Despite the fact that they are two separate layers, their vertices parameter has already been linked — so you can select PANELS - SYNFIG ANIMATION STUDIO - SYNFIG STUDIO Just drag and drop by the Panel tab and put it down on another dock or place it using the Placement Widget. This way, you can arrange the workspace of Synfig Studio to a SDI, MDI or TDI application, single or multiple windows allowing easily configure Synfig Studio in dual screen environment . The panels list and predefined workspaces can be SCALE TOOL - SYNFIG ANIMATION STUDIO The Tool Options Panel allows you to specify: . Lock Aspect Ratio : Prevent from changing the ratio x:y of the bounding box of the selected Handles.; Usage. Select multiple Handles, by either: . Pressing Control A to select all Handles; Dragging a rectangle around a group of Handles; Holding the Control key while clicking Handles to toggle their selected statusADDING LAYERS
Introduction. In the previous tutorial, you made your first simple animation by changing the attributes of primitive objects, such as: position, color, and size. These simple types, however, are seldom sufficient to create advanced characters and objects. To do so, Synfig uses layers.They are similar to layers used in other drawing applications in that they are used to separate differentCATEGORY:MANUAL
Pages in category "Manual" The following 53 pages are in this category, out of 53 total.PREFERENCES DIALOG
Purpose of the Preferences Dialog. The Preferences Dialog allows the user set certain properties and preferences that are globally adopted by the application and used by all the Documents opened or to be opened. The Preferences Dialog is organized in Tabs allowing modify the properties or preferences by meaningful groups. SYNFIG – FREE AND OPEN-SOURCE ANIMATION SOFTWAREDOWNLOAD STABLE VERSIONDOCUMENTATIONNEWSFORUMSDONATEDOWNLOAD DEVELOPMENT VERSION Development version. A good opportunity to try latest (experimental) features and bugfixes. Synfig is a free and open-source software licensed under GNU GPL v3. The sources are available on GitHub. INTERFACE - SYNFIG ANIMATION STUDIO 3 The other panels. 3.1 The Navigator, Tool Options and Layers Panel. 3.2 The Parameter and Time Track Panel. Synfig Studio start in one window, and dock a number of individual panels into that window. The default layout of user interface is divided in three parts : the toolbox, the canvas and the other panels. SynfigStudio - UserInterface.
SYNFIG STUDIO :: DOCUMENTATION Welcome to the Synfig wiki! This wiki is the main documentation for the Synfig Project, a 2D animation and design program.The wiki documentation is divided in three main sections: User Documentation (for the users of the animation program), Developer Documentation (for the people developing the code of the program) and Writer Documentation (for the people that wish to keep this wiki up to date).CUT-OUT ANIMATION
GROUP LAYER
RENDER OPTIONS
2) Just before rendering, in canvas property->Other->Locks and links, set checkboxes for Image Aspect and Image Span, and uncheck Pixel Aspect (Depending on synfig version, this may possibly be the options dialog for File|Render, at least it is for me) 3) Change back to the Image settings. 4) Change resolution to 720x576 for PAL, 720*480 forNTSC.
BASIC BONE TUTORIAL
In this tutorial we are going to rig an arm with fixed joints using the Skeleton Layer and three bones. The arm consists of three parts: the upperArm, the lowerArm and the hand. (pic.1) Each part is grouped in its own layer and the three groups are again grouped in a layer REALISTIC RAIN ANIMATION Start with a blank Synfig file, any size will do. To match a good-looking widescreen ratio this tutorial uses 360x203. 1. Add a new black & white Noise Gradient Layer, name it gr-nsClouds and change these values/parameters for the clouds: . Gradient to 00002e,ffffff; Random Seed to 1274099207; Size to 84,44 pt 'Interpolation to Cubic; Animation Speed to 0.5; step 2: An object under the rainBASIC BONE MORPHING
PREFERENCES DIALOG
Purpose of the Preferences Dialog. The Preferences Dialog allows the user set certain properties and preferences that are globally adopted by the application and used by all the Documents opened or to be opened. The Preferences Dialog is organized in Tabs allowing modify the properties or preferences by meaningful groups. DOWNLOAD DEVELOPMENT VERSION Download. Synfig is a FREE software and you are not obligated to pay for this download – just enter “0” (zero) in the “Price” field above to download for free. Alternatively, you can use this private link. Our order process is conducted by our online reseller Paddle.com. Paddle.com is LAYERS - SYNFIG ANIMATION STUDIO - SYNFIG STUDIO Description. Position. The center (or axis) of the distortion. Radius. Defines the radious of the distortion (spherize) or a half of the bar (vertical or horizontal bar) Amount. Defines how much convex (positive) or concave (negative) the distortion is. Clip. When checked it only distorts inside the Radious area. SCALE TOOL - SYNFIG ANIMATION STUDIO - SYNFIG STUDIO The Tool Options Panel allows you to specify: . Lock Aspect Ratio : Prevent from changing the ratio x:y of the bounding box of the selected Handles.; Usage. Select multiple Handles, by either: . Pressing Control A to select all Handles; Dragging a rectangle around a group of Handles; Holding the Control key while clicking Handles to toggle their selected statusROTATE TOOL
Usage. Select multiple Handles, by either: Pressing Control A to select all Handles. Dragging a rectangle around a group of Handles. Holding the Control key while clicking Handles to toggle their selected status. Then drag one of the selected Handles. All the selected Handles will move, rotating about the center of the selectedhandles group.
GALLERY - SYNFIG ANIMATION STUDIO - SYNFIG STUDIO This was the first animated production created using Synfig, and as such has become our “proof of concept” animation for it. Created by: Voria Studios. Source code is available, for educational use only, do not distribute or distribute modified renders. Happy Fun-Joy Time Start! Download (around 22 seconds, 2.9 megabytes) December 2004.BASIC BONE MORPHING
Linking bones to members. Then select your puppet, in the "Layers panel" and then make a Ctrl A in the canvas to select all vertices.. Then selected the layer "skeleton" We have create earlier, making Ctrl Clic, in the layers panel.In the "canvas" now right-click on one of the handles of the skeleton and make "Link to the skeleton".. You just have to create your animation.DOC:BASIC MASKING
Hiding. In this masking mode everything covered by the mask shape is hidden. Create a mask shape and place it above the elements you want to mask, either within the same group layer or above it and then grouping the mask and elements together. Set the blend method of the mask to "Alpha Over". Everything below the mask shape will now behidden.
PANELS - SYNFIG ANIMATION STUDIO - SYNFIG STUDIO Just drag and drop by the Panel tab and put it down on another dock or place it using the Placement Widget. This way, you can arrange the workspace of Synfig Studio to a SDI, MDI or TDI application, single or multiple windows allowing easily configure Synfig Studio in dual screen environment . The panels list and predefined workspaces can beROTATE LAYER
About Rotate Layers. A "Rotate Layer" change the position of any primitive layers below it in the layer hierarchy.It apply an "Angle" from his "Origin" to the resulting calculated points to render the shape, it doesn't modify the values of the underlying layers."Rotate Layer" is part of Transform Layers category. Parameters of Rotate Layers. The parameters of the rotate layers are:ANIMER DES FORMES
Ouvrez Synfig Studio— une nouvelle animation se crée.Si Synfig Studio est déjà ouvert, faites "Fichier → Nouveau" dans la boite à outil.. Premièrement, nous avons besoin de créer un dégradé comme arrière-plan. Cliquez sur les couleurs de contour et de remplissage dans la Boite à Outils pour sélectionner les couleurs que votre dégradé prendra. SYNFIG – FREE AND OPEN-SOURCE ANIMATION SOFTWAREDOWNLOAD STABLE VERSIONDOCUMENTATIONNEWSFORUMSDONATEDOWNLOAD DEVELOPMENT VERSION Development version. A good opportunity to try latest (experimental) features and bugfixes. Synfig is a free and open-source software licensed under GNU GPL v3. The sources are available on GitHub. DOWNLOAD DEVELOPMENT VERSION Download. Synfig is a FREE software and you are not obligated to pay for this download – just enter “0” (zero) in the “Price” field above to download for free. Alternatively, you can use this private link. Our order process is conducted by our online reseller Paddle.com. Paddle.com is the Merchant of Record for all our orders. DOWNLOAD STABLE VERSION Download. Synfig is a FREE software and you are not obligated to pay for this download – just enter “0” (zero) in the “Price” field above to download for free. Alternatively, you can use this private link. Our order process is conducted by our online reseller Paddle.com. Paddle.com is INTERFACE - SYNFIG ANIMATION STUDIO 3 The other panels. 3.1 The Navigator, Tool Options and Layers Panel. 3.2 The Parameter and Time Track Panel. Synfig Studio start in one window, and dock a number of individual panels into that window. The default layout of user interface is divided in three parts : the toolbox, the canvas and the other panels. SynfigStudio - UserInterface.
SYNFIG STUDIO :: DOCUMENTATION Welcome to the Synfig wiki! This wiki is the main documentation for the Synfig Project, a 2D animation and design program.The wiki documentation is divided in three main sections: User Documentation (for the users of the animation program), Developer Documentation (for the people developing the code of the program) and Writer Documentation (for the people that wish to keep this wiki up to date).CUT-OUT ANIMATION
TIMEBAR - SYNFIG ANIMATION STUDIO - SYNFIG STUDIO Timebar. The "Timebar" is the area above the Time Track Panel, the Graphs Panel and optionally at the bottom of the Canvas Window . In the Timebar you could find informations about : "Project duration" : as a frame ruler. "Current Time" : The horizontal orange/blue line. You can click and drag within it REALISTIC RAIN ANIMATION Start with a blank Synfig file, any size will do. To match a good-looking widescreen ratio this tutorial uses 360x203. 1. Add a new black & white Noise Gradient Layer, name it gr-nsClouds and change these values/parameters for the clouds: . Gradient to 00002e,ffffff; Random Seed to 1274099207; Size to 84,44 pt 'Interpolation to Cubic; Animation Speed to 0.5; step 2: An object under the rainOUTLINE LAYER
Outline Layers are used to hold strokes or edges of filled shapes. They give a cartoon look to an animation when added as the edge of the filled shapes. Also standalone Outlines (strokes) are used to define fold of 3D drawings and used together with shadows (created using gradients or feathering) are the basis of an artist's work.PREFERENCES DIALOG
Purpose of the Preferences Dialog. The Preferences Dialog allows the user set certain properties and preferences that are globally adopted by the application and used by all the Documents opened or to be opened. The Preferences Dialog is organized in Tabs allowing modify the properties or preferences by meaningful groups. SYNFIG – FREE AND OPEN-SOURCE ANIMATION SOFTWAREDOWNLOAD STABLE VERSIONDOCUMENTATIONNEWSFORUMSDONATEDOWNLOAD DEVELOPMENT VERSION Development version. A good opportunity to try latest (experimental) features and bugfixes. Synfig is a free and open-source software licensed under GNU GPL v3. The sources are available on GitHub. DOWNLOAD DEVELOPMENT VERSION Download. Synfig is a FREE software and you are not obligated to pay for this download – just enter “0” (zero) in the “Price” field above to download for free. Alternatively, you can use this private link. Our order process is conducted by our online reseller Paddle.com. Paddle.com is the Merchant of Record for all our orders. DOWNLOAD STABLE VERSION Download. Synfig is a FREE software and you are not obligated to pay for this download – just enter “0” (zero) in the “Price” field above to download for free. Alternatively, you can use this private link. Our order process is conducted by our online reseller Paddle.com. Paddle.com is INTERFACE - SYNFIG ANIMATION STUDIO 3 The other panels. 3.1 The Navigator, Tool Options and Layers Panel. 3.2 The Parameter and Time Track Panel. Synfig Studio start in one window, and dock a number of individual panels into that window. The default layout of user interface is divided in three parts : the toolbox, the canvas and the other panels. SynfigStudio - UserInterface.
SYNFIG STUDIO :: DOCUMENTATION Welcome to the Synfig wiki! This wiki is the main documentation for the Synfig Project, a 2D animation and design program.The wiki documentation is divided in three main sections: User Documentation (for the users of the animation program), Developer Documentation (for the people developing the code of the program) and Writer Documentation (for the people that wish to keep this wiki up to date).CUT-OUT ANIMATION
TIMEBAR - SYNFIG ANIMATION STUDIO - SYNFIG STUDIO Timebar. The "Timebar" is the area above the Time Track Panel, the Graphs Panel and optionally at the bottom of the Canvas Window . In the Timebar you could find informations about : "Project duration" : as a frame ruler. "Current Time" : The horizontal orange/blue line. You can click and drag within it REALISTIC RAIN ANIMATION Start with a blank Synfig file, any size will do. To match a good-looking widescreen ratio this tutorial uses 360x203. 1. Add a new black & white Noise Gradient Layer, name it gr-nsClouds and change these values/parameters for the clouds: . Gradient to 00002e,ffffff; Random Seed to 1274099207; Size to 84,44 pt 'Interpolation to Cubic; Animation Speed to 0.5; step 2: An object under the rainOUTLINE LAYER
Outline Layers are used to hold strokes or edges of filled shapes. They give a cartoon look to an animation when added as the edge of the filled shapes. Also standalone Outlines (strokes) are used to define fold of 3D drawings and used together with shadows (created using gradients or feathering) are the basis of an artist's work.PREFERENCES DIALOG
Purpose of the Preferences Dialog. The Preferences Dialog allows the user set certain properties and preferences that are globally adopted by the application and used by all the Documents opened or to be opened. The Preferences Dialog is organized in Tabs allowing modify the properties or preferences by meaningful groups. DOWNLOAD STABLE VERSION Download. Synfig is a FREE software and you are not obligated to pay for this download – just enter “0” (zero) in the “Price” field above to download for free. Alternatively, you can use this private link. Our order process is conducted by our online reseller Paddle.com. Paddle.com isGETTING STARTED
The center of the window is the Canvas Window.A new Canvas Window appears each time Synfig Studio starts. The window represents the Root Canvas, not that it means much to you at the moment, but that's OK — we're just trying to show you around.In the upper left corner of the Canvas Window, you'll see a button with a caret.If you click on this caret button, the canvas window menu will pop up. EXAMPLES - SYNFIG ANIMATION STUDIO - SYNFIG STUDIO Examples. Examples of Synfig-made animations and stills can be found in various places, including our website, and in a dedicated examples package released under the terms of GPL V3. Many topics, techniques and ideas have been explored over time by the community of Synfig users. Many creators were keen enough to share the source files oftheir
REFERENCE - SYNFIG ANIMATION STUDIO - SYNFIG STUDIO Noise Distort Layer. Skeleton Deformation LayerSkeleton Deformation Layer. Spherize Layer. Stretch Layer. Twirl Layer. Warp Layer Layer. Example. Filled Rectangle Layer. Metaballs Layer.TOOLBOX FILE MENU
The Toolbox File Menu has the following options: . New (Ctrl N): Create a new file.Its default name is Synfig Animation # where # starts from 1 and increases by 1 for each new file you create in a Synfigstudio session. It starts editing the "Root" canvas. Open (Ctrl O): Pops up a choose file dialog to select the sifz file you want to open.; Open Recent: It gives a dynamic menu list with theBASIC BONE MORPHING
Linking bones to members. Then select your puppet, in the "Layers panel" and then make a Ctrl A in the canvas to select all vertices.. Then selected the layer "skeleton" We have create earlier, making Ctrl Clic, in the layers panel.In the "canvas" now right-click on one of the handles of the skeleton and make "Link to the skeleton".. You just have to create your animation.ROTATE TOOL
Usage. Select multiple Handles, by either: Pressing Control A to select all Handles. Dragging a rectangle around a group of Handles. Holding the Control key while clicking Handles to toggle their selected status. Then drag one of the selected Handles. All the selected Handles will move, rotating about the center of the selectedhandles group.
BRUSH TOOL - SYNFIG ANIMATION STUDIO - SYNFIG STUDIO The "Brush Tool" allows you to draw freehand over the top of a raster image using the MyPaint brushes. Combined with Switch Group Layer you can create frame by frame animations. It is possible to paint on the Image Layer. Basic pressure sensitivity is supported. Image size is automatically expanded when you paint outside of image boundaries.ROTATE LAYER
About Rotate Layers. A "Rotate Layer" change the position of any primitive layers below it in the layer hierarchy.It apply an "Angle" from his "Origin" to the resulting calculated points to render the shape, it doesn't modify the values of the underlying layers."Rotate Layer" is part of Transform Layers category. Parameters of Rotate Layers. The parameters of the rotate layers are:TOOL OPTIONS PANEL
The "Tool Options Panel" displays the options you have available to apply to the current tool you're using. For the tools that can create multiple layers at the same time the panel contextually display the available options for the selected type of layers. The icon for the Tool Options Panel always changes to what tool you're currently using. SYNFIG – FREE AND OPEN-SOURCE ANIMATION SOFTWAREDOWNLOAD STABLE VERSIONDOCUMENTATIONNEWSFORUMSDONATEDOWNLOAD DEVELOPMENT VERSION Development version. A good opportunity to try latest (experimental) features and bugfixes. Synfig is a free and open-source software licensed under GNU GPL v3. The sources are available on GitHub. DOWNLOAD DEVELOPMENT VERSION Download. Synfig is a FREE software and you are not obligated to pay for this download – just enter “0” (zero) in the “Price” field above to download for free. Alternatively, you can use this private link. Our order process is conducted by our online reseller Paddle.com. Paddle.com is the Merchant of Record for all our orders. DOWNLOAD STABLE VERSION Download. Synfig is a FREE software and you are not obligated to pay for this download – just enter “0” (zero) in the “Price” field above to download for free. Alternatively, you can use this private link. Our order process is conducted by our online reseller Paddle.com. Paddle.com is INTERFACE - SYNFIG ANIMATION STUDIODOWNLOAD SYNFIG STUDIODOWNLOAD SYNFIG STUDIOIS SYNFIG STUDIO SAFESYNFIG STUDIO ANIMESYNFIG STUDIO APKSYNFIG STUDIO MAC 3 The other panels. 3.1 The Navigator, Tool Options and Layers Panel. 3.2 The Parameter and Time Track Panel. Synfig Studio start in one window, and dock a number of individual panels into that window. The default layout of user interface is divided in three parts : the toolbox, the canvas and the other panels. SynfigStudio - UserInterface.
SYNFIG STUDIO :: DOCUMENTATION Welcome to the Synfig wiki! This wiki is the main documentation for the Synfig Project, a 2D animation and design program.The wiki documentation is divided in three main sections: User Documentation (for the users of the animation program), Developer Documentation (for the people developing the code of the program) and Writer Documentation (for the people that wish to keep this wiki up to date).CUT-OUT ANIMATION
TIMEBAR - SYNFIG ANIMATION STUDIO - SYNFIG STUDIODOWNLOAD SYNFIG STUDIOIS SYNFIG STUDIO SAFESYNFIG STUDIO ANIMESYNFIG STUDIO OPENSYNFIG STUDIO TUTORIALSSYNFIG TUTORIALS Timebar. The "Timebar" is the area above the Time Track Panel, the Graphs Panel and optionally at the bottom of the Canvas Window . In the Timebar you could find informations about : "Project duration" : as a frame ruler. "Current Time" : The horizontal orange/blue line. You can click and drag within it REALISTIC RAIN ANIMATION Start with a blank Synfig file, any size will do. To match a good-looking widescreen ratio this tutorial uses 360x203. 1. Add a new black & white Noise Gradient Layer, name it gr-nsClouds and change these values/parameters for the clouds: . Gradient to 00002e,ffffff; Random Seed to 1274099207; Size to 84,44 pt 'Interpolation to Cubic; Animation Speed to 0.5; step 2: An object under the rainOUTLINE LAYER
Outline Layers are used to hold strokes or edges of filled shapes. They give a cartoon look to an animation when added as the edge of the filled shapes. Also standalone Outlines (strokes) are used to define fold of 3D drawings and used together with shadows (created using gradients or feathering) are the basis of an artist's work.PREFERENCES DIALOG
Purpose of the Preferences Dialog. The Preferences Dialog allows the user set certain properties and preferences that are globally adopted by the application and used by all the Documents opened or to be opened. The Preferences Dialog is organized in Tabs allowing modify the properties or preferences by meaningful groups. SYNFIG – FREE AND OPEN-SOURCE ANIMATION SOFTWAREDOWNLOAD STABLE VERSIONDOCUMENTATIONNEWSFORUMSDONATEDOWNLOAD DEVELOPMENT VERSION Development version. A good opportunity to try latest (experimental) features and bugfixes. Synfig is a free and open-source software licensed under GNU GPL v3. The sources are available on GitHub. DOWNLOAD DEVELOPMENT VERSION Download. Synfig is a FREE software and you are not obligated to pay for this download – just enter “0” (zero) in the “Price” field above to download for free. Alternatively, you can use this private link. Our order process is conducted by our online reseller Paddle.com. Paddle.com is the Merchant of Record for all our orders. DOWNLOAD STABLE VERSION Download. Synfig is a FREE software and you are not obligated to pay for this download – just enter “0” (zero) in the “Price” field above to download for free. Alternatively, you can use this private link. Our order process is conducted by our online reseller Paddle.com. Paddle.com is INTERFACE - SYNFIG ANIMATION STUDIODOWNLOAD SYNFIG STUDIODOWNLOAD SYNFIG STUDIOIS SYNFIG STUDIO SAFESYNFIG STUDIO ANIMESYNFIG STUDIO APKSYNFIG STUDIO MAC 3 The other panels. 3.1 The Navigator, Tool Options and Layers Panel. 3.2 The Parameter and Time Track Panel. Synfig Studio start in one window, and dock a number of individual panels into that window. The default layout of user interface is divided in three parts : the toolbox, the canvas and the other panels. SynfigStudio - UserInterface.
SYNFIG STUDIO :: DOCUMENTATION Welcome to the Synfig wiki! This wiki is the main documentation for the Synfig Project, a 2D animation and design program.The wiki documentation is divided in three main sections: User Documentation (for the users of the animation program), Developer Documentation (for the people developing the code of the program) and Writer Documentation (for the people that wish to keep this wiki up to date).CUT-OUT ANIMATION
TIMEBAR - SYNFIG ANIMATION STUDIO - SYNFIG STUDIODOWNLOAD SYNFIG STUDIOIS SYNFIG STUDIO SAFESYNFIG STUDIO ANIMESYNFIG STUDIO OPENSYNFIG STUDIO TUTORIALSSYNFIG TUTORIALS Timebar. The "Timebar" is the area above the Time Track Panel, the Graphs Panel and optionally at the bottom of the Canvas Window . In the Timebar you could find informations about : "Project duration" : as a frame ruler. "Current Time" : The horizontal orange/blue line. You can click and drag within it REALISTIC RAIN ANIMATION Start with a blank Synfig file, any size will do. To match a good-looking widescreen ratio this tutorial uses 360x203. 1. Add a new black & white Noise Gradient Layer, name it gr-nsClouds and change these values/parameters for the clouds: . Gradient to 00002e,ffffff; Random Seed to 1274099207; Size to 84,44 pt 'Interpolation to Cubic; Animation Speed to 0.5; step 2: An object under the rainOUTLINE LAYER
Outline Layers are used to hold strokes or edges of filled shapes. They give a cartoon look to an animation when added as the edge of the filled shapes. Also standalone Outlines (strokes) are used to define fold of 3D drawings and used together with shadows (created using gradients or feathering) are the basis of an artist's work.PREFERENCES DIALOG
Purpose of the Preferences Dialog. The Preferences Dialog allows the user set certain properties and preferences that are globally adopted by the application and used by all the Documents opened or to be opened. The Preferences Dialog is organized in Tabs allowing modify the properties or preferences by meaningful groups. DOWNLOAD STABLE VERSION Download. Synfig is a FREE software and you are not obligated to pay for this download – just enter “0” (zero) in the “Price” field above to download for free. Alternatively, you can use this private link. Our order process is conducted by our online reseller Paddle.com. Paddle.com isGETTING STARTED
The center of the window is the Canvas Window.A new Canvas Window appears each time Synfig Studio starts. The window represents the Root Canvas, not that it means much to you at the moment, but that's OK — we're just trying to show you around.In the upper left corner of the Canvas Window, you'll see a button with a caret.If you click on this caret button, the canvas window menu will pop up. EXAMPLES - SYNFIG ANIMATION STUDIO - SYNFIG STUDIO Examples. Examples of Synfig-made animations and stills can be found in various places, including our website, and in a dedicated examples package released under the terms of GPL V3. Many topics, techniques and ideas have been explored over time by the community of Synfig users. Many creators were keen enough to share the source files oftheir
REFERENCE - SYNFIG ANIMATION STUDIO - SYNFIG STUDIO Noise Distort Layer. Skeleton Deformation LayerSkeleton Deformation Layer. Spherize Layer. Stretch Layer. Twirl Layer. Warp Layer Layer. Example. Filled Rectangle Layer. Metaballs Layer.TOOLBOX FILE MENU
The Toolbox File Menu has the following options: . New (Ctrl N): Create a new file.Its default name is Synfig Animation # where # starts from 1 and increases by 1 for each new file you create in a Synfigstudio session. It starts editing the "Root" canvas. Open (Ctrl O): Pops up a choose file dialog to select the sifz file you want to open.; Open Recent: It gives a dynamic menu list with theBASIC BONE MORPHING
Linking bones to members. Then select your puppet, in the "Layers panel" and then make a Ctrl A in the canvas to select all vertices.. Then selected the layer "skeleton" We have create earlier, making Ctrl Clic, in the layers panel.In the "canvas" now right-click on one of the handles of the skeleton and make "Link to the skeleton".. You just have to create your animation.ROTATE TOOL
Usage. Select multiple Handles, by either: Pressing Control A to select all Handles. Dragging a rectangle around a group of Handles. Holding the Control key while clicking Handles to toggle their selected status. Then drag one of the selected Handles. All the selected Handles will move, rotating about the center of the selectedhandles group.
BRUSH TOOL - SYNFIG ANIMATION STUDIO - SYNFIG STUDIO The "Brush Tool" allows you to draw freehand over the top of a raster image using the MyPaint brushes. Combined with Switch Group Layer you can create frame by frame animations. It is possible to paint on the Image Layer. Basic pressure sensitivity is supported. Image size is automatically expanded when you paint outside of image boundaries.ROTATE LAYER
About Rotate Layers. A "Rotate Layer" change the position of any primitive layers below it in the layer hierarchy.It apply an "Angle" from his "Origin" to the resulting calculated points to render the shape, it doesn't modify the values of the underlying layers."Rotate Layer" is part of Transform Layers category. Parameters of Rotate Layers. The parameters of the rotate layers are:TOOL OPTIONS PANEL
The "Tool Options Panel" displays the options you have available to apply to the current tool you're using. For the tools that can create multiple layers at the same time the panel contextually display the available options for the selected type of layers. The icon for the Tool Options Panel always changes to what tool you're currently using.Skip to content
June 2021 donations: $613 contributed by 50 awesome peopleSupport Synfig
Synfig
* Download
* Documentation
* News
* Forums
* Development
* Donate
*
Search for:
__ Menu Close
* Download
* Documentation
* News
* Forums
* Development
* Donate
*
__
HOME
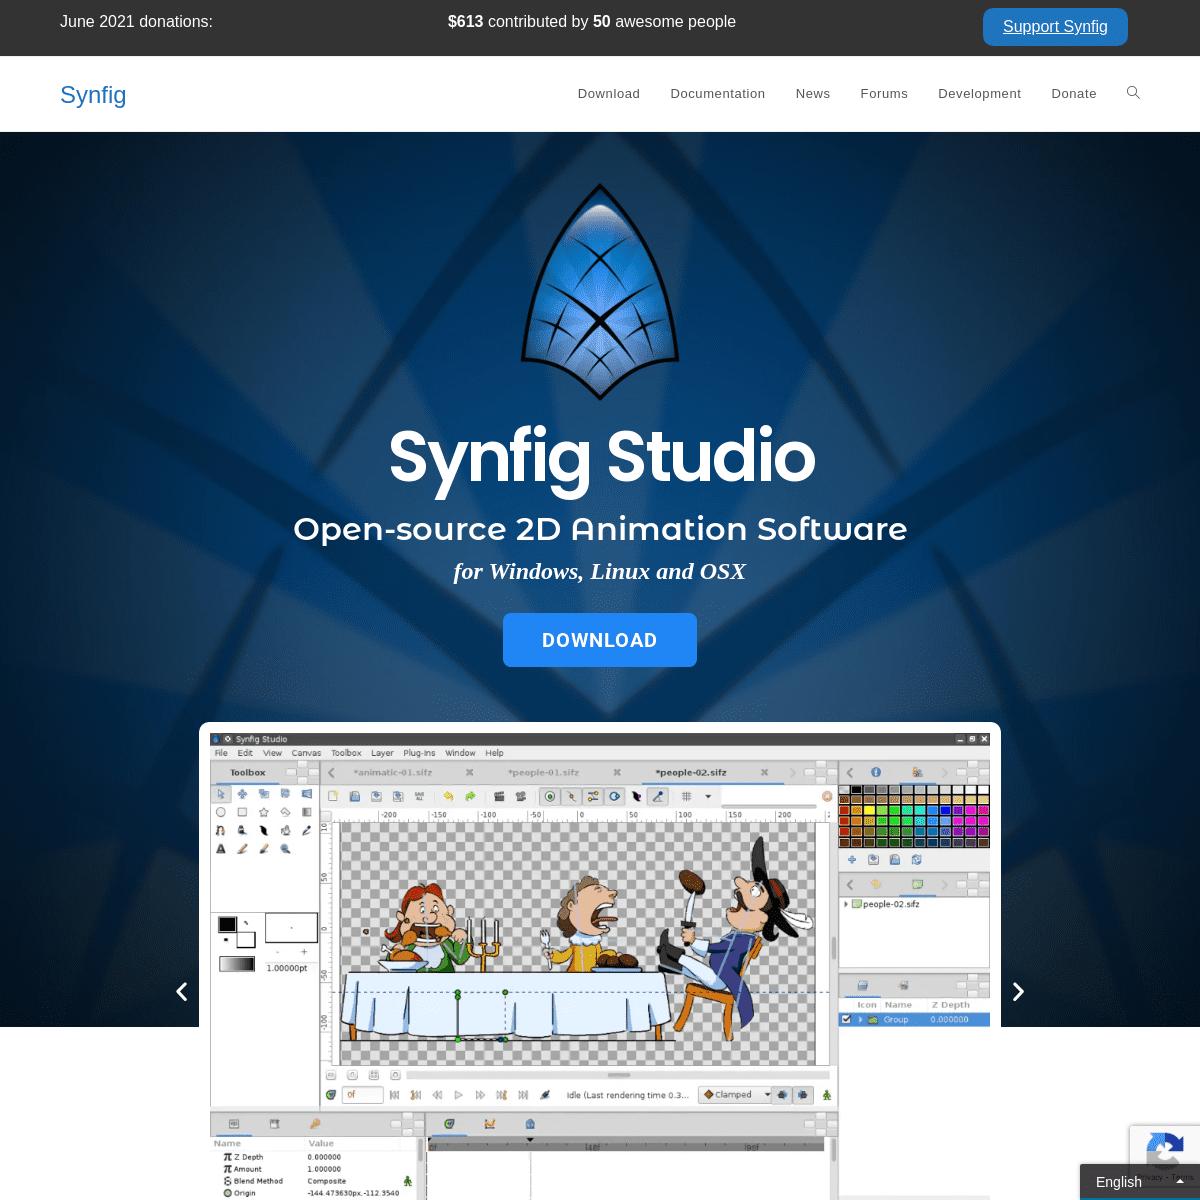
SYNFIG STUDIO
OPEN-SOURCE 2D ANIMATION SOFTWARE for Windows, Linux and OSXDownload
__ Previous
__ Next
DOWNLOAD
We providing two flavors of binary builds of Synfig for all supportedoperating systems.
Please choose which one is best fit for you.Stable version
A proven and well-tested set of features. For everyday use in yourprojects.
Development version
A good opportunity to try latest (experimental) features and bugfixes. Synfig is a free and open-source software licensed under GNU GPL v3. The sources are AVAILABLE ON GITHUB.
FEATURES
VECTOR TWEENING
Transform any vector shape into another! Synfig gives you powerful tools for full control on your vector artwork. Just set the key positions and inbetween frames will be calculated automatically.LAYERS AND FILTERS
Synfig provides 50+ layers to create artwork and animation of any complexity. Choose from various layer types: geometric, gradients, filters, distortions, transformations, fractals and others.BONES
Full-featured bone system allows to create cutout animation using bitmap images or control your vector artwork. Use additional Skeleton Distortion layer to apply complex deformations to bitmap artwork.ADVANCED CONTROLS
You can link parameters of various layers – directly or through mathematical expressions. This allows you to create advanced character puppets and other dynamic structures. The illustrations above use artwork and characters by Morevna Projectand Nina Paley.
SYSTEM REQUIREMENTS
WINDOWS
* Microsoft Windows 7 or above * Dual-Core CPU at 2 Ghz or better* 2GB RAM or more
OS X
* OS X 10.8 or above * Dual-Core CPU at 2 Ghz or better* 2GB RAM or more
LINUX
* Linux distro released in 2012 or later * Dual-Core CPU at 2 Ghz or better* 2GB RAM or more
FEATURED WORKS
__ Play Video
MOREVNA: DEMO
by Morevna Project
__ Play Video
MOREVNA EPISODE 3.0.2by Morevna Project
__ Play Video
POLAR DETECTIVE – PROLOGUEby Cyan Los
__ Play Video
ANIMATION REEL
by Van Chatto
__ Play Video
PROLOGUE
by Voria Studio
__ Play Video
THE DEADLINE
by Morevna School
__
LEARN SYNFIG
Documentation
Video course
Get video training course in your language:English
Русский
Deutsch
Français
SUPPORTED BY
LATEST NEWS
SYNFIG STUDIO 1.4.1 RELEASED__ May 9, 2021 •
__ Uncategorized •__ 1 Comment
New stable release of Synfig Studio is available for download now! This version adds the possibility to export videos with sound and alsodelivers many …
SYNFIG IS ACCEPTED TO PARTICIPATE IN GOOGLE SUMMER OF CODE 2021 __ March 14, 2021 • __ Uncategorized •__ No Comments
Great news – Synfig is one of 202 organizations who has been accepted to participate in Google Summer of Code this year again! Thisis …
SYNFIG STUDIO 1.4.0 RELEASED __ November 14, 2020 • __ Releases , Releases(stable)
•
__ 15 Comments
It’s been more than 2 years since our last stable release, time to update! After 26 months of development we are happy to announce new…
USERS NOW CAN HELP WITH TESTING NEW PULL REQUESTS __ October 12, 2020 •__ News •
__ No Comments
Pull Request – is a proposal for including some code improvement into main code of application. In our project all code contributions are managed through …View more...
Contact Us | Subscribe | Privacy Policy Copyright 2021 - Synfig - OceanWP Theme by Nick* English
* 中文
* 中文 (台灣)
* Nederlands
* Français
* Deutsch
* Ελληνικά
* Bahasa Indonesia
* Italiano
* Kurdî, كوردی* Polski
* Português
* Русский
* Español
* Uzbek (Latin)
English
Details
3