2
More Annotations


1


1
Favourite Annotations


3


1
Text
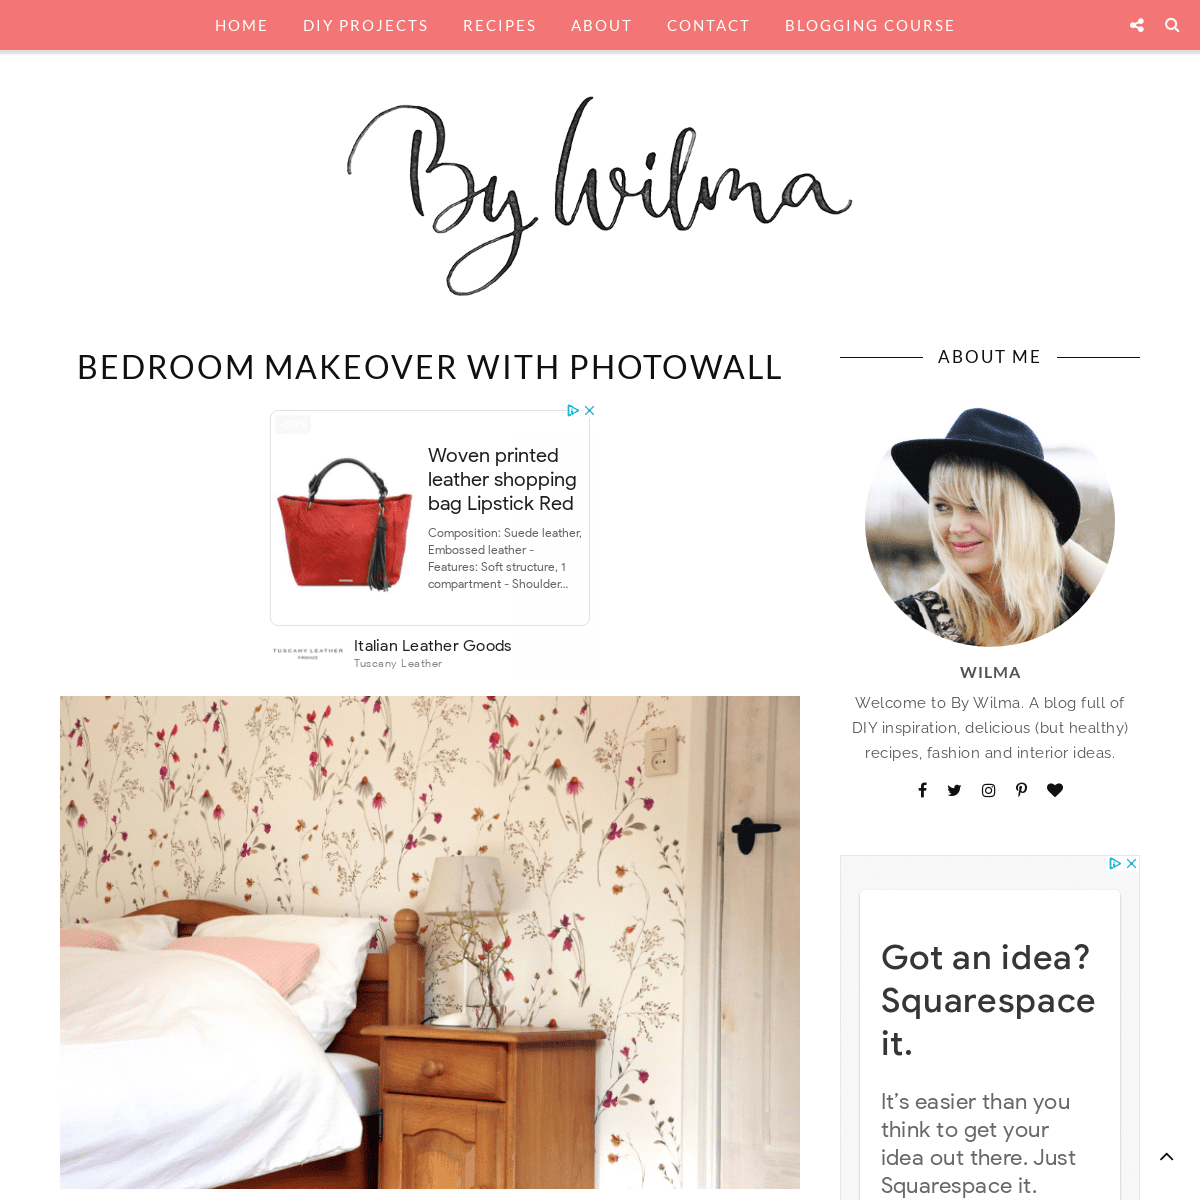
BY WILMA | A BLOG BY WILMA BOEKHOLTDIY PROJECTSRECIPESABOUTCONTACTBLOGGING COURSE DIY – Super easy bohemian flip flops makeover. These bohemian are an absolute must have for this summer. They are super easy to make but are so much prettier than simple store bought flip flops! You can use any ribbon you like for this project, as long as it’s not wider than 1/2 inch or 1,25 cm. DIY - OLIVE OIL SPRAY BOTTLE A while back I bought a spray bottle with olive oil. The olive oil wasn’t amazing, but I loved the way it worked. It makes it so easy to grease a dish, love it! But why not make a spray bottle with your favorite olive oil? I mean, how hard can it be? Well it turned out to be really easy. You need a spray bottle and your favorite olive oil. Just add the olive oil to your spray bottle and DIY - RAFFIA BRACELET Another bracelet tutorial today! This one is made with raffia. I love the material because it’s so natural and easy to work with. I bought it in a package with three colors for just 60 Euro cents. The bracelet I made with the raffia is really easy to make and perfect for summer! Learn how to make this cute raffia bracelet after the jump. . . What you need for this raffia bracelet – raffia DIY - HOW TO PRINT ON BOOKPAGES How to make it. First print your image on the printer paper. Cover the image with the book page and use masking tape to keep it in place. Run the page again trough the printer. Now remove the masking tape and your book page print is ready for framing! The illustration of the bird is from Flow Magazine. art bookpage etsy frame print. DIY - UPCYCLED TINS WITH LIDS! How to make upcycled tins with lids. 1. Draw a line around your tin on the MDF for the lid. The lid will exist out of two pieces of MDF, so do this two times. The second time you should draw another circle within the one you just made that’s about 2 millimeter smaller in diameter. This piece should fit inside the tin. DIY - PAINTED CUTTING BOARD I love to serve food on cutting boards. It just looks so rustic and pure. So effortless, but so pretty at the same time. Or, as my boyfriend would say, very ‘Jamie Oliver’. I do love a good ‘plain’ cutting board for this purpose, but sometimes a girl needs a little more than that. Not all food is pretty on it’s own, you know. So today I have a painted cutting board / serving tray DIY DIY - HOW TO MAKE VINYL LETTER DECALS A lot of craft projects contain vinyl letter decals. I really like them, but I don’t want to pay a lot of money for them. I always find it very strange that the vinyl letters are quite expensive compared to the big sheets. Besides that it’s nice to be able to choose from all the free fonts the web has to offer instead of just a few basic ones. I thought I could make them myself. This DIY - HOW TO PRESS FLOWERS WITH AN IRON A little while ago I saw this idea on Pinterest: pressing flowers with an iron. Super handy when you don’t want to wait a few weeks until they are all done and dry. I decided to try it myself. And I must say: it works pretty well! Not every flower is perfect for this and some flowers needed a day or two drying after being ironed. But if you have the right flower, they are absolutely DIY - HOW TO MAKE A TEA COZY (WITH TEA COZY PATTERN) How to make a tea cozy. 1. Gather your materials and decide on the color and fabric combination for your tea cozy. 2. Print the tea cozy pattern, cut it out and put it together with tape. For the piece of fabric that you use for the bottom of the tea cozy plus the inside you need tea cozy pattern piece number A+B. DIY - AN EASY WAY TO MOD PODGE YOUR SHOES WITH FABRIC Place for the second shoe the contact paper on the other side of your fabric and repeat. 4. Put a thick layer of Mod Podge on your shoe and glue the fabric on your shoe. You may need to make some small cuts to make it fit. Make some cuts at the excess fabric on top and glue it inside your shoe. 5. BY WILMA | A BLOG BY WILMA BOEKHOLTDIY PROJECTSRECIPESABOUTCONTACTBLOGGING COURSE DIY – Super easy bohemian flip flops makeover. These bohemian are an absolute must have for this summer. They are super easy to make but are so much prettier than simple store bought flip flops! You can use any ribbon you like for this project, as long as it’s not wider than 1/2 inch or 1,25 cm. DIY - OLIVE OIL SPRAY BOTTLE A while back I bought a spray bottle with olive oil. The olive oil wasn’t amazing, but I loved the way it worked. It makes it so easy to grease a dish, love it! But why not make a spray bottle with your favorite olive oil? I mean, how hard can it be? Well it turned out to be really easy. You need a spray bottle and your favorite olive oil. Just add the olive oil to your spray bottle and DIY - RAFFIA BRACELET Another bracelet tutorial today! This one is made with raffia. I love the material because it’s so natural and easy to work with. I bought it in a package with three colors for just 60 Euro cents. The bracelet I made with the raffia is really easy to make and perfect for summer! Learn how to make this cute raffia bracelet after the jump. . . What you need for this raffia bracelet – raffia DIY - HOW TO PRINT ON BOOKPAGES How to make it. First print your image on the printer paper. Cover the image with the book page and use masking tape to keep it in place. Run the page again trough the printer. Now remove the masking tape and your book page print is ready for framing! The illustration of the bird is from Flow Magazine. art bookpage etsy frame print. DIY - UPCYCLED TINS WITH LIDS! How to make upcycled tins with lids. 1. Draw a line around your tin on the MDF for the lid. The lid will exist out of two pieces of MDF, so do this two times. The second time you should draw another circle within the one you just made that’s about 2 millimeter smaller in diameter. This piece should fit inside the tin. DIY - PAINTED CUTTING BOARD I love to serve food on cutting boards. It just looks so rustic and pure. So effortless, but so pretty at the same time. Or, as my boyfriend would say, very ‘Jamie Oliver’. I do love a good ‘plain’ cutting board for this purpose, but sometimes a girl needs a little more than that. Not all food is pretty on it’s own, you know. So today I have a painted cutting board / serving tray DIY DIY - HOW TO MAKE VINYL LETTER DECALS A lot of craft projects contain vinyl letter decals. I really like them, but I don’t want to pay a lot of money for them. I always find it very strange that the vinyl letters are quite expensive compared to the big sheets. Besides that it’s nice to be able to choose from all the free fonts the web has to offer instead of just a few basic ones. I thought I could make them myself. This DIY - HOW TO PRESS FLOWERS WITH AN IRON A little while ago I saw this idea on Pinterest: pressing flowers with an iron. Super handy when you don’t want to wait a few weeks until they are all done and dry. I decided to try it myself. And I must say: it works pretty well! Not every flower is perfect for this and some flowers needed a day or two drying after being ironed. But if you have the right flower, they are absolutely DIY - HOW TO MAKE A TEA COZY (WITH TEA COZY PATTERN) How to make a tea cozy. 1. Gather your materials and decide on the color and fabric combination for your tea cozy. 2. Print the tea cozy pattern, cut it out and put it together with tape. For the piece of fabric that you use for the bottom of the tea cozy plus the inside you need tea cozy pattern piece number A+B. DIY - AN EASY WAY TO MOD PODGE YOUR SHOES WITH FABRIC Place for the second shoe the contact paper on the other side of your fabric and repeat. 4. Put a thick layer of Mod Podge on your shoe and glue the fabric on your shoe. You may need to make some small cuts to make it fit. Make some cuts at the excess fabric on top and glue it inside your shoe. 5. BY WILMA | A BLOG BY WILMA BOEKHOLT DIY – Super easy bohemian flip flops makeover. These bohemian are an absolute must have for this summer. They are super easy to make but are so much prettier than simple store bought flip flops! You can use any ribbon you like for this project, as long as it’s not wider than 1/2 inch or 1,25 cm. RECIPE - KLETSKOPPEN A Kletskop is a classic Dutch cookie. They are sweet but with a little darkness in it. You could garnish desserts with them or just with some tea. Kletskoppen look really delicate but they are very simple to make! Today I’m sharing my recipe for Kletskoppen with you. Enjoy! Learn how to make Kletskoppen after the jump. . . What you need for Kletskoppen – 60 grams of flour – 40 grams of
DIY - BOOT JEWELRY
How to create belt jewelry. 1. Wrap the belt around your boot and cut the belt at the right length. Cut another piece of the belt on the same length for the other boot. 2. Cut for both boots a piece of ribbon that is approximately 8 cm longer that the piece of belt you just cut. Fold over the ends of your ribbon for 2,5 cm and glue them DIY - HOW TO PRESS FLOWERS WITH AN IRON A little while ago I saw this idea on Pinterest: pressing flowers with an iron. Super handy when you don’t want to wait a few weeks until they are all done and dry. I decided to try it myself. And I must say: it works pretty well! Not every flower is perfect for this and some flowers needed a day or two drying after being ironed. But if you have the right flower, they are absolutely DIY - PRINTABLE FOX CORNER BOOKMARK I love the cuteness and color of foxes. I know, I know, they aren’t that cute in real life. But in print or fabric they are super cute. Today I want to share a cute printable fox corner bookmark with you. Perfect for children books but why not for your own books? It makes even the most boring things look cuter. Not that my book really needed it because I looooove that cacti print! The DIY - INSPIRATIONAL QUOTE SIGN How to make this DIY inspirational quote sign. 1. Choose a font and the text on your computer. Print it out in the desired size. 2. Cut the words out and put them on your piece of wood. If the size of the text is right you can move on to the next step. If not, you have torepeat step one. 3.
'STRESSED IS DESSERTS SPELLED BACKWARDS' When I came across the quote ‘Stressed is Desserts spelled backwards’ I knew I had to do something with it. I really needed it to be in my kitchen. I love desserts and this quote sounds like an excuse to eat just a little more of them. To start this new blog I am giving you this poster for free as a download. Find the download link after the jump . . . The poster is made in a nice vintage DIY - AN EASY WAY TO MOD PODGE YOUR SHOES WITH FABRIC Place for the second shoe the contact paper on the other side of your fabric and repeat. 4. Put a thick layer of Mod Podge on your shoe and glue the fabric on your shoe. You may need to make some small cuts to make it fit. Make some cuts at the excess fabric on top and glue it inside your shoe. 5. DIY - HOW TO MAKE A PHOTO IPHONE CASE 2. Trace around your iPhone and cut the photo out. 3. Put the photo inside your clear iPhone case and trace around the opening for your camera. Cut this out. You may want to use small craft scissors for this. This makes it easier and more precise! 4. Put your case with the photo in it on your iPhone and your done! DIY - LEATHER ARROW BRACELET I love the arrows you see everywhere in jewelry right now. So I thought I could make a cute little bracelet with arrows. For this project I used an old leather belt and a chain necklace I had laying around. So yes, another cute recycling project! Learn how to make this cute leather arrow bracelet after the jump. . . What you need for this leather arrow bracelet – old leather belt (not to BY WILMA | A BLOG BY WILMA BOEKHOLTDIY PROJECTSRECIPESABOUTCONTACTBLOGGING COURSE DIY – Super easy bohemian flip flops makeover. These bohemian are an absolute must have for this summer. They are super easy to make but are so much prettier than simple store bought flip flops! You can use any ribbon you like for this project, as long as it’s not wider than 1/2 inch or 1,25 cm. HOW TO GROW GINGER FROM A STORE BOUGHT GINGER ROOT Step 2. Soak your ginger. Most store bought ginger has growth inhibitors on them. In order to remove this and also to hydrate the root you have to soak your ginger in a bowl of water for 12-24 hours. Step 3. Plant your ginger. Ginger roots grow horizontally, so you need a wide but shallow pot. DIY - HOW TO PRESS FLOWERS WITH AN IRON A little while ago I saw this idea on Pinterest: pressing flowers with an iron. Super handy when you don’t want to wait a few weeks until they are all done and dry. I decided to try it myself. And I must say: it works pretty well! Not every flower is perfect for this and some flowers needed a day or two drying after being ironed. But if you have the right flower, they are absolutely DIY - UPCYCLED TINS WITH LIDS! How to make upcycled tins with lids. 1. Draw a line around your tin on the MDF for the lid. The lid will exist out of two pieces of MDF, so do this two times. The second time you should draw another circle within the one you just made that’s about 2 millimeter smaller in diameter. This piece should fit inside the tin. DIY - OLIVE OIL SPRAY BOTTLE A while back I bought a spray bottle with olive oil. The olive oil wasn’t amazing, but I loved the way it worked. It makes it so easy to grease a dish, love it! But why not make a spray bottle with your favorite olive oil? I mean, how hard can it be? Well it turned out to be really easy. You need a spray bottle and your favorite olive oil. Just add the olive oil to your spray bottle and DIY - RAFFIA BRACELET Another bracelet tutorial today! This one is made with raffia. I love the material because it’s so natural and easy to work with. I bought it in a package with three colors for just 60 Euro cents. The bracelet I made with the raffia is really easy to make and perfect for summer! Learn how to make this cute raffia bracelet after the jump. . . What you need for this raffia bracelet – raffia DIY - HOW TO MAKE VINYL LETTER DECALS A lot of craft projects contain vinyl letter decals. I really like them, but I don’t want to pay a lot of money for them. I always find it very strange that the vinyl letters are quite expensive compared to the big sheets. Besides that it’s nice to be able to choose from all the free fonts the web has to offer instead of just a few basic ones. I thought I could make them myself. This DIY - PAINTED CUTTING BOARD I love to serve food on cutting boards. It just looks so rustic and pure. So effortless, but so pretty at the same time. Or, as my boyfriend would say, very ‘Jamie Oliver’. I do love a good ‘plain’ cutting board for this purpose, but sometimes a girl needs a little more than that. Not all food is pretty on it’s own, you know. So today I have a painted cutting board / serving tray DIY DIY - PRINTABLE FOX CORNER BOOKMARK I love the cuteness and color of foxes. I know, I know, they aren’t that cute in real life. But in print or fabric they are super cute. Today I want to share a cute printable fox corner bookmark with you. Perfect for children books but why not for your own books? It makes even the most boring things look cuter. Not that my book really needed it because I looooove that cacti print! The DIY - HOW TO MAKE A TEA COZY (WITH TEA COZY PATTERN) How to make a tea cozy. 1. Gather your materials and decide on the color and fabric combination for your tea cozy. 2. Print the tea cozy pattern, cut it out and put it together with tape. For the piece of fabric that you use for the bottom of the tea cozy plus the inside you need tea cozy pattern piece number A+B. BY WILMA | A BLOG BY WILMA BOEKHOLTDIY PROJECTSRECIPESABOUTCONTACTBLOGGING COURSE DIY – Super easy bohemian flip flops makeover. These bohemian are an absolute must have for this summer. They are super easy to make but are so much prettier than simple store bought flip flops! You can use any ribbon you like for this project, as long as it’s not wider than 1/2 inch or 1,25 cm. HOW TO GROW GINGER FROM A STORE BOUGHT GINGER ROOT Step 2. Soak your ginger. Most store bought ginger has growth inhibitors on them. In order to remove this and also to hydrate the root you have to soak your ginger in a bowl of water for 12-24 hours. Step 3. Plant your ginger. Ginger roots grow horizontally, so you need a wide but shallow pot. DIY - HOW TO PRESS FLOWERS WITH AN IRON A little while ago I saw this idea on Pinterest: pressing flowers with an iron. Super handy when you don’t want to wait a few weeks until they are all done and dry. I decided to try it myself. And I must say: it works pretty well! Not every flower is perfect for this and some flowers needed a day or two drying after being ironed. But if you have the right flower, they are absolutely DIY - UPCYCLED TINS WITH LIDS! How to make upcycled tins with lids. 1. Draw a line around your tin on the MDF for the lid. The lid will exist out of two pieces of MDF, so do this two times. The second time you should draw another circle within the one you just made that’s about 2 millimeter smaller in diameter. This piece should fit inside the tin. DIY - OLIVE OIL SPRAY BOTTLE A while back I bought a spray bottle with olive oil. The olive oil wasn’t amazing, but I loved the way it worked. It makes it so easy to grease a dish, love it! But why not make a spray bottle with your favorite olive oil? I mean, how hard can it be? Well it turned out to be really easy. You need a spray bottle and your favorite olive oil. Just add the olive oil to your spray bottle and DIY - RAFFIA BRACELET Another bracelet tutorial today! This one is made with raffia. I love the material because it’s so natural and easy to work with. I bought it in a package with three colors for just 60 Euro cents. The bracelet I made with the raffia is really easy to make and perfect for summer! Learn how to make this cute raffia bracelet after the jump. . . What you need for this raffia bracelet – raffia DIY - HOW TO MAKE VINYL LETTER DECALS A lot of craft projects contain vinyl letter decals. I really like them, but I don’t want to pay a lot of money for them. I always find it very strange that the vinyl letters are quite expensive compared to the big sheets. Besides that it’s nice to be able to choose from all the free fonts the web has to offer instead of just a few basic ones. I thought I could make them myself. This DIY - PAINTED CUTTING BOARD I love to serve food on cutting boards. It just looks so rustic and pure. So effortless, but so pretty at the same time. Or, as my boyfriend would say, very ‘Jamie Oliver’. I do love a good ‘plain’ cutting board for this purpose, but sometimes a girl needs a little more than that. Not all food is pretty on it’s own, you know. So today I have a painted cutting board / serving tray DIY DIY - PRINTABLE FOX CORNER BOOKMARK I love the cuteness and color of foxes. I know, I know, they aren’t that cute in real life. But in print or fabric they are super cute. Today I want to share a cute printable fox corner bookmark with you. Perfect for children books but why not for your own books? It makes even the most boring things look cuter. Not that my book really needed it because I looooove that cacti print! The DIY - HOW TO MAKE A TEA COZY (WITH TEA COZY PATTERN) How to make a tea cozy. 1. Gather your materials and decide on the color and fabric combination for your tea cozy. 2. Print the tea cozy pattern, cut it out and put it together with tape. For the piece of fabric that you use for the bottom of the tea cozy plus the inside you need tea cozy pattern piece number A+B. DIY - HOW TO PRINT ON BOOKPAGES How to make it. First print your image on the printer paper. Cover the image with the book page and use masking tape to keep it in place. Run the page again trough the printer. Now remove the masking tape and your book page print is ready for framing! The illustration of the bird is from Flow Magazine. art bookpage etsy frame print.DIY - BOOT JEWELRY
How to create belt jewelry. 1. Wrap the belt around your boot and cut the belt at the right length. Cut another piece of the belt on the same length for the other boot. 2. Cut for both boots a piece of ribbon that is approximately 8 cm longer that the piece of belt you just cut. Fold over the ends of your ribbon for 2,5 cm and glue them RECIPE - KLETSKOPPEN A Kletskop is a classic Dutch cookie. They are sweet but with a little darkness in it. You could garnish desserts with them or just with some tea. Kletskoppen look really delicate but they are very simple to make! Today I’m sharing my recipe for Kletskoppen with you. Enjoy! Learn how to make Kletskoppen after the jump. . . What you need for Kletskoppen – 60 grams of flour – 40 grams of DIY - INSPIRATIONAL QUOTE SIGN How to make this DIY inspirational quote sign. 1. Choose a font and the text on your computer. Print it out in the desired size. 2. Cut the words out and put them on your piece of wood. If the size of the text is right you can move on to the next step. If not, you have torepeat step one. 3.
DIY - FABRIC COVERED JARS How to make a fabric-covered jar. 1. Find a few pots whit hollow lids. Often you can remove the plastic on the inside of the lids. Spray the inside with white paint and put the plastic back into place. 2. Cut the fabric to size. Take an extra inch in width and 2 inch in height. Make cuts at the bottom of the fabric for about 1 inch as seen in RECIPE - TOMATO SALSA AS TORTILLA CHIPS DIP SAUCE! My sister is going to stay with us for a few nights so I decided to make something delicious for tonight. I have to work, but my boyfriend and sister will have this delicious tomato salsa that is perfect as a tortilla chips dip sauce! It’s just a few minutes work but it really tastes great! Learn how to make this delicious tomato salsa after the jump. . . What you need for this tomato salsaDIY - MAP WALLET
This beautiful wallet is made out of a map. I made it for my boyfriend for valentines day. Of course you could make it with any paper you really like. It’s really easy to make, so let’s get started! The full instruction continues after the jump . . . What you need – a map or some other pretty paper – transparent self-adhesive foil (contact paper) – a ruler – a pencil – a DIY - WASHER NECKLACE Lay down your materials. 2. Use the nail polish to give the washers the color you want. Let dry. 3. Attach the washers with the jump rings like shown in the picture. 4. Attach the washers to the chain. If your chain is fine, like mine, you may need a smaller jump ring between the bigger one and the chain. 'STRESSED IS DESSERTS SPELLED BACKWARDS' When I came across the quote ‘Stressed is Desserts spelled backwards’ I knew I had to do something with it. I really needed it to be in my kitchen. I love desserts and this quote sounds like an excuse to eat just a little more of them. To start this new blog I am giving you this poster for free as a download. Find the download link after the jump . . . The poster is made in a nice vintage DIY - AN EASY WAY TO MOD PODGE YOUR SHOES WITH FABRIC Place for the second shoe the contact paper on the other side of your fabric and repeat. 4. Put a thick layer of Mod Podge on your shoe and glue the fabric on your shoe. You may need to make some small cuts to make it fit. Make some cuts at the excess fabric on top and glue it inside your shoe. 5. BY WILMA | A BLOG BY WILMA BOEKHOLTDIY PROJECTSRECIPESABOUTCONTACTBLOGGING COURSE DIY – Super easy bohemian flip flops makeover. These bohemian are an absolute must have for this summer. They are super easy to make but are so much prettier than simple store bought flip flops! You can use any ribbon you like for this project, as long as it’s not wider than 1/2 inch or 1,25 cm. HOW TO GROW GINGER FROM A STORE BOUGHT GINGER ROOT Step 2. Soak your ginger. Most store bought ginger has growth inhibitors on them. In order to remove this and also to hydrate the root you have to soak your ginger in a bowl of water for 12-24 hours. Step 3. Plant your ginger. Ginger roots grow horizontally, so you need a wide but shallow pot. DIY - HOW TO PRESS FLOWERS WITH AN IRON A little while ago I saw this idea on Pinterest: pressing flowers with an iron. Super handy when you don’t want to wait a few weeks until they are all done and dry. I decided to try it myself. And I must say: it works pretty well! Not every flower is perfect for this and some flowers needed a day or two drying after being ironed. But if you have the right flower, they are absolutely DIY - UPCYCLED TINS WITH LIDS! How to make upcycled tins with lids. 1. Draw a line around your tin on the MDF for the lid. The lid will exist out of two pieces of MDF, so do this two times. The second time you should draw another circle within the one you just made that’s about 2 millimeter smaller in diameter. This piece should fit inside the tin. DIY - OLIVE OIL SPRAY BOTTLE A while back I bought a spray bottle with olive oil. The olive oil wasn’t amazing, but I loved the way it worked. It makes it so easy to grease a dish, love it! But why not make a spray bottle with your favorite olive oil? I mean, how hard can it be? Well it turned out to be really easy. You need a spray bottle and your favorite olive oil. Just add the olive oil to your spray bottle and DIY - RAFFIA BRACELET Another bracelet tutorial today! This one is made with raffia. I love the material because it’s so natural and easy to work with. I bought it in a package with three colors for just 60 Euro cents. The bracelet I made with the raffia is really easy to make and perfect for summer! Learn how to make this cute raffia bracelet after the jump. . . What you need for this raffia bracelet – raffia DIY - HOW TO MAKE VINYL LETTER DECALS A lot of craft projects contain vinyl letter decals. I really like them, but I don’t want to pay a lot of money for them. I always find it very strange that the vinyl letters are quite expensive compared to the big sheets. Besides that it’s nice to be able to choose from all the free fonts the web has to offer instead of just a few basic ones. I thought I could make them myself. This DIY - PAINTED CUTTING BOARD I love to serve food on cutting boards. It just looks so rustic and pure. So effortless, but so pretty at the same time. Or, as my boyfriend would say, very ‘Jamie Oliver’. I do love a good ‘plain’ cutting board for this purpose, but sometimes a girl needs a little more than that. Not all food is pretty on it’s own, you know. So today I have a painted cutting board / serving tray DIY DIY - PRINTABLE FOX CORNER BOOKMARK I love the cuteness and color of foxes. I know, I know, they aren’t that cute in real life. But in print or fabric they are super cute. Today I want to share a cute printable fox corner bookmark with you. Perfect for children books but why not for your own books? It makes even the most boring things look cuter. Not that my book really needed it because I looooove that cacti print! The DIY - HOW TO MAKE A TEA COZY (WITH TEA COZY PATTERN) How to make a tea cozy. 1. Gather your materials and decide on the color and fabric combination for your tea cozy. 2. Print the tea cozy pattern, cut it out and put it together with tape. For the piece of fabric that you use for the bottom of the tea cozy plus the inside you need tea cozy pattern piece number A+B. BY WILMA | A BLOG BY WILMA BOEKHOLTDIY PROJECTSRECIPESABOUTCONTACTBLOGGING COURSE DIY – Super easy bohemian flip flops makeover. These bohemian are an absolute must have for this summer. They are super easy to make but are so much prettier than simple store bought flip flops! You can use any ribbon you like for this project, as long as it’s not wider than 1/2 inch or 1,25 cm. HOW TO GROW GINGER FROM A STORE BOUGHT GINGER ROOT Step 2. Soak your ginger. Most store bought ginger has growth inhibitors on them. In order to remove this and also to hydrate the root you have to soak your ginger in a bowl of water for 12-24 hours. Step 3. Plant your ginger. Ginger roots grow horizontally, so you need a wide but shallow pot. DIY - HOW TO PRESS FLOWERS WITH AN IRON A little while ago I saw this idea on Pinterest: pressing flowers with an iron. Super handy when you don’t want to wait a few weeks until they are all done and dry. I decided to try it myself. And I must say: it works pretty well! Not every flower is perfect for this and some flowers needed a day or two drying after being ironed. But if you have the right flower, they are absolutely DIY - UPCYCLED TINS WITH LIDS! How to make upcycled tins with lids. 1. Draw a line around your tin on the MDF for the lid. The lid will exist out of two pieces of MDF, so do this two times. The second time you should draw another circle within the one you just made that’s about 2 millimeter smaller in diameter. This piece should fit inside the tin. DIY - OLIVE OIL SPRAY BOTTLE A while back I bought a spray bottle with olive oil. The olive oil wasn’t amazing, but I loved the way it worked. It makes it so easy to grease a dish, love it! But why not make a spray bottle with your favorite olive oil? I mean, how hard can it be? Well it turned out to be really easy. You need a spray bottle and your favorite olive oil. Just add the olive oil to your spray bottle and DIY - RAFFIA BRACELET Another bracelet tutorial today! This one is made with raffia. I love the material because it’s so natural and easy to work with. I bought it in a package with three colors for just 60 Euro cents. The bracelet I made with the raffia is really easy to make and perfect for summer! Learn how to make this cute raffia bracelet after the jump. . . What you need for this raffia bracelet – raffia DIY - HOW TO MAKE VINYL LETTER DECALS A lot of craft projects contain vinyl letter decals. I really like them, but I don’t want to pay a lot of money for them. I always find it very strange that the vinyl letters are quite expensive compared to the big sheets. Besides that it’s nice to be able to choose from all the free fonts the web has to offer instead of just a few basic ones. I thought I could make them myself. This DIY - PAINTED CUTTING BOARD I love to serve food on cutting boards. It just looks so rustic and pure. So effortless, but so pretty at the same time. Or, as my boyfriend would say, very ‘Jamie Oliver’. I do love a good ‘plain’ cutting board for this purpose, but sometimes a girl needs a little more than that. Not all food is pretty on it’s own, you know. So today I have a painted cutting board / serving tray DIY DIY - PRINTABLE FOX CORNER BOOKMARK I love the cuteness and color of foxes. I know, I know, they aren’t that cute in real life. But in print or fabric they are super cute. Today I want to share a cute printable fox corner bookmark with you. Perfect for children books but why not for your own books? It makes even the most boring things look cuter. Not that my book really needed it because I looooove that cacti print! The DIY - HOW TO MAKE A TEA COZY (WITH TEA COZY PATTERN) How to make a tea cozy. 1. Gather your materials and decide on the color and fabric combination for your tea cozy. 2. Print the tea cozy pattern, cut it out and put it together with tape. For the piece of fabric that you use for the bottom of the tea cozy plus the inside you need tea cozy pattern piece number A+B. DIY - HOW TO PRINT ON BOOKPAGES How to make it. First print your image on the printer paper. Cover the image with the book page and use masking tape to keep it in place. Run the page again trough the printer. Now remove the masking tape and your book page print is ready for framing! The illustration of the bird is from Flow Magazine. art bookpage etsy frame print.DIY - BOOT JEWELRY
How to create belt jewelry. 1. Wrap the belt around your boot and cut the belt at the right length. Cut another piece of the belt on the same length for the other boot. 2. Cut for both boots a piece of ribbon that is approximately 8 cm longer that the piece of belt you just cut. Fold over the ends of your ribbon for 2,5 cm and glue them RECIPE - KLETSKOPPEN A Kletskop is a classic Dutch cookie. They are sweet but with a little darkness in it. You could garnish desserts with them or just with some tea. Kletskoppen look really delicate but they are very simple to make! Today I’m sharing my recipe for Kletskoppen with you. Enjoy! Learn how to make Kletskoppen after the jump. . . What you need for Kletskoppen – 60 grams of flour – 40 grams of DIY - INSPIRATIONAL QUOTE SIGN How to make this DIY inspirational quote sign. 1. Choose a font and the text on your computer. Print it out in the desired size. 2. Cut the words out and put them on your piece of wood. If the size of the text is right you can move on to the next step. If not, you have torepeat step one. 3.
DIY - FABRIC COVERED JARS How to make a fabric-covered jar. 1. Find a few pots whit hollow lids. Often you can remove the plastic on the inside of the lids. Spray the inside with white paint and put the plastic back into place. 2. Cut the fabric to size. Take an extra inch in width and 2 inch in height. Make cuts at the bottom of the fabric for about 1 inch as seen in RECIPE - TOMATO SALSA AS TORTILLA CHIPS DIP SAUCE! My sister is going to stay with us for a few nights so I decided to make something delicious for tonight. I have to work, but my boyfriend and sister will have this delicious tomato salsa that is perfect as a tortilla chips dip sauce! It’s just a few minutes work but it really tastes great! Learn how to make this delicious tomato salsa after the jump. . . What you need for this tomato salsaDIY - MAP WALLET
This beautiful wallet is made out of a map. I made it for my boyfriend for valentines day. Of course you could make it with any paper you really like. It’s really easy to make, so let’s get started! The full instruction continues after the jump . . . What you need – a map or some other pretty paper – transparent self-adhesive foil (contact paper) – a ruler – a pencil – a DIY - WASHER NECKLACE Lay down your materials. 2. Use the nail polish to give the washers the color you want. Let dry. 3. Attach the washers with the jump rings like shown in the picture. 4. Attach the washers to the chain. If your chain is fine, like mine, you may need a smaller jump ring between the bigger one and the chain. 'STRESSED IS DESSERTS SPELLED BACKWARDS' When I came across the quote ‘Stressed is Desserts spelled backwards’ I knew I had to do something with it. I really needed it to be in my kitchen. I love desserts and this quote sounds like an excuse to eat just a little more of them. To start this new blog I am giving you this poster for free as a download. Find the download link after the jump . . . The poster is made in a nice vintage DIY - AN EASY WAY TO MOD PODGE YOUR SHOES WITH FABRIC Place for the second shoe the contact paper on the other side of your fabric and repeat. 4. Put a thick layer of Mod Podge on your shoe and glue the fabric on your shoe. You may need to make some small cuts to make it fit. Make some cuts at the excess fabric on top and glue it inside your shoe. 5. HOW TO GROW GINGER FROM A STORE BOUGHT GINGER ROOT Step 2. Soak your ginger. Most store bought ginger has growth inhibitors on them. In order to remove this and also to hydrate the root you have to soak your ginger in a bowl of water for 12-24 hours. Step 3. Plant your ginger. Ginger roots grow horizontally, so you need a wide but shallow pot. DIY - OLIVE OIL SPRAY BOTTLE A while back I bought a spray bottle with olive oil. The olive oil wasn’t amazing, but I loved the way it worked. It makes it so easy to grease a dish, love it! But why not make a spray bottle with your favorite olive oil? I mean, how hard can it be? Well it turned out to be really easy. You need a spray bottle and your favorite olive oil. Just add the olive oil to your spray bottle and DIY - UPCYCLED TINS WITH LIDS! How to make upcycled tins with lids. 1. Draw a line around your tin on the MDF for the lid. The lid will exist out of two pieces of MDF, so do this two times. The second time you should draw another circle within the one you just made that’s about 2 millimeter smaller in diameter. This piece should fit inside the tin. DIY - HOW TO PRESS FLOWERS WITH AN IRON A little while ago I saw this idea on Pinterest: pressing flowers with an iron. Super handy when you don’t want to wait a few weeks until they are all done and dry. I decided to try it myself. And I must say: it works pretty well! Not every flower is perfect for this and some flowers needed a day or two drying after being ironed. But if you have the right flower, they are absolutely DIY - RAFFIA BRACELET Another bracelet tutorial today! This one is made with raffia. I love the material because it’s so natural and easy to work with. I bought it in a package with three colors for just 60 Euro cents. The bracelet I made with the raffia is really easy to make and perfect for summer! Learn how to make this cute raffia bracelet after the jump. . . What you need for this raffia bracelet – raffia DIY - HOW TO PRINT ON BOOKPAGES How to make it. First print your image on the printer paper. Cover the image with the book page and use masking tape to keep it in place. Run the page again trough the printer. Now remove the masking tape and your book page print is ready for framing! The illustration of the bird is from Flow Magazine. art bookpage etsy frame print. DIY - PAINTED CUTTING BOARD I love to serve food on cutting boards. It just looks so rustic and pure. So effortless, but so pretty at the same time. Or, as my boyfriend would say, very ‘Jamie Oliver’. I do love a good ‘plain’ cutting board for this purpose, but sometimes a girl needs a little more than that. Not all food is pretty on it’s own, you know. So today I have a painted cutting board / serving tray DIY DIY - FABRIC COVERED JARS How to make a fabric-covered jar. 1. Find a few pots whit hollow lids. Often you can remove the plastic on the inside of the lids. Spray the inside with white paint and put the plastic back into place. 2. Cut the fabric to size. Take an extra inch in width and 2 inch in height. Make cuts at the bottom of the fabric for about 1 inch as seen in RECIPE - KLETSKOPPEN A Kletskop is a classic Dutch cookie. They are sweet but with a little darkness in it. You could garnish desserts with them or just with some tea. Kletskoppen look really delicate but they are very simple to make! Today I’m sharing my recipe for Kletskoppen with you. Enjoy! Learn how to make Kletskoppen after the jump. . . What you need for Kletskoppen – 60 grams of flour – 40 grams of DIY - HOW TO MAKE A TEA COZY (WITH TEA COZY PATTERN) How to make a tea cozy. 1. Gather your materials and decide on the color and fabric combination for your tea cozy. 2. Print the tea cozy pattern, cut it out and put it together with tape. For the piece of fabric that you use for the bottom of the tea cozy plus the inside you need tea cozy pattern piece number A+B. HOW TO GROW GINGER FROM A STORE BOUGHT GINGER ROOT Step 2. Soak your ginger. Most store bought ginger has growth inhibitors on them. In order to remove this and also to hydrate the root you have to soak your ginger in a bowl of water for 12-24 hours. Step 3. Plant your ginger. Ginger roots grow horizontally, so you need a wide but shallow pot. DIY - OLIVE OIL SPRAY BOTTLE A while back I bought a spray bottle with olive oil. The olive oil wasn’t amazing, but I loved the way it worked. It makes it so easy to grease a dish, love it! But why not make a spray bottle with your favorite olive oil? I mean, how hard can it be? Well it turned out to be really easy. You need a spray bottle and your favorite olive oil. Just add the olive oil to your spray bottle and DIY - UPCYCLED TINS WITH LIDS! How to make upcycled tins with lids. 1. Draw a line around your tin on the MDF for the lid. The lid will exist out of two pieces of MDF, so do this two times. The second time you should draw another circle within the one you just made that’s about 2 millimeter smaller in diameter. This piece should fit inside the tin. DIY - HOW TO PRESS FLOWERS WITH AN IRON A little while ago I saw this idea on Pinterest: pressing flowers with an iron. Super handy when you don’t want to wait a few weeks until they are all done and dry. I decided to try it myself. And I must say: it works pretty well! Not every flower is perfect for this and some flowers needed a day or two drying after being ironed. But if you have the right flower, they are absolutely DIY - RAFFIA BRACELET Another bracelet tutorial today! This one is made with raffia. I love the material because it’s so natural and easy to work with. I bought it in a package with three colors for just 60 Euro cents. The bracelet I made with the raffia is really easy to make and perfect for summer! Learn how to make this cute raffia bracelet after the jump. . . What you need for this raffia bracelet – raffia DIY - HOW TO PRINT ON BOOKPAGES How to make it. First print your image on the printer paper. Cover the image with the book page and use masking tape to keep it in place. Run the page again trough the printer. Now remove the masking tape and your book page print is ready for framing! The illustration of the bird is from Flow Magazine. art bookpage etsy frame print. DIY - PAINTED CUTTING BOARD I love to serve food on cutting boards. It just looks so rustic and pure. So effortless, but so pretty at the same time. Or, as my boyfriend would say, very ‘Jamie Oliver’. I do love a good ‘plain’ cutting board for this purpose, but sometimes a girl needs a little more than that. Not all food is pretty on it’s own, you know. So today I have a painted cutting board / serving tray DIY DIY - FABRIC COVERED JARS How to make a fabric-covered jar. 1. Find a few pots whit hollow lids. Often you can remove the plastic on the inside of the lids. Spray the inside with white paint and put the plastic back into place. 2. Cut the fabric to size. Take an extra inch in width and 2 inch in height. Make cuts at the bottom of the fabric for about 1 inch as seen in RECIPE - KLETSKOPPEN A Kletskop is a classic Dutch cookie. They are sweet but with a little darkness in it. You could garnish desserts with them or just with some tea. Kletskoppen look really delicate but they are very simple to make! Today I’m sharing my recipe for Kletskoppen with you. Enjoy! Learn how to make Kletskoppen after the jump. . . What you need for Kletskoppen – 60 grams of flour – 40 grams of DIY - HOW TO MAKE A TEA COZY (WITH TEA COZY PATTERN) How to make a tea cozy. 1. Gather your materials and decide on the color and fabric combination for your tea cozy. 2. Print the tea cozy pattern, cut it out and put it together with tape. For the piece of fabric that you use for the bottom of the tea cozy plus the inside you need tea cozy pattern piece number A+B. BY WILMA | A BLOG BY WILMA BOEKHOLT DIY – Super easy bohemian flip flops makeover. These bohemian are an absolute must have for this summer. They are super easy to make but are so much prettier than simple store bought flip flops! You can use any ribbon you like for this project, as long as it’s not wider than 1/2 inch or 1,25 cm.DIY - BOOT JEWELRY
How to create belt jewelry. 1. Wrap the belt around your boot and cut the belt at the right length. Cut another piece of the belt on the same length for the other boot. 2. Cut for both boots a piece of ribbon that is approximately 8 cm longer that the piece of belt you just cut. Fold over the ends of your ribbon for 2,5 cm and glue them DIY - HOW TO MAKE A TEA COZY (WITH TEA COZY PATTERN) How to make a tea cozy. 1. Gather your materials and decide on the color and fabric combination for your tea cozy. 2. Print the tea cozy pattern, cut it out and put it together with tape. For the piece of fabric that you use for the bottom of the tea cozy plus the inside you need tea cozy pattern piece number A+B. DIY - HOW TO MAKE VINYL LETTER DECALS A lot of craft projects contain vinyl letter decals. I really like them, but I don’t want to pay a lot of money for them. I always find it very strange that the vinyl letters are quite expensive compared to the big sheets. Besides that it’s nice to be able to choose from all the free fonts the web has to offer instead of just a few basic ones. I thought I could make them myself. ThisDIY - MAP WALLET
This beautiful wallet is made out of a map. I made it for my boyfriend for valentines day. Of course you could make it with any paper you really like. It’s really easy to make, so let’s get started! The full instruction continues after the jump . . . What you need – a map or some other pretty paper – transparent self-adhesive foil (contact paper) – a ruler – a pencil – a DIY - NO SEW T-SHIRT RECONSTRUCTION I love to make things that are easy to make but with a big effect. For this t-shirt reconstruction is no sewing required. It’s really easy to make but it looks lovely! You only need a few basic tools to make this t-shirt. From baggy t-shirt to cute shirt: let’s get started! Learn how to make this no sew t-shirt reconstruction after the jump. . . What you need for this no sew t-shirt DIY - PRINTABLE FOX CORNER BOOKMARK I love the cuteness and color of foxes. I know, I know, they aren’t that cute in real life. But in print or fabric they are super cute. Today I want to share a cute printable fox corner bookmark with you. Perfect for children books but why not for your own books? It makes even the most boring things look cuter. Not that my book really needed it because I looooove that cacti print! The DIY - AN EASY WAY TO MOD PODGE YOUR SHOES WITH FABRIC Place for the second shoe the contact paper on the other side of your fabric and repeat. 4. Put a thick layer of Mod Podge on your shoe and glue the fabric on your shoe. You may need to make some small cuts to make it fit. Make some cuts at the excess fabric on top and glue it inside your shoe. 5. 'STRESSED IS DESSERTS SPELLED BACKWARDS' When I came across the quote ‘Stressed is Desserts spelled backwards’ I knew I had to do something with it. I really needed it to be in my kitchen. I love desserts and this quote sounds like an excuse to eat just a little more of them. To start this new blog I am giving you this poster for free as a download. Find the download link after the jump . . . The poster is made in a nice vintage DIY - LEATHER ARROW BRACELET I love the arrows you see everywhere in jewelry right now. So I thought I could make a cute little bracelet with arrows. For this project I used an old leather belt and a chain necklace I had laying around. So yes, another cute recycling project! Learn how to make this cute leather arrow bracelet after the jump. . . What you need for this leather arrow bracelet – old leather belt (not to BY WILMA | A BLOG BY WILMA BOEKHOLTDIY PROJECTSRECIPESABOUTCONTACTBLOGGING COURSE DIY – Super easy bohemian flip flops makeover. These bohemian are an absolute must have for this summer. They are super easy to make but are so much prettier than simple store bought flip flops! You can use any ribbon you like for this project, as long as it’s not wider than 1/2 inch or 1,25 cm. HOW TO GROW GINGER FROM A STORE BOUGHT GINGER ROOT Step 2. Soak your ginger. Most store bought ginger has growth inhibitors on them. In order to remove this and also to hydrate the root you have to soak your ginger in a bowl of water for 12-24 hours. Step 3. Plant your ginger. Ginger roots grow horizontally, so you need a wide but shallow pot. DIY - HOW TO PRESS FLOWERS WITH AN IRON A little while ago I saw this idea on Pinterest: pressing flowers with an iron. Super handy when you don’t want to wait a few weeks until they are all done and dry. I decided to try it myself. And I must say: it works pretty well! Not every flower is perfect for this and some flowers needed a day or two drying after being ironed. But if you have the right flower, they are absolutely DIY - RAFFIA BRACELET Another bracelet tutorial today! This one is made with raffia. I love the material because it’s so natural and easy to work with. I bought it in a package with three colors for just 60 Euro cents. The bracelet I made with the raffia is really easy to make and perfect for summer! Learn how to make this cute raffia bracelet after the jump. . . What you need for this raffia bracelet – raffia DIY - PAINTED CUTTING BOARD I love to serve food on cutting boards. It just looks so rustic and pure. So effortless, but so pretty at the same time. Or, as my boyfriend would say, very ‘Jamie Oliver’. I do love a good ‘plain’ cutting board for this purpose, but sometimes a girl needs a little more than that. Not all food is pretty on it’s own, you know. So today I have a painted cutting board / serving tray DIY DIY - UPCYCLED TINS WITH LIDS! How to make upcycled tins with lids. 1. Draw a line around your tin on the MDF for the lid. The lid will exist out of two pieces of MDF, so do this two times. The second time you should draw another circle within the one you just made that’s about 2 millimeter smaller in diameter. This piece should fit inside the tin. DIY - OLIVE OIL SPRAY BOTTLE A while back I bought a spray bottle with olive oil. The olive oil wasn’t amazing, but I loved the way it worked. It makes it so easy to grease a dish, love it! But why not make a spray bottle with your favorite olive oil? I mean, how hard can it be? Well it turned out to be really easy. You need a spray bottle and your favorite olive oil. Just add the olive oil to your spray bottle and DIY - HOW TO PRINT ON BOOKPAGES How to make it. First print your image on the printer paper. Cover the image with the book page and use masking tape to keep it in place. Run the page again trough the printer. Now remove the masking tape and your book page print is ready for framing! The illustration of the bird is from Flow Magazine. art bookpage etsy frame print. RECIPE - KLETSKOPPEN A Kletskop is a classic Dutch cookie. They are sweet but with a little darkness in it. You could garnish desserts with them or just with some tea. Kletskoppen look really delicate but they are very simple to make! Today I’m sharing my recipe for Kletskoppen with you. Enjoy! Learn how to make Kletskoppen after the jump. . . What you need for Kletskoppen – 60 grams of flour – 40 grams of DIY - HOW TO MAKE VINYL LETTER DECALS A lot of craft projects contain vinyl letter decals. I really like them, but I don’t want to pay a lot of money for them. I always find it very strange that the vinyl letters are quite expensive compared to the big sheets. Besides that it’s nice to be able to choose from all the free fonts the web has to offer instead of just a few basic ones. I thought I could make them myself. This BY WILMA | A BLOG BY WILMA BOEKHOLTDIY PROJECTSRECIPESABOUTCONTACTBLOGGING COURSE DIY – Super easy bohemian flip flops makeover. These bohemian are an absolute must have for this summer. They are super easy to make but are so much prettier than simple store bought flip flops! You can use any ribbon you like for this project, as long as it’s not wider than 1/2 inch or 1,25 cm. HOW TO GROW GINGER FROM A STORE BOUGHT GINGER ROOT Step 2. Soak your ginger. Most store bought ginger has growth inhibitors on them. In order to remove this and also to hydrate the root you have to soak your ginger in a bowl of water for 12-24 hours. Step 3. Plant your ginger. Ginger roots grow horizontally, so you need a wide but shallow pot. DIY - HOW TO PRESS FLOWERS WITH AN IRON A little while ago I saw this idea on Pinterest: pressing flowers with an iron. Super handy when you don’t want to wait a few weeks until they are all done and dry. I decided to try it myself. And I must say: it works pretty well! Not every flower is perfect for this and some flowers needed a day or two drying after being ironed. But if you have the right flower, they are absolutely DIY - RAFFIA BRACELET Another bracelet tutorial today! This one is made with raffia. I love the material because it’s so natural and easy to work with. I bought it in a package with three colors for just 60 Euro cents. The bracelet I made with the raffia is really easy to make and perfect for summer! Learn how to make this cute raffia bracelet after the jump. . . What you need for this raffia bracelet – raffia DIY - PAINTED CUTTING BOARD I love to serve food on cutting boards. It just looks so rustic and pure. So effortless, but so pretty at the same time. Or, as my boyfriend would say, very ‘Jamie Oliver’. I do love a good ‘plain’ cutting board for this purpose, but sometimes a girl needs a little more than that. Not all food is pretty on it’s own, you know. So today I have a painted cutting board / serving tray DIY DIY - UPCYCLED TINS WITH LIDS! How to make upcycled tins with lids. 1. Draw a line around your tin on the MDF for the lid. The lid will exist out of two pieces of MDF, so do this two times. The second time you should draw another circle within the one you just made that’s about 2 millimeter smaller in diameter. This piece should fit inside the tin. DIY - OLIVE OIL SPRAY BOTTLE A while back I bought a spray bottle with olive oil. The olive oil wasn’t amazing, but I loved the way it worked. It makes it so easy to grease a dish, love it! But why not make a spray bottle with your favorite olive oil? I mean, how hard can it be? Well it turned out to be really easy. You need a spray bottle and your favorite olive oil. Just add the olive oil to your spray bottle and DIY - HOW TO PRINT ON BOOKPAGES How to make it. First print your image on the printer paper. Cover the image with the book page and use masking tape to keep it in place. Run the page again trough the printer. Now remove the masking tape and your book page print is ready for framing! The illustration of the bird is from Flow Magazine. art bookpage etsy frame print. RECIPE - KLETSKOPPEN A Kletskop is a classic Dutch cookie. They are sweet but with a little darkness in it. You could garnish desserts with them or just with some tea. Kletskoppen look really delicate but they are very simple to make! Today I’m sharing my recipe for Kletskoppen with you. Enjoy! Learn how to make Kletskoppen after the jump. . . What you need for Kletskoppen – 60 grams of flour – 40 grams of DIY - HOW TO MAKE VINYL LETTER DECALS A lot of craft projects contain vinyl letter decals. I really like them, but I don’t want to pay a lot of money for them. I always find it very strange that the vinyl letters are quite expensive compared to the big sheets. Besides that it’s nice to be able to choose from all the free fonts the web has to offer instead of just a few basic ones. I thought I could make them myself. This BY WILMA | A BLOG BY WILMA BOEKHOLT DIY – Super easy bohemian flip flops makeover. These bohemian are an absolute must have for this summer. They are super easy to make but are so much prettier than simple store bought flip flops! You can use any ribbon you like for this project, as long as it’s not wider than 1/2 inch or 1,25 cm.DIY - MAP WALLET
This beautiful wallet is made out of a map. I made it for my boyfriend for valentines day. Of course you could make it with any paper you really like. It’s really easy to make, so let’s get started! The full instruction continues after the jump . . . What you need – a map or some other pretty paper – transparent self-adhesive foil (contact paper) – a ruler – a pencil – aDIY - BOOT JEWELRY
How to create belt jewelry. 1. Wrap the belt around your boot and cut the belt at the right length. Cut another piece of the belt on the same length for the other boot. 2. Cut for both boots a piece of ribbon that is approximately 8 cm longer that the piece of belt you just cut. Fold over the ends of your ribbon for 2,5 cm and glue them DIY - FABRIC COVERED JARS How to make a fabric-covered jar. 1. Find a few pots whit hollow lids. Often you can remove the plastic on the inside of the lids. Spray the inside with white paint and put the plastic back into place. 2. Cut the fabric to size. Take an extra inch in width and 2 inch in height. Make cuts at the bottom of the fabric for about 1 inch as seen in RECIPE - PAVLOVA WITH STRAWBERRIES Pavlova seems a difficult dish and is therefore often avoided. But it’s quite easy to make. It’s super fun to do and your guests will be impressed with you when you serve this at your next dinner party. There are two ways to make a pavlova. The first is to make one big pavlova, the other, and that’s my favorite way, is to make mini pavlova’s. This way you do not have to cut the pavlova DIY - INSPIRATIONAL QUOTE SIGN How to make this DIY inspirational quote sign. 1. Choose a font and the text on your computer. Print it out in the desired size. 2. Cut the words out and put them on your piece of wood. If the size of the text is right you can move on to the next step. If not, you have torepeat step one. 3.
DIY - NO SEW T-SHIRT RECONSTRUCTION I love to make things that are easy to make but with a big effect. For this t-shirt reconstruction is no sewing required. It’s really easy to make but it looks lovely! You only need a few basic tools to make this t-shirt. From baggy t-shirt to cute shirt: let’s get started! Learn how to make this no sew t-shirt reconstruction after the jump. . . What you need for this no sew t-shirt DIY - HOW TO MAKE A TEA COZY (WITH TEA COZY PATTERN) How to make a tea cozy. 1. Gather your materials and decide on the color and fabric combination for your tea cozy. 2. Print the tea cozy pattern, cut it out and put it together with tape. For the piece of fabric that you use for the bottom of the tea cozy plus the inside you need tea cozy pattern piece number A+B. DIY - PRINTABLE FOX CORNER BOOKMARK I love the cuteness and color of foxes. I know, I know, they aren’t that cute in real life. But in print or fabric they are super cute. Today I want to share a cute printable fox corner bookmark with you. Perfect for children books but why not for your own books? It makes even the most boring things look cuter. Not that my book really needed it because I looooove that cacti print! The DIY - AN EASY WAY TO MOD PODGE YOUR SHOES WITH FABRIC Place for the second shoe the contact paper on the other side of your fabric and repeat. 4. Put a thick layer of Mod Podge on your shoe and glue the fabric on your shoe. You may need to make some small cuts to make it fit. Make some cuts at the excess fabric on top and glue it inside your shoe. 5. BY WILMA | A BLOG BY WILMA BOEKHOLTDIY PROJECTSRECIPESABOUTCONTACTBLOGGING COURSEHONESTLY YUM BLOGHONESTLYWTF BLOGFRED AND WILMA FLINTSTONEWILMA HURRICANEWILMA MAGAZINEWILMA MAGAZINE WILMINGTON NC DIY – Super easy bohemian flip flops makeover. These bohemian are an absolute must have for this summer. They are super easy to make but are so much prettier than simple store bought flip flops! You can use any ribbon you like for this project, as long as it’s not wider than 1/2 inch or 1,25 cm. HOW TO GROW GINGER FROM A STORE BOUGHT GINGER ROOT Step 2. Soak your ginger. Most store bought ginger has growth inhibitors on them. In order to remove this and also to hydrate the root you have to soak your ginger in a bowl of water for 12-24 hours. Step 3. Plant your ginger. Ginger roots grow horizontally, so you need a wide but shallow pot. DIY - HOW TO PRESS FLOWERS WITH AN IRON A little while ago I saw this idea on Pinterest: pressing flowers with an iron. Super handy when you don’t want to wait a few weeks until they are all done and dry. I decided to try it myself. And I must say: it works pretty well! Not every flower is perfect for this and some flowers needed a day or two drying after being ironed. But if you have the right flower, they are absolutely DIY - RAFFIA BRACELET Another bracelet tutorial today! This one is made with raffia. I love the material because it’s so natural and easy to work with. I bought it in a package with three colors for just 60 Euro cents. The bracelet I made with the raffia is really easy to make and perfect for summer! Learn how to make this cute raffia bracelet after the jump. . . What you need for this raffia bracelet – raffia DIY - PAINTED CUTTING BOARD I love to serve food on cutting boards. It just looks so rustic and pure. So effortless, but so pretty at the same time. Or, as my boyfriend would say, very ‘Jamie Oliver’. I do love a good ‘plain’ cutting board for this purpose, but sometimes a girl needs a little more than that. Not all food is pretty on it’s own, you know. So today I have a painted cutting board / serving tray DIY DIY - UPCYCLED TINS WITH LIDS! How to make upcycled tins with lids. 1. Draw a line around your tin on the MDF for the lid. The lid will exist out of two pieces of MDF, so do this two times. The second time you should draw another circle within the one you just made that’s about 2 millimeter smaller in diameter. This piece should fit inside the tin. DIY - OLIVE OIL SPRAY BOTTLE A while back I bought a spray bottle with olive oil. The olive oil wasn’t amazing, but I loved the way it worked. It makes it so easy to grease a dish, love it! But why not make a spray bottle with your favorite olive oil? I mean, how hard can it be? Well it turned out to be really easy. You need a spray bottle and your favorite olive oil. Just add the olive oil to your spray bottle and DIY - HOW TO PRINT ON BOOKPAGES How to make it. First print your image on the printer paper. Cover the image with the book page and use masking tape to keep it in place. Run the page again trough the printer. Now remove the masking tape and your book page print is ready for framing! The illustration of the bird is from Flow Magazine. art bookpage etsy frame print. RECIPE - KLETSKOPPEN A Kletskop is a classic Dutch cookie. They are sweet but with a little darkness in it. You could garnish desserts with them or just with some tea. Kletskoppen look really delicate but they are very simple to make! Today I’m sharing my recipe for Kletskoppen with you. Enjoy! Learn how to make Kletskoppen after the jump. . . What you need for Kletskoppen – 60 grams of flour – 40 grams of DIY - HOW TO MAKE VINYL LETTER DECALS A lot of craft projects contain vinyl letter decals. I really like them, but I don’t want to pay a lot of money for them. I always find it very strange that the vinyl letters are quite expensive compared to the big sheets. Besides that it’s nice to be able to choose from all the free fonts the web has to offer instead of just a few basic ones. I thought I could make them myself. This BY WILMA | A BLOG BY WILMA BOEKHOLTDIY PROJECTSRECIPESABOUTCONTACTBLOGGING COURSEHONESTLY YUM BLOGHONESTLYWTF BLOGFRED AND WILMA FLINTSTONEWILMA HURRICANEWILMA MAGAZINEWILMA MAGAZINE WILMINGTON NC DIY – Super easy bohemian flip flops makeover. These bohemian are an absolute must have for this summer. They are super easy to make but are so much prettier than simple store bought flip flops! You can use any ribbon you like for this project, as long as it’s not wider than 1/2 inch or 1,25 cm. HOW TO GROW GINGER FROM A STORE BOUGHT GINGER ROOT Step 2. Soak your ginger. Most store bought ginger has growth inhibitors on them. In order to remove this and also to hydrate the root you have to soak your ginger in a bowl of water for 12-24 hours. Step 3. Plant your ginger. Ginger roots grow horizontally, so you need a wide but shallow pot. DIY - HOW TO PRESS FLOWERS WITH AN IRON A little while ago I saw this idea on Pinterest: pressing flowers with an iron. Super handy when you don’t want to wait a few weeks until they are all done and dry. I decided to try it myself. And I must say: it works pretty well! Not every flower is perfect for this and some flowers needed a day or two drying after being ironed. But if you have the right flower, they are absolutely DIY - RAFFIA BRACELET Another bracelet tutorial today! This one is made with raffia. I love the material because it’s so natural and easy to work with. I bought it in a package with three colors for just 60 Euro cents. The bracelet I made with the raffia is really easy to make and perfect for summer! Learn how to make this cute raffia bracelet after the jump. . . What you need for this raffia bracelet – raffia DIY - PAINTED CUTTING BOARD I love to serve food on cutting boards. It just looks so rustic and pure. So effortless, but so pretty at the same time. Or, as my boyfriend would say, very ‘Jamie Oliver’. I do love a good ‘plain’ cutting board for this purpose, but sometimes a girl needs a little more than that. Not all food is pretty on it’s own, you know. So today I have a painted cutting board / serving tray DIY DIY - UPCYCLED TINS WITH LIDS! How to make upcycled tins with lids. 1. Draw a line around your tin on the MDF for the lid. The lid will exist out of two pieces of MDF, so do this two times. The second time you should draw another circle within the one you just made that’s about 2 millimeter smaller in diameter. This piece should fit inside the tin. DIY - OLIVE OIL SPRAY BOTTLE A while back I bought a spray bottle with olive oil. The olive oil wasn’t amazing, but I loved the way it worked. It makes it so easy to grease a dish, love it! But why not make a spray bottle with your favorite olive oil? I mean, how hard can it be? Well it turned out to be really easy. You need a spray bottle and your favorite olive oil. Just add the olive oil to your spray bottle and DIY - HOW TO PRINT ON BOOKPAGES How to make it. First print your image on the printer paper. Cover the image with the book page and use masking tape to keep it in place. Run the page again trough the printer. Now remove the masking tape and your book page print is ready for framing! The illustration of the bird is from Flow Magazine. art bookpage etsy frame print. RECIPE - KLETSKOPPEN A Kletskop is a classic Dutch cookie. They are sweet but with a little darkness in it. You could garnish desserts with them or just with some tea. Kletskoppen look really delicate but they are very simple to make! Today I’m sharing my recipe for Kletskoppen with you. Enjoy! Learn how to make Kletskoppen after the jump. . . What you need for Kletskoppen – 60 grams of flour – 40 grams of DIY - HOW TO MAKE VINYL LETTER DECALS A lot of craft projects contain vinyl letter decals. I really like them, but I don’t want to pay a lot of money for them. I always find it very strange that the vinyl letters are quite expensive compared to the big sheets. Besides that it’s nice to be able to choose from all the free fonts the web has to offer instead of just a few basic ones. I thought I could make them myself. This BY WILMA | A BLOG BY WILMA BOEKHOLT DIY – Super easy bohemian flip flops makeover. These bohemian are an absolute must have for this summer. They are super easy to make but are so much prettier than simple store bought flip flops! You can use any ribbon you like for this project, as long as it’s not wider than 1/2 inch or 1,25 cm.DIY - MAP WALLET
This beautiful wallet is made out of a map. I made it for my boyfriend for valentines day. Of course you could make it with any paper you really like. It’s really easy to make, so let’s get started! The full instruction continues after the jump . . . What you need – a map or some other pretty paper – transparent self-adhesive foil (contact paper) – a ruler – a pencil – aDIY - BOOT JEWELRY
How to create belt jewelry. 1. Wrap the belt around your boot and cut the belt at the right length. Cut another piece of the belt on the same length for the other boot. 2. Cut for both boots a piece of ribbon that is approximately 8 cm longer that the piece of belt you just cut. Fold over the ends of your ribbon for 2,5 cm and glue them DIY - FABRIC COVERED JARS How to make a fabric-covered jar. 1. Find a few pots whit hollow lids. Often you can remove the plastic on the inside of the lids. Spray the inside with white paint and put the plastic back into place. 2. Cut the fabric to size. Take an extra inch in width and 2 inch in height. Make cuts at the bottom of the fabric for about 1 inch as seen in RECIPE - PAVLOVA WITH STRAWBERRIES Pavlova seems a difficult dish and is therefore often avoided. But it’s quite easy to make. It’s super fun to do and your guests will be impressed with you when you serve this at your next dinner party. There are two ways to make a pavlova. The first is to make one big pavlova, the other, and that’s my favorite way, is to make mini pavlova’s. This way you do not have to cut the pavlova DIY - INSPIRATIONAL QUOTE SIGN How to make this DIY inspirational quote sign. 1. Choose a font and the text on your computer. Print it out in the desired size. 2. Cut the words out and put them on your piece of wood. If the size of the text is right you can move on to the next step. If not, you have torepeat step one. 3.
DIY - NO SEW T-SHIRT RECONSTRUCTION I love to make things that are easy to make but with a big effect. For this t-shirt reconstruction is no sewing required. It’s really easy to make but it looks lovely! You only need a few basic tools to make this t-shirt. From baggy t-shirt to cute shirt: let’s get started! Learn how to make this no sew t-shirt reconstruction after the jump. . . What you need for this no sew t-shirt DIY - HOW TO MAKE A TEA COZY (WITH TEA COZY PATTERN) How to make a tea cozy. 1. Gather your materials and decide on the color and fabric combination for your tea cozy. 2. Print the tea cozy pattern, cut it out and put it together with tape. For the piece of fabric that you use for the bottom of the tea cozy plus the inside you need tea cozy pattern piece number A+B. DIY - PRINTABLE FOX CORNER BOOKMARK I love the cuteness and color of foxes. I know, I know, they aren’t that cute in real life. But in print or fabric they are super cute. Today I want to share a cute printable fox corner bookmark with you. Perfect for children books but why not for your own books? It makes even the most boring things look cuter. Not that my book really needed it because I looooove that cacti print! The DIY - AN EASY WAY TO MOD PODGE YOUR SHOES WITH FABRIC Place for the second shoe the contact paper on the other side of your fabric and repeat. 4. Put a thick layer of Mod Podge on your shoe and glue the fabric on your shoe. You may need to make some small cuts to make it fit. Make some cuts at the excess fabric on top and glue it inside your shoe. 5.* Home
* DIY Projects
* Recipes
* About
* Contact
* Blogging Course
MENU
* Home
* DIY Projects
* Recipes
* About
* Contact
* Blogging Course
__
__ __ __
__ __
__
__
BEDROOM MAKEOVER WITH PHOTOWALL When I got the change to review the Photowallwallpaper,
I immediately knew which room I wanted to tackle. My parents live in a beautiful old farmhouse and one of their spare bedrooms really needed a makeover. Well, to be honest: they just never finished it. When my grandparents bought a new bed my parents placed the old one in their (half finished) spare bedroom, and that was it. I thought it would be a great idea to find a nice wallpaper for this room to update the look of the bed. Also, I do love the reclaimed wood cabinets, but the fact that the whole room isn’t finished yet just makes it look old (notin a good way).
My parents choose this beautiful patterned wallpaper with large florals from Photowall (Obviously Pink 24A). We got the premium wallpaper with the tool set. Everything you need is in the tool set. The only thing we were missing was a stick to stir the wallpaper glue. The glue was amazing by the way, the wallpaper is really thick and heavy, so we where a little bit afraid that it would come right off. But it worked perfectly! Because the wallpaper is so heavy we did run into a few things that we would do different next time. First: There is this piece you have to cut of after the glue has dried. I think I would cut off that piece before gluing it down next time. As you can see our walls have an angle. We tried to just glue the paper down en cut it off later. That was a giant fail. It was way to heavy to do it that way, it came right down. This makes it a little bit trickier to glue down walls that aren’t rectangles.Photowall
is not cheap, actually it’s quite expensive. Do I think it’s worth it? Well yes, I absolutely do! The wallpaper goes on smoother than any other wallpaper we ever tried before, and it looks so luxurious! They have the most beautiful patterns and images to choose from, so there will be something for everyone. If you want something special, that looks high end and are willing to spend some money this wallpaper isfor you!
If you order your Photowall wallpaper before June 4th 2021 you can use my code bywilma25a and youget 25% off!
Advertorial , InteriorDesign
Share: __
__
Save
__
RECIPE – SWEET AND SPICY SAMBAL BADJAK I love a little bit of spice to my food but with a 3 year old I can’t just spice up every dish. Sambal is a great way to add a little bit of spice to individual dishes. It’s an Indonesian sauce and widely available here in the Netherlands. It tastes great as a sauce with meat or use it to marinade for example chicken. Delicious! There are many different kinds of sambal but the store bought variants are by far not as tasty as homemade sambal. The homemade Sambal Badjak recipe that I’m sharing with you today has many layers of sweet, sour and spicey. Store bought sambal here in the Netherlands mostly tastes sour and spicy. So if you want to try this delicious spicy sauce I really recommend making your own! ReadMore »
2 Comments
Recipe
Share: __
__
Save
__
DIY – SUPER EASY BOHEMIAN FLIP FLOPS MAKEOVER These bohemian are an absolute must have for this summer. They are super easy to make but are so much prettier than simple store bought flip flops! You can use any ribbon you like for this project, as long as it’s not wider than 1/2 inch or 1,25 cm. For the flip flops I used a pair with a nice sturdy sole instead of a rubber sole. This makes your flip flops look a lot nicer and more like sandals. But it’s all up to you! Read More »1 Comment
DIY , Fashion
Share: __
__
Save
__
HOW TO GROW GINGER FROM A STORE BOUGHT GINGER ROOTI love to have
some fresh ginger lying around. This delicious root is great in many dishes (like sambal!) and of course in tea. Nothing beats ginger tea when you feel under the weather! Ginger is easy to come by where I live, but I just love to grow my own food. That’s why I decided to grow my own ginger from a store bought root. Ginger isn’t a fast growing plant, it takes weeks to root and months before you can harvest. But it’s absolutely worth the wait! So if you want to now how to grow ginger, please read on!Read More »
1 Comment
plants
Share: __
__
Save
__
DIY – IBIZA STYLE BUFFALO SKULLI
really love the bohemian interior style and if there’s one place you’ll find it a lot it’s Ibiza. It’s been over two years since I’ve last been there, and I can’t wait to go back again because I love being there! Today’s DIY has Ibiza written all over it. A buffalo skull Ibiza-style! I always use a polyresin skull because they are affordable and they work really well for this DIY project!Read More »
1 Comment
DIY
, Interior Design
Share: __
__
Save
__
DIY – SUNBURST MIRRORS (FROM DISPOSABLE CUTLERY!) I love mirrors. Not because I feel the need to look in it all day long, but because they come in so many pretty designs. They also make a room look bigger, so that’s a big plus too! I already have a large collection of mirrors but there was one in particular that I still wanted: a sunburst mirror. I fall in love every time I see them on Pinterest. But unfortunately they are really expensive and I never see them in thrift stores. So for a while now, I was thinking about doing a great DIY version of a sunburst mirror. And when I saw this plastic silver cutlery set I knew it would work for this project. This sunburst mirror is super easy to make and really budget friendly. But the most important is that it looks absolutely amazing! Read More »6 Comments
DIY , Featured
, Interior Design
Share: __
__
Save
__
RECIPE – GOAT YOGURT BARK WITH BLUEBERRIES AND ALMONDS I love goat yogurt and so I eat it almost everyday for breakfast. My body doesn’t cope well with cow milk and for me goat yogurt is a good alternative for normal yogurt. To be honest, I even like it better. Unfortunately not everything is that easy to replace. Yogurt ice cream for instants is almost always made with cow milk. So I thought it would be fun to make my own yogurt ice cream, but now with goat yogurt. It became this amazing and delicious goat yogurt bark with strawberries, blueberries and almonds. Super easy to make and you don’t even need an ice machine! Read More »Featured , Recipe
Share: __
__
Save
__
Older Posts __
ABOUT ME
WILMA
Welcome to By Wilma. A blog full of DIY inspiration, delicious (but healthy) recipes, fashion and interior ideas.__ __ __
__ __
SUBSCRIBE & FOLLOW
__ __ __
SHOP MY TATTOORARY TATTOOS! FOLLOW ME ON INSTAGRAM Instagram did not return a 200.Follow Me!
__ Facebook __ Twitter__ Instagram
__ Pinterest
__ Bloglovin
__Shop
__
� 2017 - Wilma Boekholt - Privacy Policy- Sitemap
Details
5