5
More Annotations


3


2
Favourite Annotations


2


2
Text
BILDR MUXING AROUND WITH THE CD74HC4067 + ARDUINO The CD74HC4067 is capable of more than reading analog signals. It can be uses in either direction. So you could connect SIG to 5v, and then be able to switch the 5v to one of 16 channel pins if you needed to control 16 . It also works with . So if you had 16 readers that output serial, you could connect the BILDR LINE SENSING. QRE1113 REFLECTANCE SENSOR + ARDUINO Line Sensing. QRE1113 Reflectance Sensor + Arduino. The QRE1113 is a common reflectance sensor often used in robotic line followers. The sensor works by shining an down and seeing how much of that light bounces back using a . Because dark colors will bounce back less of the light, the sensor can be used to BILDR CAN YOU MOVE OVER? THE 74HC595 8 BIT SHIFT REGISTER Basically a shift register will, in the end, let you expand on the outputs you have on your . Each one of these 74HC595s can act like 8 more digital outputs, and you can daisy chain them. So you could hook 8 of them up next to each other and have control of 64 outputs. But the way it works is a little confusing BILDR HIGH-POWER CONTROL: ARDUINO + N-CHANNEL MOSFET High-Power Control: Arduino + N-Channel MOSFET. Monday, March 5 th , 2012. Eventually you are going to find yourself holding a 12v , , or light and wondering “How the heck am I supposed to control this from my Arduino?”. And we have covered this in the past. Today we are going to talk about another way of doing * Twitter
* Facebook
Search Wiki Search Forum Search Blog
just
BILDR SENSING HUMIDITY WITH THE HIH-4030 + ARDUINO Well luckily measuring relative humidity is pretty simple with the HIH-4030. The HIH-4030 is a low-power, analog output sensor. Hooking It Up. Hooking up the HIH-4030 to your arduino is super simple, just power it with 5V / Ground, and connect the out to an analog pin on thearduino.
BILDR SENSING BAROMETRIC PRESSURE Well the BMP085 Barometric Pressure sensor, available at SparkFun is a great little sensor capable of sensing such small changes in barometric pressure it can be used as a pretty precise altimeter as well. And, because no Barometric pressure sensor would be complete without a temperature reading, the BMP085 has an imbedded thermometer. BILDR USE THE EASYDRIVER STEPPER MOTOR DRIVER + ARDUINO Only a few things need to connected to use the EasyDriver to use it with your Arduino. You need some 12V source to the EasyDriver (the motor in this article is 12V) – This will be powering the stepper – Im using a 12 adapter – similar to the one in the illustration. Just make sure it is rated at least 750 – Ahigher
BILDR ROTARY ENCODER + ARDUINO A rotary encoder is a device that you can rotate infinitely. Simple ones like this one I got from sparkfun have no real state like a pot does, so when you start up, you won’t be able to simply read from the encoder where it is turned to. But because you can keep turning it it has no beginning, middle or end anyways. BILDR TRIPLE AXIS MAGNETOMETER HMC5883L + ARDUINO The HMC5883L is an device, a type 2-wire serial connection, so we just need to connect the SDA (Data) and SCL (Clock) lines to your Arduino for communication. On your Arduino (everything but the ) SDA is on analog pin 4, and SCL is on analog pin 5. On an arduino mega, SDA is digital 20, and SCL is digital 21. BILDR GETTING DATA FROM THE WEB Getting Data From The Web – Arduino + Ethernet. Friday, June 10 th , 2011. Yesterday we covered how you would go about controlling pins of your arduino over the internet using the Arduino Ethernet Shield set up as a server. Today we are going to take a look at using the shield as a client to get information off of a web page, and report back. BILDR MUXING AROUND WITH THE CD74HC4067 + ARDUINO The CD74HC4067 is capable of more than reading analog signals. It can be uses in either direction. So you could connect SIG to 5v, and then be able to switch the 5v to one of 16 channel pins if you needed to control 16 . It also works with . So if you had 16 readers that output serial, you could connect the BILDR LINE SENSING. QRE1113 REFLECTANCE SENSOR + ARDUINO Line Sensing. QRE1113 Reflectance Sensor + Arduino. The QRE1113 is a common reflectance sensor often used in robotic line followers. The sensor works by shining an down and seeing how much of that light bounces back using a . Because dark colors will bounce back less of the light, the sensor can be used to BILDR CAN YOU MOVE OVER? THE 74HC595 8 BIT SHIFT REGISTER Basically a shift register will, in the end, let you expand on the outputs you have on your . Each one of these 74HC595s can act like 8 more digital outputs, and you can daisy chain them. So you could hook 8 of them up next to each other and have control of 64 outputs. But the way it works is a little confusing BILDR HIGH-POWER CONTROL: ARDUINO + N-CHANNEL MOSFET High-Power Control: Arduino + N-Channel MOSFET. Monday, March 5 th , 2012. Eventually you are going to find yourself holding a 12v , , or light and wondering “How the heck am I supposed to control this from my Arduino?”. And we have covered this in the past. Today we are going to talk about another way of doingjust
BILDR SENSING HUMIDITY WITH THE HIH-4030 + ARDUINO Well luckily measuring relative humidity is pretty simple with the HIH-4030. The HIH-4030 is a low-power, analog output sensor. Hooking It Up. Hooking up the HIH-4030 to your arduino is super simple, just power it with 5V / Ground, and connect the out to an analog pin on thearduino.
BILDR SENSING BAROMETRIC PRESSURE Well the BMP085 Barometric Pressure sensor, available at SparkFun is a great little sensor capable of sensing such small changes in barometric pressure it can be used as a pretty precise altimeter as well. And, because no Barometric pressure sensor would be complete without a temperature reading, the BMP085 has an imbedded thermometer. BILDR USE THE EASYDRIVER STEPPER MOTOR DRIVER + ARDUINO Only a few things need to connected to use the EasyDriver to use it with your Arduino. You need some 12V source to the EasyDriver (the motor in this article is 12V) – This will be powering the stepper – Im using a 12 adapter – similar to the one in the illustration. Just make sure it is rated at least 750 – Ahigher
BILDR ROTARY ENCODER + ARDUINO A rotary encoder is a device that you can rotate infinitely. Simple ones like this one I got from sparkfun have no real state like a pot does, so when you start up, you won’t be able to simply read from the encoder where it is turned to. But because you can keep turning it it has no beginning, middle or end anyways. BILDR TRIPLE AXIS MAGNETOMETER HMC5883L + ARDUINO The HMC5883L is an device, a type 2-wire serial connection, so we just need to connect the SDA (Data) and SCL (Clock) lines to your Arduino for communication. On your Arduino (everything but the ) SDA is on analog pin 4, and SCL is on analog pin 5. On an arduino mega, SDA is digital 20, and SCL is digital 21. BILDR GETTING DATA FROM THE WEB Getting Data From The Web – Arduino + Ethernet. Friday, June 10 th , 2011. Yesterday we covered how you would go about controlling pins of your arduino over the internet using the Arduino Ethernet Shield set up as a server. Today we are going to take a look at using the shield as a client to get information off of a web page, and report back.BILDR ABOUT
bildr (not Bildr) was founded by Adam Meyer, an Interaction designer at Tellart who is so totally obsessed with making things easier for people that he decided to spend countless hours learning electronics and code just in hopes of giving it back to the community in a simplified fashion. bildr is not a company, has no funding, and doesnot make
BILDR SENSING HUMIDITY WITH THE SHT15 + ARDUINO The SHT15 is a digital humidity sensor that outputs a fully calibrated humidity reading. And because what we are measuring is actually relative humidity, and relative humidity being relative to temperature, the SHT15 has a builtin digital thermometer.This makes things much easier to work with than sensors without a thermometer onboard.You can pick one up from sparkFun here. BILDR CONTROLLING 2 MOTORS WITH THE TB6612FNG + ARDUINO In previous articles we have discussed how to control motors with simple . And with you could control the speed. But that is just one , and you can only go one direction. Today we are going to talk about the TB6612FNG dual motor driver, specifically the TB6612FNG breakout board from sparkfun.. The TB6612FNG isn’t just a dual motor driver, it is a dual [[H BILDR SIMPLE LIGHT READING WITH LDR + ARDUINO The amount of that 5V that each part gets is proportional to its resistance. With the arduino analogRead, at 5V (its max) it would read 1023, and at 0v it read 0. So if the the LDR and the resistor have the same resistance, the 5V is split evenly (2.5V), to each part. (analogRead of 512) But if the LDR is hit with a ton of light and isreading
BILDR ROTARY ENCODER + ARDUINO A rotary encoder is a device that you can rotate infinitely. Simple ones like this one I got from sparkfun have no real state like a pot does, so when you start up, you won’t be able to simply read from the encoder where it is turned to. But because you can keep turning it it has no beginning, middle or end anyways. BILDR TRIPLE AXIS MAGNETOMETER HMC5883L + ARDUINO The HMC5883L is an device, a type 2-wire serial connection, so we just need to connect the SDA (Data) and SCL (Clock) lines to your Arduino for communication. On your Arduino (everything but the ) SDA is on analog pin 4, and SCL is on analog pin 5. On an arduino mega, SDA is digital 20, and SCL is digital 21. BILDR SENSING ORIENTATION WITH THE ADXL335 + ARDUINO A few weeks ago we wrote a tutorial about using the ADXL345 to sense taps, and drops, but this week we are going to wind it back, go back to basics, and show you how to take an analog 3-axis and use it to sense simple orientation with it, specifically the ADXL335, but this can be applied to any analog 3-axis accelerometer.. Before we really dive into it, we need a general BILDR YOU SEARCHED FOR ADXL345 The ADXL345 supports both and , but we are just going to talk I2C here. I2C is a 2-wire serial connection, so you just need to connect the SDA (Data) and SCL (Clock) lines to your Arduino for communication. On your Arduino (everything but the mega) SDA BILDR GETTING DATA FROM THE WEB Getting Data From The Web – Arduino + Ethernet. Friday, June 10 th , 2011. Yesterday we covered how you would go about controlling pins of your arduino over the internet using the Arduino Ethernet Shield set up as a server. Today we are going to take a look at using the shield as a client to get information off of a web page, and report back. BILDR IS IT HOT? ARDUINO + MLX90614 IR THERMOMETER But being able to read the temperature of an object without even touching it is simply awesome. The is a sensor that can do just that. By reading the light coming off an object, this guy can sense between -95 and 720ºf (-70 to 382.2°C) with 17 resolution. That’s 128X more precise than the Arduino’s BILDR MUXING AROUND WITH THE CD74HC4067 + ARDUINO The CD74HC4067 is capable of more than reading analog signals. It can be uses in either direction. So you could connect SIG to 5v, and then be able to switch the 5v to one of 16 channel pins if you needed to control 16 . It also works with . So if you had 16 readers that output serial, you could connect the BILDR CAN YOU MOVE OVER? THE 74HC595 8 BIT SHIFT REGISTER Basically a shift register will, in the end, let you expand on the outputs you have on your . Each one of these 74HC595s can act like 8 more digital outputs, and you can daisy chain them. So you could hook 8 of them up next to each other and have control of 64 outputs. But the way it works is a little confusing BILDR LINE SENSING. QRE1113 REFLECTANCE SENSOR + ARDUINO Line Sensing. QRE1113 Reflectance Sensor + Arduino. The QRE1113 is a common reflectance sensor often used in robotic line followers. The sensor works by shining an down and seeing how much of that light bounces back using a . Because dark colors will bounce back less of the light, the sensor can be used to BILDR THE BIG EASY STEPPER MOTOR DRIVER + ARDUINO A higher current/amperage rating is better, and just means it wont burn out. (The Big Easy Driver can supply up to 2 amps) Connect the 3 control wires from the “gnd”, “dir”, and “step” of the Big Easy Driver to the Arduino as shown. Connect the stepper motor to the driver – For me the red/green were one pair, and the blue/yellow BILDR CONTROLLING 2 MOTORS WITH THE TB6612FNG + ARDUINO In previous articles we have discussed how to control motors with simple . And with you could control the speed. But that is just one , and you can only go one direction. Today we are going to talk about the TB6612FNG dual motor driver, specifically the TB6612FNG breakout board from sparkfun.. The TB6612FNG isn’t just a dual motor driver, it is a dual [[H BILDR HIGH-POWER CONTROL: ARDUINO + N-CHANNEL MOSFET High-Power Control: Arduino + N-Channel MOSFET. Monday, March 5 th , 2012. Eventually you are going to find yourself holding a 12v , , or light and wondering “How the heck am I supposed to control this from my Arduino?”. And we have covered this in the past. Today we are going to talk about another way of doingjust
BILDR SENSING HUMIDITY WITH THE HIH-4030 + ARDUINO Well luckily measuring relative humidity is pretty simple with the HIH-4030. The HIH-4030 is a low-power, analog output sensor. Hooking It Up. Hooking up the HIH-4030 to your arduino is super simple, just power it with 5V / Ground, and connect the out to an analog pin on thearduino.
BILDR USE THE EASYDRIVER STEPPER MOTOR DRIVER + ARDUINO Only a few things need to connected to use the EasyDriver to use it with your Arduino. You need some 12V source to the EasyDriver (the motor in this article is 12V) – This will be powering the stepper – Im using a 12 adapter – similar to the one in the illustration. Just make sure it is rated at least 750 – Ahigher
BILDR HIGH-POWER CONTROL: ARDUINO + TIP120 TRANSISTOR The TIP120 can handle switching up to 60V, and the amperage is limited to 5A, or up to 8A pulses of 300µs. I have managed to blow out one of these with a 5A load because of heat. Actually anything over a few amps, especially when the current is constant (like in a motor) and not short pulses, I would recommend using a heat-sink. BILDR ROTARY ENCODER + ARDUINO A rotary encoder is a device that you can rotate infinitely. Simple ones like this one I got from sparkfun have no real state like a pot does, so when you start up, you won’t be able to simply read from the encoder where it is turned to. But because you can keep turning it it has no beginning, middle or end anyways. BILDR MUXING AROUND WITH THE CD74HC4067 + ARDUINO The CD74HC4067 is capable of more than reading analog signals. It can be uses in either direction. So you could connect SIG to 5v, and then be able to switch the 5v to one of 16 channel pins if you needed to control 16 . It also works with . So if you had 16 readers that output serial, you could connect the BILDR CAN YOU MOVE OVER? THE 74HC595 8 BIT SHIFT REGISTER Basically a shift register will, in the end, let you expand on the outputs you have on your . Each one of these 74HC595s can act like 8 more digital outputs, and you can daisy chain them. So you could hook 8 of them up next to each other and have control of 64 outputs. But the way it works is a little confusing BILDR LINE SENSING. QRE1113 REFLECTANCE SENSOR + ARDUINO Line Sensing. QRE1113 Reflectance Sensor + Arduino. The QRE1113 is a common reflectance sensor often used in robotic line followers. The sensor works by shining an down and seeing how much of that light bounces back using a . Because dark colors will bounce back less of the light, the sensor can be used to BILDR THE BIG EASY STEPPER MOTOR DRIVER + ARDUINO A higher current/amperage rating is better, and just means it wont burn out. (The Big Easy Driver can supply up to 2 amps) Connect the 3 control wires from the “gnd”, “dir”, and “step” of the Big Easy Driver to the Arduino as shown. Connect the stepper motor to the driver – For me the red/green were one pair, and the blue/yellow BILDR CONTROLLING 2 MOTORS WITH THE TB6612FNG + ARDUINO In previous articles we have discussed how to control motors with simple . And with you could control the speed. But that is just one , and you can only go one direction. Today we are going to talk about the TB6612FNG dual motor driver, specifically the TB6612FNG breakout board from sparkfun.. The TB6612FNG isn’t just a dual motor driver, it is a dual [[H BILDR HIGH-POWER CONTROL: ARDUINO + N-CHANNEL MOSFET High-Power Control: Arduino + N-Channel MOSFET. Monday, March 5 th , 2012. Eventually you are going to find yourself holding a 12v , , or light and wondering “How the heck am I supposed to control this from my Arduino?”. And we have covered this in the past. Today we are going to talk about another way of doingjust
BILDR SENSING HUMIDITY WITH THE HIH-4030 + ARDUINO Well luckily measuring relative humidity is pretty simple with the HIH-4030. The HIH-4030 is a low-power, analog output sensor. Hooking It Up. Hooking up the HIH-4030 to your arduino is super simple, just power it with 5V / Ground, and connect the out to an analog pin on thearduino.
BILDR USE THE EASYDRIVER STEPPER MOTOR DRIVER + ARDUINO Only a few things need to connected to use the EasyDriver to use it with your Arduino. You need some 12V source to the EasyDriver (the motor in this article is 12V) – This will be powering the stepper – Im using a 12 adapter – similar to the one in the illustration. Just make sure it is rated at least 750 – Ahigher
BILDR HIGH-POWER CONTROL: ARDUINO + TIP120 TRANSISTOR The TIP120 can handle switching up to 60V, and the amperage is limited to 5A, or up to 8A pulses of 300µs. I have managed to blow out one of these with a 5A load because of heat. Actually anything over a few amps, especially when the current is constant (like in a motor) and not short pulses, I would recommend using a heat-sink. BILDR ROTARY ENCODER + ARDUINO A rotary encoder is a device that you can rotate infinitely. Simple ones like this one I got from sparkfun have no real state like a pot does, so when you start up, you won’t be able to simply read from the encoder where it is turned to. But because you can keep turning it it has no beginning, middle or end anyways.BILDR BILDR
A lot has happened since our last article was published and to celebrate the continuance of bildr we’ll be playing with the MQ-3 Alcohol Gas Sensor.Coupled with the SparkFun Gas Sensor Breakout Board, connecting the MQ-3 to your Arduino is a breeze.. The MQ-3 is a heater-driven alcohol sensor that outputs an analog signal (usually interpreted somewhere between 150 and 1023 depending on how BILDR SENSING BAROMETRIC PRESSURE Well the BMP085 Barometric Pressure sensor, available at SparkFun is a great little sensor capable of sensing such small changes in barometric pressure it can be used as a pretty precise altimeter as well. And, because no Barometric pressure sensor would be complete without a temperature reading, the BMP085 has an imbedded thermometer. BILDR SENSING HUMIDITY WITH THE SHT15 + ARDUINO Sensing Humidity With The SHT15 + Arduino. Tuesday, November 27 th , 2012. The SHT15 is a digital humidity sensor that outputs a fully calibrated humidity reading. And because what we are measuring is actually relative humidity, and relative humidity being relative to temperature, the SHT15 has a builtin digital thermometer. BILDR HIGH-POWER CONTROL: ARDUINO + TIP120 TRANSISTOR The TIP120 can handle switching up to 60V, and the amperage is limited to 5A, or up to 8A pulses of 300µs. I have managed to blow out one of these with a 5A load because of heat. Actually anything over a few amps, especially when the current is constant (like in a motor) and not short pulses, I would recommend using a heat-sink. BILDR CONTROLLING 2 MOTORS WITH THE TB6612FNG + ARDUINO In previous articles we have discussed how to control motors with simple . And with you could control the speed. But that is just one , and you can only go one direction. Today we are going to talk about the TB6612FNG dual motor driver, specifically the TB6612FNG breakout board from sparkfun.. The TB6612FNG isn’t just a dual motor driver, it is a dual [[H BILDR TRIPLE AXIS MAGNETOMETER HMC5883L + ARDUINO The HMC5883L is an device, a type 2-wire serial connection, so we just need to connect the SDA (Data) and SCL (Clock) lines to your Arduino for communication. On your Arduino (everything but the ) SDA is on analog pin 4, and SCL is on analog pin 5. On an arduino mega, SDA is digital 20, and SCL is digital 21. BILDR SENSING ORIENTATION WITH THE ADXL335 + ARDUINO A few weeks ago we wrote a tutorial about using the ADXL345 to sense taps, and drops, but this week we are going to wind it back, go back to basics, and show you how to take an analog 3-axis and use it to sense simple orientation with it, specifically the ADXL335, but this can be applied to any analog 3-axis accelerometer.. Before we really dive into it, we need a general BILDR ROTARY ENCODER + ARDUINO A rotary encoder is a device that you can rotate infinitely. Simple ones like this one I got from sparkfun have no real state like a pot does, so when you start up, you won’t be able to simply read from the encoder where it is turned to. But because you can keep turning it it has no beginning, middle or end anyways. BILDR TAP, TAP, DROP. ADXL345 ACCELEROMETER + ARDUINO Hooking it up. The ADXL345 supports both and , but we are just going to talk I2C here. I2C is a 2-wire serial connection, so you just need to connect the SDA (Data) and SCL (Clock) lines to your Arduino for communication. On your Arduino (everything BILDR IS IT HOT? ARDUINO + MLX90614 IR THERMOMETER But being able to read the temperature of an object without even touching it is simply awesome. The is a sensor that can do just that. By reading the light coming off an object, this guy can sense between -95 and 720ºf (-70 to 382.2°C) with 17 resolution. That’s 128X more precise than the Arduino’s BILDR MUXING AROUND WITH THE CD74HC4067 + ARDUINO The CD74HC4067 is capable of more than reading analog signals. It can be uses in either direction. So you could connect SIG to 5v, and then be able to switch the 5v to one of 16 channel pins if you needed to control 16 . It also works with . So if you had 16 readers that output serial, you could connect the BILDR CAN YOU MOVE OVER? THE 74HC595 8 BIT SHIFT REGISTER Basically a shift register will, in the end, let you expand on the outputs you have on your . Each one of these 74HC595s can act like 8 more digital outputs, and you can daisy chain them. So you could hook 8 of them up next to each other and have control of 64 outputs. But the way it works is a little confusing BILDR LINE SENSING. QRE1113 REFLECTANCE SENSOR + ARDUINO Line Sensing. QRE1113 Reflectance Sensor + Arduino. The QRE1113 is a common reflectance sensor often used in robotic line followers. The sensor works by shining an down and seeing how much of that light bounces back using a . Because dark colors will bounce back less of the light, the sensor can be used to BILDR THE BIG EASY STEPPER MOTOR DRIVER + ARDUINO A higher current/amperage rating is better, and just means it wont burn out. (The Big Easy Driver can supply up to 2 amps) Connect the 3 control wires from the “gnd”, “dir”, and “step” of the Big Easy Driver to the Arduino as shown. Connect the stepper motor to the driver – For me the red/green were one pair, and the blue/yellow BILDR CONTROLLING 2 MOTORS WITH THE TB6612FNG + ARDUINO In previous articles we have discussed how to control motors with simple . And with you could control the speed. But that is just one , and you can only go one direction. Today we are going to talk about the TB6612FNG dual motor driver, specifically the TB6612FNG breakout board from sparkfun.. The TB6612FNG isn’t just a dual motor driver, it is a dual [[H BILDR HIGH-POWER CONTROL: ARDUINO + N-CHANNEL MOSFET High-Power Control: Arduino + N-Channel MOSFET. Monday, March 5 th , 2012. Eventually you are going to find yourself holding a 12v , , or light and wondering “How the heck am I supposed to control this from my Arduino?”. And we have covered this in the past. Today we are going to talk about another way of doingjust
BILDR SENSING HUMIDITY WITH THE HIH-4030 + ARDUINO Well luckily measuring relative humidity is pretty simple with the HIH-4030. The HIH-4030 is a low-power, analog output sensor. Hooking It Up. Hooking up the HIH-4030 to your arduino is super simple, just power it with 5V / Ground, and connect the out to an analog pin on thearduino.
BILDR USE THE EASYDRIVER STEPPER MOTOR DRIVER + ARDUINO Only a few things need to connected to use the EasyDriver to use it with your Arduino. You need some 12V source to the EasyDriver (the motor in this article is 12V) – This will be powering the stepper – Im using a 12 adapter – similar to the one in the illustration. Just make sure it is rated at least 750 – Ahigher
BILDR HIGH-POWER CONTROL: ARDUINO + TIP120 TRANSISTOR The TIP120 can handle switching up to 60V, and the amperage is limited to 5A, or up to 8A pulses of 300µs. I have managed to blow out one of these with a 5A load because of heat. Actually anything over a few amps, especially when the current is constant (like in a motor) and not short pulses, I would recommend using a heat-sink. BILDR ROTARY ENCODER + ARDUINO A rotary encoder is a device that you can rotate infinitely. Simple ones like this one I got from sparkfun have no real state like a pot does, so when you start up, you won’t be able to simply read from the encoder where it is turned to. But because you can keep turning it it has no beginning, middle or end anyways. BILDR MUXING AROUND WITH THE CD74HC4067 + ARDUINO The CD74HC4067 is capable of more than reading analog signals. It can be uses in either direction. So you could connect SIG to 5v, and then be able to switch the 5v to one of 16 channel pins if you needed to control 16 . It also works with . So if you had 16 readers that output serial, you could connect the BILDR CAN YOU MOVE OVER? THE 74HC595 8 BIT SHIFT REGISTER Basically a shift register will, in the end, let you expand on the outputs you have on your . Each one of these 74HC595s can act like 8 more digital outputs, and you can daisy chain them. So you could hook 8 of them up next to each other and have control of 64 outputs. But the way it works is a little confusing BILDR LINE SENSING. QRE1113 REFLECTANCE SENSOR + ARDUINO Line Sensing. QRE1113 Reflectance Sensor + Arduino. The QRE1113 is a common reflectance sensor often used in robotic line followers. The sensor works by shining an down and seeing how much of that light bounces back using a . Because dark colors will bounce back less of the light, the sensor can be used to BILDR THE BIG EASY STEPPER MOTOR DRIVER + ARDUINO A higher current/amperage rating is better, and just means it wont burn out. (The Big Easy Driver can supply up to 2 amps) Connect the 3 control wires from the “gnd”, “dir”, and “step” of the Big Easy Driver to the Arduino as shown. Connect the stepper motor to the driver – For me the red/green were one pair, and the blue/yellow BILDR CONTROLLING 2 MOTORS WITH THE TB6612FNG + ARDUINO In previous articles we have discussed how to control motors with simple . And with you could control the speed. But that is just one , and you can only go one direction. Today we are going to talk about the TB6612FNG dual motor driver, specifically the TB6612FNG breakout board from sparkfun.. The TB6612FNG isn’t just a dual motor driver, it is a dual [[H BILDR HIGH-POWER CONTROL: ARDUINO + N-CHANNEL MOSFET High-Power Control: Arduino + N-Channel MOSFET. Monday, March 5 th , 2012. Eventually you are going to find yourself holding a 12v , , or light and wondering “How the heck am I supposed to control this from my Arduino?”. And we have covered this in the past. Today we are going to talk about another way of doingjust
BILDR SENSING HUMIDITY WITH THE HIH-4030 + ARDUINO Well luckily measuring relative humidity is pretty simple with the HIH-4030. The HIH-4030 is a low-power, analog output sensor. Hooking It Up. Hooking up the HIH-4030 to your arduino is super simple, just power it with 5V / Ground, and connect the out to an analog pin on thearduino.
BILDR USE THE EASYDRIVER STEPPER MOTOR DRIVER + ARDUINO Only a few things need to connected to use the EasyDriver to use it with your Arduino. You need some 12V source to the EasyDriver (the motor in this article is 12V) – This will be powering the stepper – Im using a 12 adapter – similar to the one in the illustration. Just make sure it is rated at least 750 – Ahigher
BILDR HIGH-POWER CONTROL: ARDUINO + TIP120 TRANSISTOR The TIP120 can handle switching up to 60V, and the amperage is limited to 5A, or up to 8A pulses of 300µs. I have managed to blow out one of these with a 5A load because of heat. Actually anything over a few amps, especially when the current is constant (like in a motor) and not short pulses, I would recommend using a heat-sink. BILDR ROTARY ENCODER + ARDUINO A rotary encoder is a device that you can rotate infinitely. Simple ones like this one I got from sparkfun have no real state like a pot does, so when you start up, you won’t be able to simply read from the encoder where it is turned to. But because you can keep turning it it has no beginning, middle or end anyways.BILDR BILDR
A lot has happened since our last article was published and to celebrate the continuance of bildr we’ll be playing with the MQ-3 Alcohol Gas Sensor.Coupled with the SparkFun Gas Sensor Breakout Board, connecting the MQ-3 to your Arduino is a breeze.. The MQ-3 is a heater-driven alcohol sensor that outputs an analog signal (usually interpreted somewhere between 150 and 1023 depending on how BILDR SENSING BAROMETRIC PRESSURE Well the BMP085 Barometric Pressure sensor, available at SparkFun is a great little sensor capable of sensing such small changes in barometric pressure it can be used as a pretty precise altimeter as well. And, because no Barometric pressure sensor would be complete without a temperature reading, the BMP085 has an imbedded thermometer. BILDR SENSING HUMIDITY WITH THE SHT15 + ARDUINO The SHT15 is a digital humidity sensor that outputs a fully calibrated humidity reading. And because what we are measuring is actually relative humidity, and relative humidity being relative to temperature, the SHT15 has a builtin digital thermometer.This makes things much easier to work with than sensors without a thermometer onboard.You can pick one up from sparkFun here. BILDR DID IT MOVE? DETECTING MOTION WITH PIR + ARDUINO Motion detection. Motion detection can be a very handy thing in installation art, interactive walls, and other times you need a cheep way to know when people are around. PIR or Passive Infrared is a common method of motion detection that measure changes in heat to signal the change. The basic model is that they take (heat)images on 2
BILDR TRIPLE AXIS MAGNETOMETER HMC5883L + ARDUINO The HMC5883L is an device, a type 2-wire serial connection, so we just need to connect the SDA (Data) and SCL (Clock) lines to your Arduino for communication. On your Arduino (everything but the ) SDA is on analog pin 4, and SCL is on analog pin 5. On an arduino mega, SDA is digital 20, and SCL is digital 21. BILDR ROTARY ENCODER + ARDUINO A rotary encoder is a device that you can rotate infinitely. Simple ones like this one I got from sparkfun have no real state like a pot does, so when you start up, you won’t be able to simply read from the encoder where it is turned to. But because you can keep turning it it has no beginning, middle or end anyways. BILDR SENSING ORIENTATION WITH THE ADXL335 + ARDUINO A few weeks ago we wrote a tutorial about using the ADXL345 to sense taps, and drops, but this week we are going to wind it back, go back to basics, and show you how to take an analog 3-axis and use it to sense simple orientation with it, specifically the ADXL335, but this can be applied to any analog 3-axis accelerometer.. Before we really dive into it, we need a general BILDR HIGH-POWER CONTROL: ARDUINO + TIP120 TRANSISTOR The TIP120 can handle switching up to 60V, and the amperage is limited to 5A, or up to 8A pulses of 300µs. I have managed to blow out one of these with a 5A load because of heat. Actually anything over a few amps, especially when the current is constant (like in a motor) and not short pulses, I would recommend using a heat-sink. BILDR TAP, TAP, DROP. ADXL345 ACCELEROMETER + ARDUINO Hooking it up. The ADXL345 supports both and , but we are just going to talk I2C here. I2C is a 2-wire serial connection, so you just need to connect the SDA (Data) and SCL (Clock) lines to your Arduino for communication. On your Arduino (everything BILDR IS IT HOT? ARDUINO + MLX90614 IR THERMOMETER But being able to read the temperature of an object without even touching it is simply awesome. The is a sensor that can do just that. By reading the light coming off an object, this guy can sense between -95 and 720ºf (-70 to 382.2°C) with 17 resolution. That’s 128X more precise than the Arduino’s BILDR CAN YOU MOVE OVER? THE 74HC595 8 BIT SHIFT REGISTER Basically a shift register will, in the end, let you expand on the outputs you have on your . Each one of these 74HC595s can act like 8 more digital outputs, and you can daisy chain them. So you could hook 8 of them up next to each other and have control of 64 outputs. But the way it works is a little confusing BILDR MUXING AROUND WITH THE CD74HC4067 + ARDUINO The CD74HC4067 is capable of more than reading analog signals. It can be uses in either direction. So you could connect SIG to 5v, and then be able to switch the 5v to one of 16 channel pins if you needed to control 16 . It also works with . So if you had 16 readers that output serial, you could connect the BILDR THE BIG EASY STEPPER MOTOR DRIVER + ARDUINO A higher current/amperage rating is better, and just means it wont burn out. (The Big Easy Driver can supply up to 2 amps) Connect the 3 control wires from the “gnd”, “dir”, and “step” of the Big Easy Driver to the Arduino as shown. Connect the stepper motor to the driver – For me the red/green were one pair, and the blue/yellow BILDR LINE SENSING. QRE1113 REFLECTANCE SENSOR + ARDUINO Line Sensing. QRE1113 Reflectance Sensor + Arduino. The QRE1113 is a common reflectance sensor often used in robotic line followers. The sensor works by shining an down and seeing how much of that light bounces back using a . Because dark colors will bounce back less of the light, the sensor can be used to BILDR SENSING HUMIDITY WITH THE HIH-4030 + ARDUINO Well luckily measuring relative humidity is pretty simple with the HIH-4030. The HIH-4030 is a low-power, analog output sensor. Hooking It Up. Hooking up the HIH-4030 to your arduino is super simple, just power it with 5V / Ground, and connect the out to an analog pin on thearduino.
BILDR CONTROLLING 2 MOTORS WITH THE TB6612FNG + ARDUINO In previous articles we have discussed how to control motors with simple . And with you could control the speed. But that is just one , and you can only go one direction. Today we are going to talk about the TB6612FNG dual motor driver, specifically the TB6612FNG breakout board from sparkfun.. The TB6612FNG isn’t just a dual motor driver, it is a dual [[H BILDR SENSING BAROMETRIC PRESSURE Well the BMP085 Barometric Pressure sensor, available at SparkFun is a great little sensor capable of sensing such small changes in barometric pressure it can be used as a pretty precise altimeter as well. And, because no Barometric pressure sensor would be complete without a temperature reading, the BMP085 has an imbedded thermometer. BILDR USE THE EASYDRIVER STEPPER MOTOR DRIVER + ARDUINO Only a few things need to connected to use the EasyDriver to use it with your Arduino. You need some 12V source to the EasyDriver (the motor in this article is 12V) – This will be powering the stepper – Im using a 12 adapter – similar to the one in the illustration. Just make sure it is rated at least 750 – Ahigher
BILDR HIGH-POWER CONTROL: ARDUINO + N-CHANNEL MOSFET High-Power Control: Arduino + N-Channel MOSFET. Monday, March 5 th , 2012. Eventually you are going to find yourself holding a 12v , , or light and wondering “How the heck am I supposed to control this from my Arduino?”. And we have covered this in the past. Today we are going to talk about another way of doingjust
BILDR ROTARY ENCODER + ARDUINO A rotary encoder is a device that you can rotate infinitely. Simple ones like this one I got from sparkfun have no real state like a pot does, so when you start up, you won’t be able to simply read from the encoder where it is turned to. But because you can keep turning it it has no beginning, middle or end anyways. BILDR CAN YOU MOVE OVER? THE 74HC595 8 BIT SHIFT REGISTER Basically a shift register will, in the end, let you expand on the outputs you have on your . Each one of these 74HC595s can act like 8 more digital outputs, and you can daisy chain them. So you could hook 8 of them up next to each other and have control of 64 outputs. But the way it works is a little confusing BILDR MUXING AROUND WITH THE CD74HC4067 + ARDUINO The CD74HC4067 is capable of more than reading analog signals. It can be uses in either direction. So you could connect SIG to 5v, and then be able to switch the 5v to one of 16 channel pins if you needed to control 16 . It also works with . So if you had 16 readers that output serial, you could connect the BILDR THE BIG EASY STEPPER MOTOR DRIVER + ARDUINO A higher current/amperage rating is better, and just means it wont burn out. (The Big Easy Driver can supply up to 2 amps) Connect the 3 control wires from the “gnd”, “dir”, and “step” of the Big Easy Driver to the Arduino as shown. Connect the stepper motor to the driver – For me the red/green were one pair, and the blue/yellow BILDR LINE SENSING. QRE1113 REFLECTANCE SENSOR + ARDUINO Line Sensing. QRE1113 Reflectance Sensor + Arduino. The QRE1113 is a common reflectance sensor often used in robotic line followers. The sensor works by shining an down and seeing how much of that light bounces back using a . Because dark colors will bounce back less of the light, the sensor can be used to BILDR SENSING HUMIDITY WITH THE HIH-4030 + ARDUINO Well luckily measuring relative humidity is pretty simple with the HIH-4030. The HIH-4030 is a low-power, analog output sensor. Hooking It Up. Hooking up the HIH-4030 to your arduino is super simple, just power it with 5V / Ground, and connect the out to an analog pin on thearduino.
BILDR CONTROLLING 2 MOTORS WITH THE TB6612FNG + ARDUINO In previous articles we have discussed how to control motors with simple . And with you could control the speed. But that is just one , and you can only go one direction. Today we are going to talk about the TB6612FNG dual motor driver, specifically the TB6612FNG breakout board from sparkfun.. The TB6612FNG isn’t just a dual motor driver, it is a dual [[H BILDR SENSING BAROMETRIC PRESSURE Well the BMP085 Barometric Pressure sensor, available at SparkFun is a great little sensor capable of sensing such small changes in barometric pressure it can be used as a pretty precise altimeter as well. And, because no Barometric pressure sensor would be complete without a temperature reading, the BMP085 has an imbedded thermometer. BILDR USE THE EASYDRIVER STEPPER MOTOR DRIVER + ARDUINO Only a few things need to connected to use the EasyDriver to use it with your Arduino. You need some 12V source to the EasyDriver (the motor in this article is 12V) – This will be powering the stepper – Im using a 12 adapter – similar to the one in the illustration. Just make sure it is rated at least 750 – Ahigher
BILDR HIGH-POWER CONTROL: ARDUINO + N-CHANNEL MOSFET High-Power Control: Arduino + N-Channel MOSFET. Monday, March 5 th , 2012. Eventually you are going to find yourself holding a 12v , , or light and wondering “How the heck am I supposed to control this from my Arduino?”. And we have covered this in the past. Today we are going to talk about another way of doingjust
BILDR ROTARY ENCODER + ARDUINO A rotary encoder is a device that you can rotate infinitely. Simple ones like this one I got from sparkfun have no real state like a pot does, so when you start up, you won’t be able to simply read from the encoder where it is turned to. But because you can keep turning it it has no beginning, middle or end anyways.BILDR ABOUT
bildr (not Bildr) was founded by Adam Meyer, an Interaction designer at Tellart who is so totally obsessed with making things easier for people that he decided to spend countless hours learning electronics and code just in hopes of giving it back to the community in a simplified fashion. bildr is not a company, has no funding, and doesnot make
BILDR SENSING BAROMETRIC PRESSURE Well the BMP085 Barometric Pressure sensor, available at SparkFun is a great little sensor capable of sensing such small changes in barometric pressure it can be used as a pretty precise altimeter as well. And, because no Barometric pressure sensor would be complete without a temperature reading, the BMP085 has an imbedded thermometer. BILDR ROTARY ENCODER + ARDUINO A rotary encoder is a device that you can rotate infinitely. Simple ones like this one I got from sparkfun have no real state like a pot does, so when you start up, you won’t be able to simply read from the encoder where it is turned to. But because you can keep turning it it has no beginning, middle or end anyways. BILDR HIGH-POWER CONTROL: ARDUINO + N-CHANNEL MOSFET High-Power Control: Arduino + N-Channel MOSFET. Monday, March 5 th , 2012. Eventually you are going to find yourself holding a 12v , , or light and wondering “How the heck am I supposed to control this from my Arduino?”. And we have covered this in the past. Today we are going to talk about another way of doingjust
BILDR SIMPLE LIGHT READING WITH LDR + ARDUINO The amount of that 5V that each part gets is proportional to its resistance. With the arduino analogRead, at 5V (its max) it would read 1023, and at 0v it read 0. So if the the LDR and the resistor have the same resistance, the 5V is split evenly (2.5V), to each part. (analogRead of 512) But if the LDR is hit with a ton of light and isreading
BILDR WHAT'S THE PASSWORD? ARDUINO + KEYPAD For this tutorial we have 2 Arduino projects. The first example is pretty simple and just prints out the key that you press in the Arduino Software’s Serial Terminal. The second is just a little more complicated, and allows you to set up a 4 digit secret code. Both of these projects are significantly simplified because the Keypad andPassword
BILDR HIGH-POWER CONTROL: ARDUINO + TIP120 TRANSISTOR The TIP120 can handle switching up to 60V, and the amperage is limited to 5A, or up to 8A pulses of 300µs. I have managed to blow out one of these with a 5A load because of heat. Actually anything over a few amps, especially when the current is constant (like in a motor) and not short pulses, I would recommend using a heat-sink. BILDR TRIPLE AXIS MAGNETOMETER HMC5883L + ARDUINO The HMC5883L is an device, a type 2-wire serial connection, so we just need to connect the SDA (Data) and SCL (Clock) lines to your Arduino for communication. On your Arduino (everything but the ) SDA is on analog pin 4, and SCL is on analog pin 5. On an arduino mega, SDA is digital 20, and SCL is digital 21. BILDR STABLE ORIENTATION The both components of the Digital IMU 6DOF are devices on a single bus. I2C is a 2-wire serial connection, so we just need to connect the SDA (Data) and SCL (Clock) lines to your Arduino for communication. On your Arduino (everything but the ) SDA is on analog pin 4, and SCL is on analog pin 5. BILDR GETTING DATA FROM THE WEB Getting Data From The Web – Arduino + Ethernet. Friday, June 10 th , 2011. Yesterday we covered how you would go about controlling pins of your arduino over the internet using the Arduino Ethernet Shield set up as a server. Today we are going to take a look at using the shield as a client to get information off of a web page, and report back.BILDR BILDR
A lot has happened since our last article was published and to celebrate the continuance of bildr we’ll be playing with the MQ-3 Alcohol Gas Sensor.Coupled with the SparkFun Gas Sensor Breakout Board, connecting the MQ-3 to your Arduino is a breeze.. The MQ-3 is a heater-driven alcohol sensor that outputs an analog signal (usually interpreted somewhere between 150 and 1023 depending on how BILDR CAN YOU MOVE OVER? THE 74HC595 8 BIT SHIFT REGISTER Basically a shift register will, in the end, let you expand on the outputs you have on your . Each one of these 74HC595s can act like 8 more digital outputs, and you can daisy chain them. So you could hook 8 of them up next to each other and have control of 64 outputs. But the way it works is a little confusing BILDR LINE SENSING. QRE1113 REFLECTANCE SENSOR + ARDUINO Line Sensing. QRE1113 Reflectance Sensor + Arduino. The QRE1113 is a common reflectance sensor often used in robotic line followers. The sensor works by shining an down and seeing how much of that light bounces back using a . Because dark colors will bounce back less of the light, the sensor can be used to BILDR MUXING AROUND WITH THE CD74HC4067 + ARDUINO The CD74HC4067 is capable of more than reading analog signals. It can be uses in either direction. So you could connect SIG to 5v, and then be able to switch the 5v to one of 16 channel pins if you needed to control 16 . It also works with . So if you had 16 readers that output serial, you could connect the BILDR SENSING HUMIDITY WITH THE HIH-4030 + ARDUINO Well luckily measuring relative humidity is pretty simple with the HIH-4030. The HIH-4030 is a low-power, analog output sensor. Hooking It Up. Hooking up the HIH-4030 to your arduino is super simple, just power it with 5V / Ground, and connect the out to an analog pin on thearduino.
BILDR WHAT'S THE PASSWORD? ARDUINO + KEYPAD For this tutorial we have 2 Arduino projects. The first example is pretty simple and just prints out the key that you press in the Arduino Software’s Serial Terminal. The second is just a little more complicated, and allows you to set up a 4 digit secret code. Both of these projects are significantly simplified because the Keypad andPassword
BILDR SENSING HUMIDITY WITH THE SHT15 + ARDUINO Sensing Humidity With The SHT15 + Arduino. Tuesday, November 27 th , 2012. The SHT15 is a digital humidity sensor that outputs a fully calibrated humidity reading. And because what we are measuring is actually relative humidity, and relative humidity being relative to temperature, the SHT15 has a builtin digital thermometer. BILDR HIGH-POWER CONTROL: ARDUINO + N-CHANNEL MOSFET High-Power Control: Arduino + N-Channel MOSFET. Monday, March 5 th , 2012. Eventually you are going to find yourself holding a 12v , , or light and wondering “How the heck am I supposed to control this from my Arduino?”. And we have covered this in the past. Today we are going to talk about another way of doingjust
BILDR ROTARY ENCODER + ARDUINO A rotary encoder is a device that you can rotate infinitely. Simple ones like this one I got from sparkfun have no real state like a pot does, so when you start up, you won’t be able to simply read from the encoder where it is turned to. But because you can keep turning it it has no beginning, middle or end anyways. BILDR TRIPLE AXIS MAGNETOMETER HMC5883L + ARDUINO The HMC5883L is an device, a type 2-wire serial connection, so we just need to connect the SDA (Data) and SCL (Clock) lines to your Arduino for communication. On your Arduino (everything but the ) SDA is on analog pin 4, and SCL is on analog pin 5. On an arduino mega, SDA is digital 20, and SCL is digital 21.BILDR BILDR
A lot has happened since our last article was published and to celebrate the continuance of bildr we’ll be playing with the MQ-3 Alcohol Gas Sensor.Coupled with the SparkFun Gas Sensor Breakout Board, connecting the MQ-3 to your Arduino is a breeze.. The MQ-3 is a heater-driven alcohol sensor that outputs an analog signal (usually interpreted somewhere between 150 and 1023 depending on howBILDR ABOUT
bildr (not Bildr) was founded by Adam Meyer, an Interaction designer at Tellart who is so totally obsessed with making things easier for people that he decided to spend countless hours learning electronics and code just in hopes of giving it back to the community in a simplified fashion. bildr is not a company, has no funding, and doesnot make
BILDR THE BIG EASY STEPPER MOTOR DRIVER + ARDUINO A higher current/amperage rating is better, and just means it wont burn out. (The Big Easy Driver can supply up to 2 amps) Connect the 3 control wires from the “gnd”, “dir”, and “step” of the Big Easy Driver to the Arduino as shown. Connect the stepper motor to the driver – For me the red/green were one pair, and the blue/yellow BILDR SENSING BAROMETRIC PRESSURE Well the BMP085 Barometric Pressure sensor, available at SparkFun is a great little sensor capable of sensing such small changes in barometric pressure it can be used as a pretty precise altimeter as well. And, because no Barometric pressure sensor would be complete without a temperature reading, the BMP085 has an imbedded thermometer. BILDR ROTARY ENCODER + ARDUINO A rotary encoder is a device that you can rotate infinitely. Simple ones like this one I got from sparkfun have no real state like a pot does, so when you start up, you won’t be able to simply read from the encoder where it is turned to. But because you can keep turning it it has no beginning, middle or end anyways. BILDR CONTROLLING 2 MOTORS WITH THE TB6612FNG + ARDUINO In previous articles we have discussed how to control motors with simple . And with you could control the speed. But that is just one , and you can only go one direction. Today we are going to talk about the TB6612FNG dual motor driver, specifically the TB6612FNG breakout board from sparkfun.. The TB6612FNG isn’t just a dual motor driver, it is a dual [[H BILDR TRIPLE AXIS MAGNETOMETER HMC5883L + ARDUINO The HMC5883L is an device, a type 2-wire serial connection, so we just need to connect the SDA (Data) and SCL (Clock) lines to your Arduino for communication. On your Arduino (everything but the ) SDA is on analog pin 4, and SCL is on analog pin 5. On an arduino mega, SDA is digital 20, and SCL is digital 21. BILDR IS IT HOT? ARDUINO + MLX90614 IR THERMOMETER But being able to read the temperature of an object without even touching it is simply awesome. The is a sensor that can do just that. By reading the light coming off an object, this guy can sense between -95 and 720ºf (-70 to 382.2°C) with 17 resolution. That’s 128X more precise than the Arduino’s BILDR GETTING DATA FROM THE WEB Getting Data From The Web – Arduino + Ethernet. Friday, June 10 th , 2011. Yesterday we covered how you would go about controlling pins of your arduino over the internet using the Arduino Ethernet Shield set up as a server. Today we are going to take a look at using the shield as a client to get information off of a web page, and report back. BILDR ARE WE GETTING CLOSE? PROXIMITY SENSORS + ARDUINO Are we getting close? Proximity Sensors + Arduino. Tuesday, March 8 th , 2011. In past tutorials, we have covered temperature, color, time, direction, but never distance or proximity. I think I strayed away from this because most of the lower cost proximity sensors are pretty drop-dead-simple to use and thought it might not be that useful.BILDR BILDR
A lot has happened since our last article was published and to celebrate the continuance of bildr we’ll be playing with the MQ-3 Alcohol Gas Sensor.Coupled with the SparkFun Gas Sensor Breakout Board, connecting the MQ-3 to your Arduino is a breeze.. The MQ-3 is a heater-driven alcohol sensor that outputs an analog signal (usually interpreted somewhere between 150 and 1023 depending on how BILDR CAN YOU MOVE OVER? THE 74HC595 8 BIT SHIFT REGISTER Basically a shift register will, in the end, let you expand on the outputs you have on your . Each one of these 74HC595s can act like 8 more digital outputs, and you can daisy chain them. So you could hook 8 of them up next to each other and have control of 64 outputs. But the way it works is a little confusing BILDR LINE SENSING. QRE1113 REFLECTANCE SENSOR + ARDUINO Line Sensing. QRE1113 Reflectance Sensor + Arduino. The QRE1113 is a common reflectance sensor often used in robotic line followers. The sensor works by shining an down and seeing how much of that light bounces back using a . Because dark colors will bounce back less of the light, the sensor can be used to BILDR MUXING AROUND WITH THE CD74HC4067 + ARDUINO The CD74HC4067 is capable of more than reading analog signals. It can be uses in either direction. So you could connect SIG to 5v, and then be able to switch the 5v to one of 16 channel pins if you needed to control 16 . It also works with . So if you had 16 readers that output serial, you could connect the BILDR SENSING HUMIDITY WITH THE HIH-4030 + ARDUINO Well luckily measuring relative humidity is pretty simple with the HIH-4030. The HIH-4030 is a low-power, analog output sensor. Hooking It Up. Hooking up the HIH-4030 to your arduino is super simple, just power it with 5V / Ground, and connect the out to an analog pin on thearduino.
BILDR WHAT'S THE PASSWORD? ARDUINO + KEYPAD For this tutorial we have 2 Arduino projects. The first example is pretty simple and just prints out the key that you press in the Arduino Software’s Serial Terminal. The second is just a little more complicated, and allows you to set up a 4 digit secret code. Both of these projects are significantly simplified because the Keypad andPassword
BILDR SENSING HUMIDITY WITH THE SHT15 + ARDUINO Sensing Humidity With The SHT15 + Arduino. Tuesday, November 27 th , 2012. The SHT15 is a digital humidity sensor that outputs a fully calibrated humidity reading. And because what we are measuring is actually relative humidity, and relative humidity being relative to temperature, the SHT15 has a builtin digital thermometer. BILDR HIGH-POWER CONTROL: ARDUINO + N-CHANNEL MOSFET High-Power Control: Arduino + N-Channel MOSFET. Monday, March 5 th , 2012. Eventually you are going to find yourself holding a 12v , , or light and wondering “How the heck am I supposed to control this from my Arduino?”. And we have covered this in the past. Today we are going to talk about another way of doingjust
BILDR ROTARY ENCODER + ARDUINO A rotary encoder is a device that you can rotate infinitely. Simple ones like this one I got from sparkfun have no real state like a pot does, so when you start up, you won’t be able to simply read from the encoder where it is turned to. But because you can keep turning it it has no beginning, middle or end anyways. BILDR TRIPLE AXIS MAGNETOMETER HMC5883L + ARDUINO The HMC5883L is an device, a type 2-wire serial connection, so we just need to connect the SDA (Data) and SCL (Clock) lines to your Arduino for communication. On your Arduino (everything but the ) SDA is on analog pin 4, and SCL is on analog pin 5. On an arduino mega, SDA is digital 20, and SCL is digital 21.BILDR BILDR
A lot has happened since our last article was published and to celebrate the continuance of bildr we’ll be playing with the MQ-3 Alcohol Gas Sensor.Coupled with the SparkFun Gas Sensor Breakout Board, connecting the MQ-3 to your Arduino is a breeze.. The MQ-3 is a heater-driven alcohol sensor that outputs an analog signal (usually interpreted somewhere between 150 and 1023 depending on howBILDR ABOUT
bildr (not Bildr) was founded by Adam Meyer, an Interaction designer at Tellart who is so totally obsessed with making things easier for people that he decided to spend countless hours learning electronics and code just in hopes of giving it back to the community in a simplified fashion. bildr is not a company, has no funding, and doesnot make
BILDR THE BIG EASY STEPPER MOTOR DRIVER + ARDUINO A higher current/amperage rating is better, and just means it wont burn out. (The Big Easy Driver can supply up to 2 amps) Connect the 3 control wires from the “gnd”, “dir”, and “step” of the Big Easy Driver to the Arduino as shown. Connect the stepper motor to the driver – For me the red/green were one pair, and the blue/yellow BILDR SENSING BAROMETRIC PRESSURE Well the BMP085 Barometric Pressure sensor, available at SparkFun is a great little sensor capable of sensing such small changes in barometric pressure it can be used as a pretty precise altimeter as well. And, because no Barometric pressure sensor would be complete without a temperature reading, the BMP085 has an imbedded thermometer. BILDR ROTARY ENCODER + ARDUINO A rotary encoder is a device that you can rotate infinitely. Simple ones like this one I got from sparkfun have no real state like a pot does, so when you start up, you won’t be able to simply read from the encoder where it is turned to. But because you can keep turning it it has no beginning, middle or end anyways. BILDR TRIPLE AXIS MAGNETOMETER HMC5883L + ARDUINO The HMC5883L is an device, a type 2-wire serial connection, so we just need to connect the SDA (Data) and SCL (Clock) lines to your Arduino for communication. On your Arduino (everything but the ) SDA is on analog pin 4, and SCL is on analog pin 5. On an arduino mega, SDA is digital 20, and SCL is digital 21. BILDR CONTROLLING 2 MOTORS WITH THE TB6612FNG + ARDUINO In previous articles we have discussed how to control motors with simple . And with you could control the speed. But that is just one , and you can only go one direction. Today we are going to talk about the TB6612FNG dual motor driver, specifically the TB6612FNG breakout board from sparkfun.. The TB6612FNG isn’t just a dual motor driver, it is a dual [[H BILDR IS IT HOT? ARDUINO + MLX90614 IR THERMOMETER But being able to read the temperature of an object without even touching it is simply awesome. The is a sensor that can do just that. By reading the light coming off an object, this guy can sense between -95 and 720ºf (-70 to 382.2°C) with 17 resolution. That’s 128X more precise than the Arduino’s BILDR GETTING DATA FROM THE WEB Getting Data From The Web – Arduino + Ethernet. Friday, June 10 th , 2011. Yesterday we covered how you would go about controlling pins of your arduino over the internet using the Arduino Ethernet Shield set up as a server. Today we are going to take a look at using the shield as a client to get information off of a web page, and report back. BILDR ARE WE GETTING CLOSE? PROXIMITY SENSORS + ARDUINO Are we getting close? Proximity Sensors + Arduino. Tuesday, March 8 th , 2011. In past tutorials, we have covered temperature, color, time, direction, but never distance or proximity. I think I strayed away from this because most of the lower cost proximity sensors are pretty drop-dead-simple to use and thought it might not be that useful.* Home
* Forum
* Wiki
* Code
* RSS
Login / Register
* About
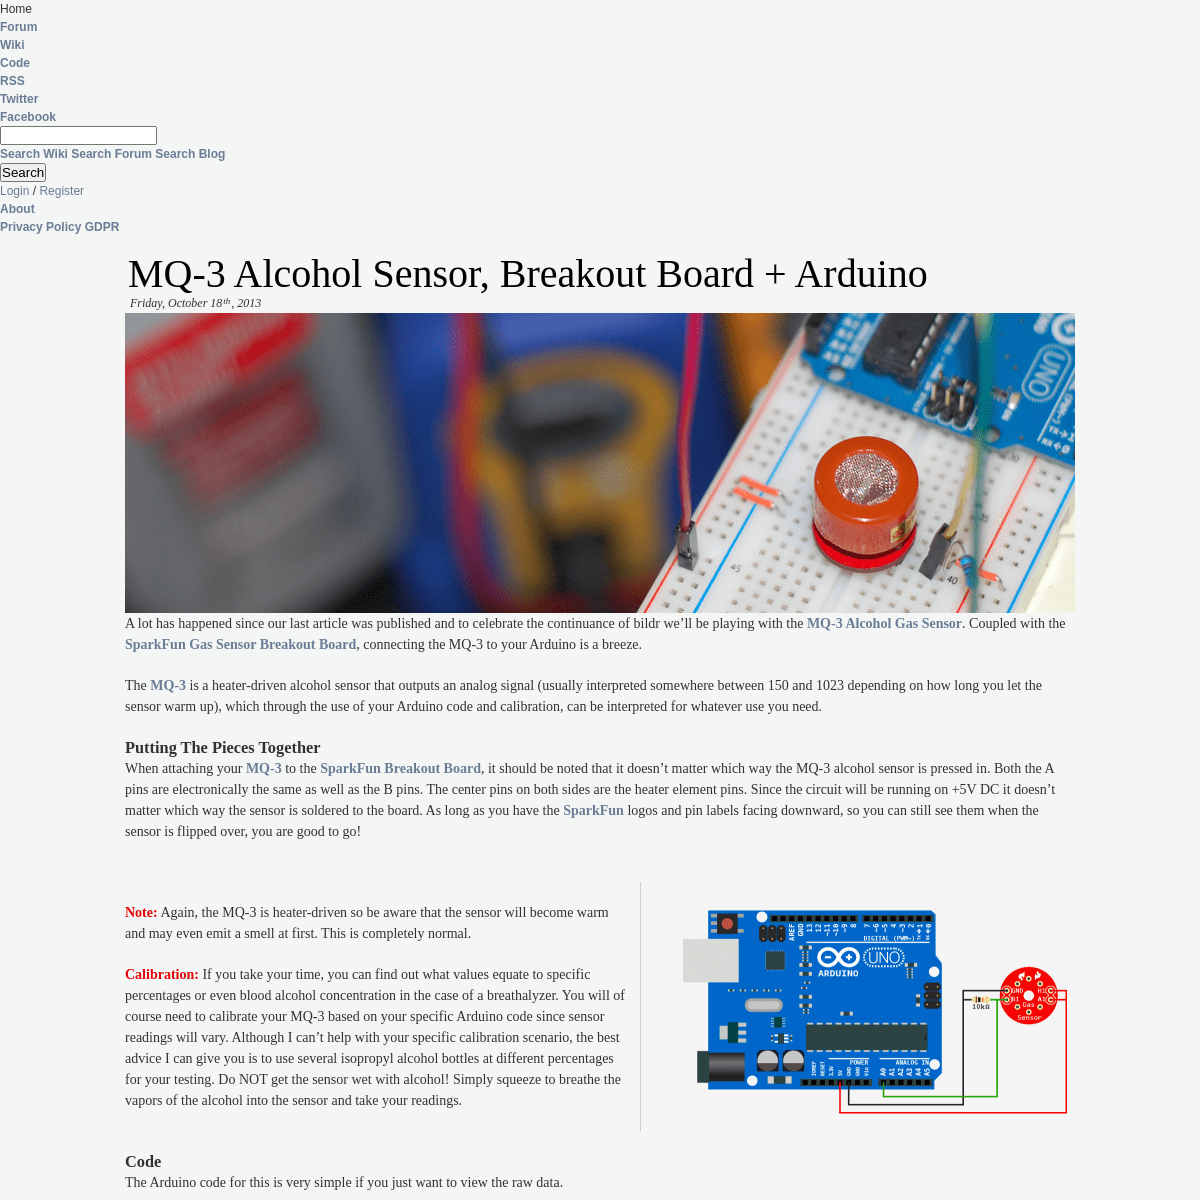
* Privacy Policy GDPR MQ-3 ALCOHOL SENSOR, BREAKOUT BOARD + ARDUINO Friday, October 18 th , 2013 A lot has happened since our last article was published and to celebrate the continuance of bildr we’ll be playing with the MQ-3 Alcohol Gas Sensor . Coupled with the SparkFun Gas Sensor Breakout Board , connecting the MQ-3 to your Arduino is a breeze. The MQ-3 is a heater-driven alcohol sensor that outputs an analog signal (usually interpreted somewhere between 150 and 1023 depending on how long you let the sensor warm up), which through the use of your Arduino code and calibration, can be interpreted for whatever use you need. PUTTING THE PIECES TOGETHER When attaching your MQ-3 to the SparkFun Breakout Board , it should be noted that it doesn’t matter which way the MQ-3 alcohol sensor is pressed in. Both the A pins are electronically the same as well as the B pins. The center pins on both sides are the heater element pins. Since the circuit will be running on +5V DC it doesn’t matter which way the sensor is soldered to the board. As long as you have the SparkFun logos and pin labels facing downward, so you can still see them when the sensor is flipped over, you are good to go! NOTE: Again, the MQ-3 is heater-driven so be aware that the sensor will become warm and may even emit a smell at first. This iscompletely normal.
CALIBRATION: If you take your time, you can find out what values equate to specific percentages or even blood alcohol concentration in the case of a breathalyzer. You will of course need to calibrate your MQ-3 based on your specific Arduino code since sensor readings will vary. Although I can’t help with your specific calibration scenario, the best advice I can give you is to use several isopropyl alcohol bottles at different percentages for your testing. Do NOT get the sensor wet with alcohol! Simply squeeze to breathe the vapors of the alcohol into the sensor and take your readings.CODE
The Arduino code for this is very simple if you just want to view theraw data.
int mq3_analogPin = A0; // connected to the output pin of MQ3void setup(){
Serial.begin(9600); // open serial at 9600 bps}
void loop()
{
// give ample warmup time for readings to stabilize int mq3_value = analogRead(mq3_analogPin); Serial.println(mq3_value); delay(100); //Just here to slow down the output.}
Tweet
No Comments
SENSING HUMIDITY WITH THE SHT15 + ARDUINO Tuesday, November 27 th , 2012 The SHT15 is a digital humidity sensor that outputs a fully calibrated humidity reading. And… because what we are measuring is actually relative humidity, and relative
humidity being relative to temperature, the SHT15 has a builtin digital thermometer. This makes things much easier to work with than sensors without a thermometer onboard . You can pick one up fromsparkFun here .
HOOKING IT UP
The SHT15 uses a two-wire connection for communication that is similar to, but not, I2C. So we wont be able to use the Arduino’s dedicated lines for this. The down side is it is a bit slower to get readings from, the plus side is that you can connect it to any 2 digital pins you want. We are using pins 2 and 3 on our arduino. BEFORE YOU SOLDER IT UP… Note that this board can not be washed! So if you are using flux, or solder that you normally clean up, don’t (They actually recommend to use “no-clean” solder just so you don’t have to worry about it). And be extremely careful not to getit wet at all.
AFTER YOU SOLDER IT UP… To get a clean reading, the sensor needs to be stored at >75% humidity for at least 12 hours to allow the polymer to re-hydrate (just what the doc says). If you don’t, your SHT15 may read an offset that slowly disappears if exposed to ambient conditions. Alternatively the re-hydration process may be performed at ambient conditions (>40% Humidity) for 5 + days. Im not exactly sure how you do that… But someone noted that they put it in a ziplock with a wet towel (not touching) for 12H.CODE
The code for this is a bit wacky (as with most digital sensors), but it is split up pretty nicely, and is as easy to read as it can be. NOTE THAT THE READINGS ARE A BIT SLOW TO RETURN A VALUE (100+ MS). //Based of the wiring code at http://wiring.org.co/learning/basics/humiditytemperaturesht15.html int SHT_clockPin = 3; // pin used for clock int SHT_dataPin = 2; // pin used for datavoid setup(){
Serial.begin(9600); // open serial at 9600 bps}
void loop(){
//these can take a bit to get the values (100ms or so) float temperature = getTemperature(); float humidity = getHumidity(); Serial.print(temperature); Serial.print(" | "); Serial.println(humidity);}
float getTemperature(){ //Return Temperature in Celsius SHT_sendCommand(B00000011, SHT_dataPin, SHT_clockPin); SHT_waitForResult(SHT_dataPin); int val = SHT_getData(SHT_dataPin, SHT_clockPin); SHT_skipCrc(SHT_dataPin, SHT_clockPin); return (float)val * 0.01 - 40; //convert to celsius}
float getHumidity(){ //Return Relative Humidity SHT_sendCommand(B00000101, SHT_dataPin, SHT_clockPin); SHT_waitForResult(SHT_dataPin); int val = SHT_getData(SHT_dataPin, SHT_clockPin); SHT_skipCrc(SHT_dataPin, SHT_clockPin); return -4.0 + 0.0405 * val + -0.0000028 * val * val;}
void SHT_sendCommand(int command, int dataPin, int clockPin){ // send a command to the SHTx sensor // transmission start pinMode(dataPin, OUTPUT); pinMode(clockPin, OUTPUT); digitalWrite(dataPin, HIGH); digitalWrite(clockPin, HIGH); digitalWrite(dataPin, LOW); digitalWrite(clockPin, LOW); digitalWrite(clockPin, HIGH); digitalWrite(dataPin, HIGH); digitalWrite(clockPin, LOW); // shift out the command (the 3 MSB are address and must be 000, the last 5 bits are the command) shiftOut(dataPin, clockPin, MSBFIRST, command); // verify we get the right ACK digitalWrite(clockPin, HIGH); pinMode(dataPin, INPUT); if (digitalRead(dataPin)) Serial.println("ACK error 0"); digitalWrite(clockPin, LOW); if (!digitalRead(dataPin)) Serial.println("ACK error 1");}
void SHT_waitForResult(int dataPin){ // wait for the SHTx answer pinMode(dataPin, INPUT); int ack; //acknowledgement //need to wait up to 2 seconds for the value for (int i = 0; i < 1000; ++i){ delay(2); ack = digitalRead(dataPin); if (ack == LOW) break; } if (ack == HIGH) Serial.println("ACK error 2"); } int SHT_getData(int dataPin, int clockPin){ // get data from the SHTx sensor // get the MSB (most significant bits) pinMode(dataPin, INPUT); pinMode(clockPin, OUTPUT); byte MSB = shiftIn(dataPin, clockPin, MSBFIRST); // send the required ACK pinMode(dataPin, OUTPUT); digitalWrite(dataPin, HIGH); digitalWrite(dataPin, LOW); digitalWrite(clockPin, HIGH); digitalWrite(clockPin, LOW); // get the LSB (less significant bits) pinMode(dataPin, INPUT); byte LSB = shiftIn(dataPin, clockPin, MSBFIRST); return ((MSB << 8) | LSB); //combine bits } void SHT_skipCrc(int dataPin, int clockPin){ // skip CRC data from the SHTx sensor pinMode(dataPin, OUTPUT); pinMode(clockPin, OUTPUT); digitalWrite(dataPin, HIGH); digitalWrite(clockPin, HIGH); digitalWrite(clockPin, LOW); }Tweet
No Comments
THE BIG EASY STEPPER MOTOR DRIVER + ARDUINO Monday, November 26 th , 2012 (or step) motors are really cool. They are perfect for automation or any time you need a motor to turn to a specific point, at a specific speed, in a specific direction. And, unlike typical motors, steppers are able to do all of this, and hold their position when they are not moving – The trade off is that they cant move as fast, and you have to power them at full power all the time, but you get total control in return. Steppers have a minimum amount they can move known as a step. You can feel these steps if you slowly turn your stepper by hand. The most common steppers have 200 steps per revolution, so all movement is in 1.8º increments (360º / 200). Controlling them can get tricky at first, so today we are doing an article on using the Big EasyDriver Stepper Motor Driver . The big easyDriver is the big brother of the easy driver we wrote about last year . It is able to take a lot more abuse and power, so it isn’t as easy to destroy as the easy driver, can power much larger motors, and it also gives you a little more control by letting you change the microstepping setting. MOTOR VOLTAGE / CURRENT A lot of people ask about what voltage they should use to power their motor. Well, when using a stepper driver, you are powering the driver, not the motor. The driver will take over powering the motor for you. It is best to power the driver with the highest voltage you can ( UP TO 35V MAX FOR THIS DRIVER ). This will allow the motor to spin faster than if powered at a lower voltage. Exactly why this is is pretty complex, but if you want to know more about it, you should really read this: Gecko Drive – Step Motor Basics On the bigEasy driver is a mini potentiometer to control the current to the motor. This varies between 0ma and 2A (2000ma). You want to set it to whatever your motor is rated to. Too high, and you could burn the motor up, too low, you wont get all the power out of your motor. NOTE: THE ARROW INDICATORS ON THE CURRENT ADJUSTMENT POTENTIOMETER ARE BACKWARDS. KEEP THIS IN MIND WHEN ADJUSTING THE CURRENT LIMITS. If you are running a higher power motor, you will probably want to put a heat sink on the driver as well.HOOKING IT UP
Even though there are some 30 pins on the Big Easy Driver, we only need a few to get this up and running. In fact, a good deal of the pins are actually just duplicates that are spaced out differently. THE BAREBONES SETUP: POWER THE DRIVER WITH 8-35V – If using a wall adapter, make sure the adapter has at least enough current for the motor. A higher current/amperage rating is better, and just means it wont burn out. (The Big Easy Driver can supply up to 2 amps) CONNECT THE 3 CONTROL WIRES from the “gnd”, “dir”, and “step” of the Big Easy Driver to the Arduino as shown. CONNECT THE STEPPER MOTOR TO THE DRIVER – For me the red/green were one pair, and the blue/yellow was another. If this does not work for you, see the section below on finding your motors coil pairs.CODE
For the arduino code for the driver, im going to be using AccelStepperLibrary . This is
an amazing library that I use for all my stepper needs now. It is even does acceleration and deceleration, supports multiple drivers at once, and most importantly it is non blocking. Meaning, you can be moving your motor as you are reading from a sensor, or turning on lights etc. The library even keeps track of the position of the motor. So if you tell it to go to 10,000 – It knows it is at 9,00 already, so it moves an additional 1000 steps. Then you can tell it to go home, and it will go back 10,000 steps to 0. I HIGHLY RECOMMEND YOU DOWNLOAD THE FULL LIBRARY FROM THE AUTHOR. THE VERSION I HAVE HERE IS BAREBONES WITH NONE OF THE EXAMPLES. IT IS JUST HERE BECAUSE I BELIEVE IF YOU POST CODE, YOU SHOULD POST EVERYTHING YOU NEED TO MAKE IT WORK To make this code work, BEFORE YOU LOAD THE CODE, OR EVEN OPEN THE ARDUINO PROGRAM, we need to place the “AccelStepper” folder into your Arduino Library. If you don’t know where that is by default,Look to the right.
If you click the download button to the right of “Arduino” you can download the whole thing as a zip, so you dont need to copy all thefiles.
DEFAULT LIBRARY FOLDER LOCATION ON YOUR MAC:: In (home directory)/Documents/Arduino/libraries ON YOUR PC:: My Documents -> Arduino -> libraries ON YOUR LINUX BOX:: (home directory)/sketchbook/libraries ADDITIONAL INFORMATION FINDING YOUR MOTORS COIL PAIRS This driver only needs 4 wires from your stepper. If you have a 4 wire stepper, awesome! If you have a 6 wire stepper, it will be slightly trickier. But no matter what, we need to find the 2 main coils inside of the motor. AND IF YOU GET IT WRONG, THE MOTOR WILL JUST TWITCH OR NOT MOVE, BUT YOU WONT BREAK IT.4 WIRE MOTOR
Using an ohmMeter, pick one wire at random, and test it with the others until you find a pair that shows resistance of a few ohms (1 – 200ohms most often). Those 2 are your “pair A”. Make sure the other 2 wires have the same resistance on them, (if not, it may be broken) and that is your “pair B”. With the two pairs of wires, there isnt a backwards, so just plug wires from “pair A” into the “A” on the driver, and “pair B” into “B”.6 WIRE MOTOR
Checking the documents on the motor is the easiest, but if you donthave it, read on.
6 wire motors have two coils in them just like 4 wire motors. But 6 wire motors also have extra wires that connects to the middle of each coil (centers). So each coil actually has 3 wires, a center and two ends. We don’t use coil center wires, we just need the 4 coil ends(2 from each coil).
Basically, We need to find ends of the two coils. The ends of the coils will have twice the resistance as the center to an end. So we need two pairs of wire that have the highest resistance in the group. The easiest way to find out the right 4 wires is to look at the documentation for the motor, but if you dont have that, you can with some testing, find the right ones. To find the correct 2 wires, we need to locate the 3 wires from each coil. Start by just picking one at random, and using an ohmMeter, test the resistance with the others until you find the 2 connected to that wire. (3 of them will show no connection because they are part of the other coil). Now, these 3 are for coil “A”. Now, take these 3 wires and test the resistance between any 2 of them until find the 2 that have the highest resistance. These are the two ends of that coil “A”. Do the same for the other 3 wires to locate the ends of coil“B”.
With the two pairs of wires, there isnt a backwards. So just plug wires from coil A into the A on the driver, and the two from coil Binto b.
8 WIRE MOTOR
There is no way to do this without looking at the documentation.MICROSTEPPING
Most stepper drivers offer something called microstepping, and the Big Easy Driver is no exception. As I mentioned before, steppers have that minimum movement called a step. Microstepping breaks down that step into smaller micro steps. Microstepping allows for smoother, quieter, more accurate control, at slower speeds. When using microstepping, a step motor will require more “step pluses” to move the motor. For instance if you are using 16 microsteps (the default on the Big Easy Driver) per step, a 200 step motor would require 3200 “step pluses” to make a full revolution. Just take note when you wonder why telling it to step 200 steps barelyrotates the motor.
Microstepping will reduce the maximum speed / torque of the motor (about 30% less), so it is a trade of speed vs smooth. Because of this, many high end drivers switch to full stepping (no microstepping) at higher speeds, and technically, you could do that with the big easyDriver, but it’s too complex for me to figure out, so I wont becovering that.
ADJUSTING THE MICROSTEPPING The Big Easy Driver defaults to 16 step microstepping mode. If you want to reduce that, you can do so by pulling the MS1, MS2, and MS3 pins HIGH (connecting them to 5V) or LOW (connecting them to GND). Check out the chart on the side to see how make the adjustments.Tweet
No Comments
� Older Entries
ARCHIVES
* October 2013
* November 2012
* August 2012
* April 2012
* March 2012
* February 2012
* January 2012
* October 2011
* September 2011
* August 2011
* July 2011
* June 2011
* May 2011
* April 2011
* March 2011
* February 2011
* January 2011
* December 2010
* November 2010
* October 2010
* September 2010
CATEGORIES
* funded projects
* Promotions
* Review
* Site
* Tutorials
* User Contributed Articles* User Project
ABOUT
* Content available under: Attribution-Share Alike 3.0 Unported * Proudly powered by WordPress , FREE WORDPRESS THEMES , AND SEARCH MARKETINGDetails
2