4
More Annotations


2


4
Favourite Annotations


1


6
Text
EV3DEV HOMESTART HEREDOWNLOADSSUPPORTNEWSCOMMUNITYTUTORIALS ev3dev is your EV3. re-imagined. ev3dev is a Debian Linux -based operating system that runs on several LEGO ® MINDSTORMS compatible platforms including the LEGO ® MINDSTORMS EV3 and Raspberry Pi -powered BrickPi . Just like you can take apart your LEGO ® models and build something completely different, we have reverse-engineered
the EV3 and
PROJECTS - EV3DEV
Balancing Robot. This is still a work in progress. It is a Segway-style balancing robot based on the HTWay. You can control it with the EV3 IR Remote/Sensor. Interesting features: Uses udev to enumerate sensors and motors. Sensors and motors can be plugged into any port without any configuration changes. Can use either the EV3Gyro sensor or
TUTORIALS - EV3DEV
Tutorials on a wide range of ev3dev functionality, including networking, motor control, and usage of extra hardware. CONNECTING TO EV3DEV USING SSH In a terminal, run the following command to use it to connect to your EV3 or other ev3dev device. ssh robot@ev3dev.local. If you have never connected before, you will be prompted to confirm the authenticity of the host, so type yes when prompted. The authenticity of host 'ev3dev.local (192.168.2.3)' can't be USING THE EV3 SPEAKERSEE MORE ON EV3DEV.ORGPS4EXPLOR3R
Pair your gamepad with EV3 by pressing and holding the PS button and the sharing button simultaneously. Select “Wireless and Networks > Bluetooth > Start scan”, then choose “Wireless Controller”. Copy ps4explor3r.py on to EV3 Brick. Write in command line chmod +x ps4explor3r.py. Choose file from brickman menu or run from commandline
SETTING UP WI-FI USING THE COMMAND LINE Setting Up Wi-Fi Using the Command Line. You must have another way to connect to your robot first before following this tutorial. On the EV3, that means USB or Bluetooth. If you have a Raspberry Pi, you can plug in a monitor and keyboard to the Raspberry Pi. SENDING AND RECEIVING MESSAGES WITH MQTTSEE MORE ON EV3DEV.ORG SETTING UP AN NFS FILE SHARE The -network and -mask options limit access to the shared directory to those on the 192.168 subnet. The -ro option limits access to read-only, while the -alldirs option provides access to all subdirectories of the specified path.. For this example, I’m going to share the Public folder under my userid (of course your userid will be different) and the subnet will be 192.168.2.0 for the case of WRITING AN SD CARD IMAGE USING UBUNTU DISK IMAGE WRITER There’s an easier way to image your SD card! Check out the “Getting Started” guide for a cross-platform guide. Open up the folder where you downloaded the ev3dev image file. Right-click and select Extract Here to uncompress the file. This will extract a single file with the same name minus the .xz (or .zip).Right-click this new file and select Open With > Disk Image Writer. EV3DEV HOMESTART HEREDOWNLOADSSUPPORTNEWSCOMMUNITYTUTORIALS ev3dev is your EV3. re-imagined. ev3dev is a Debian Linux -based operating system that runs on several LEGO ® MINDSTORMS compatible platforms including the LEGO ® MINDSTORMS EV3 and Raspberry Pi -powered BrickPi . Just like you can take apart your LEGO ® models and build something completely different, we have reverse-engineeredthe EV3 and
PROJECTS - EV3DEV
Balancing Robot. This is still a work in progress. It is a Segway-style balancing robot based on the HTWay. You can control it with the EV3 IR Remote/Sensor. Interesting features: Uses udev to enumerate sensors and motors. Sensors and motors can be plugged into any port without any configuration changes. Can use either the EV3Gyro sensor or
TUTORIALS - EV3DEV
Tutorials on a wide range of ev3dev functionality, including networking, motor control, and usage of extra hardware. CONNECTING TO EV3DEV USING SSH In a terminal, run the following command to use it to connect to your EV3 or other ev3dev device. ssh robot@ev3dev.local. If you have never connected before, you will be prompted to confirm the authenticity of the host, so type yes when prompted. The authenticity of host 'ev3dev.local (192.168.2.3)' can't be USING THE EV3 SPEAKERSEE MORE ON EV3DEV.ORGPS4EXPLOR3R
Pair your gamepad with EV3 by pressing and holding the PS button and the sharing button simultaneously. Select “Wireless and Networks > Bluetooth > Start scan”, then choose “Wireless Controller”. Copy ps4explor3r.py on to EV3 Brick. Write in command line chmod +x ps4explor3r.py. Choose file from brickman menu or run from commandline
SETTING UP WI-FI USING THE COMMAND LINE Setting Up Wi-Fi Using the Command Line. You must have another way to connect to your robot first before following this tutorial. On the EV3, that means USB or Bluetooth. If you have a Raspberry Pi, you can plug in a monitor and keyboard to the Raspberry Pi. SENDING AND RECEIVING MESSAGES WITH MQTTSEE MORE ON EV3DEV.ORG SETTING UP AN NFS FILE SHARE The -network and -mask options limit access to the shared directory to those on the 192.168 subnet. The -ro option limits access to read-only, while the -alldirs option provides access to all subdirectories of the specified path.. For this example, I’m going to share the Public folder under my userid (of course your userid will be different) and the subnet will be 192.168.2.0 for the case of WRITING AN SD CARD IMAGE USING UBUNTU DISK IMAGE WRITER There’s an easier way to image your SD card! Check out the “Getting Started” guide for a cross-platform guide. Open up the folder where you downloaded the ev3dev image file. Right-click and select Extract Here to uncompress the file. This will extract a single file with the same name minus the .xz (or .zip).Right-click this new file and select Open With > Disk Image Writer.DOWNLOADS - EV3DEV
Downloads Bootable SD card image files. Downloads. Select the download below that corresponds to your hardware. Then head to the Getting Started page for installation instructions. GETTING STARTED WITH EV3DEV To get started, you will need to download the release corresponding to the platform you are using. Visit the GitHub releases page and find the image that corresponds to your platform:. Releases for the LEGO MINDSTORMS EV3 start with ev3- ; Releases for the Raspberry Pi 1 start with rpi-; Releases for the Raspberry Pi 2 and 3 start with rpi2-; Releases for the BeagleBone start with evb- GETTING STARTED WITH C Create a file called Makefile and open it: nano Makefile. Copy the following contents into the file: all: main.o gcc main.o -o bin main.o: main.c gcc -I . -c main.c clean: rm -rf *.o rm bin. When you paste the contents into nano, the indentation will likely disappear. Move your cursor using the arrow keys to the beginning of the linesthat are
USING THE EV3 LCD
The 1 at the end of geometry means that there is 1 bit per pixel. So, each byte in the buffer represents 8 pixels. The leftmost pixel is in the least significant bit. Visual : MONO01 tells us that the value 0 is white and the value 1 is black.. LineLength : 24 means that each horizontal line is 24 bytes. If you do the math, 178 pixels / 8 bits per byte * 1 bit per pixel = 22.25 bytes. CONNECTING TO THE INTERNET VIA USB Now, we need to assign an IP address to our EV3. In brickman, go to Wireless and Networks and select All Network Connections, then select the Wired connection with the USB icon. Then select Connect. The Status should change to Connecting and then Online to indicate thatyou are
SETTING UP WI-FI USING THE COMMAND LINE Setting Up Wi-Fi Using the Command Line. You must have another way to connect to your robot first before following this tutorial. On the EV3, that means USB or Bluetooth. If you have a Raspberry Pi, you can plug in a monitor and keyboard to the Raspberry Pi. USING BLUETOOTH TETHERING The Bluetooth icon next to the battery in the status bar also indicates that Bluetooth is powered on. Go back to Wireless and Networks and select Tethering. Enable tethering via Bluetooth by checking the box next to Bluetooth. On your host computer, open System Preferences and go to Bluetooth. This will make your host computerdiscoverable.
SETTING UP AN NFS FILE SHARE The -network and -mask options limit access to the shared directory to those on the 192.168 subnet. The -ro option limits access to read-only, while the -alldirs option provides access to all subdirectories of the specified path.. For this example, I’m going to share the Public folder under my userid (of course your userid will be different) and the subnet will be 192.168.2.0 for the case ofPLATFORM COMPARISON
The version number is not actually printed on the BrickPi circuit board. ↩ The Grove sensor ports are not usable with EVB or QuestCape because of shared pins.↩EV3 PRINT3RBOT
Ev3 Print3rbot. The EV3 Print3rbot can be built using the EV3 Home Edition set, plus a 3D printed pen holder, 2 LEGO Gear Wheel 40T (ref. 4285634) and an additional push button sensor (EV3 or NXT). The additional push button and the 2 gears are included in the EV3 education set. The robot can draw simple svg files (as long as it onlycontains
EV3DEV HOMESTART HEREDOWNLOADSSUPPORTNEWSCOMMUNITYTUTORIALS ev3dev is your EV3. re-imagined. ev3dev is a Debian Linux -based operating system that runs on several LEGO ® MINDSTORMS compatible platforms including the LEGO ® MINDSTORMS EV3 and Raspberry Pi -powered BrickPi . Just like you can take apart your LEGO ® models and build something completely different, we have reverse-engineeredthe EV3 and
PROJECTS - EV3DEV
Balancing Robot. This is still a work in progress. It is a Segway-style balancing robot based on the HTWay. You can control it with the EV3 IR Remote/Sensor. Interesting features: Uses udev to enumerate sensors and motors. Sensors and motors can be plugged into any port without any configuration changes. Can use either the EV3Gyro sensor or
TUTORIALS - EV3DEV
Tutorials on a wide range of ev3dev functionality, including networking, motor control, and usage of extra hardware. GETTING STARTED WITH EV3DEV To get started, you will need to download the release corresponding to the platform you are using. Visit the GitHub releases page and find the image that corresponds to your platform:. Releases for the LEGO MINDSTORMS EV3 start with ev3- ; Releases for the Raspberry Pi 1 start with rpi-; Releases for the Raspberry Pi 2 and 3 start with rpi2-; Releases for the BeagleBone start with evb-NETWORKING - EV3DEV
Once you have plugged in a dongle, you can use Brickman’s “ Wireless and Networks > Wi-Fi ” menu to connect to a network. Make sure you check the “ Powered ” box so that it starts searching for Wi-Fi networks, and then choose the one you want from the list that appears. If you have a long Wi-Fi password, we highly recommend usinga
CONNECTING TO EV3DEV USING SSH In a terminal, run the following command to use it to connect to your EV3 or other ev3dev device. ssh robot@ev3dev.local. If you have never connected before, you will be prompted to confirm the authenticity of the host, so type yes when prompted. The authenticity of host 'ev3dev.local (192.168.2.3)' can't be CONNECTING TO THE INTERNET VIA USB Now, we need to assign an IP address to our EV3. In brickman, go to Wireless and Networks and select All Network Connections, then select the Wired connection with the USB icon. Then select Connect. The Status should change to Connecting and then Online to indicate thatyou are
SETTING UP WI-FI USING THE COMMAND LINE Setting Up Wi-Fi Using the Command Line. You must have another way to connect to your robot first before following this tutorial. On the EV3, that means USB or Bluetooth. If you have a Raspberry Pi, you can plug in a monitor and keyboard to the Raspberry Pi. SENDING AND RECEIVING MESSAGES WITH MQTTSEE MORE ON EV3DEV.ORG WRITING AN SD CARD IMAGE USING UBUNTU DISK IMAGE WRITER There’s an easier way to image your SD card! Check out the “Getting Started” guide for a cross-platform guide. Open up the folder where you downloaded the ev3dev image file. Right-click and select Extract Here to uncompress the file. This will extract a single file with the same name minus the .xz (or .zip).Right-click this new file and select Open With > Disk Image Writer. EV3DEV HOMESTART HEREDOWNLOADSSUPPORTNEWSCOMMUNITYTUTORIALS ev3dev is your EV3. re-imagined. ev3dev is a Debian Linux -based operating system that runs on several LEGO ® MINDSTORMS compatible platforms including the LEGO ® MINDSTORMS EV3 and Raspberry Pi -powered BrickPi . Just like you can take apart your LEGO ® models and build something completely different, we have reverse-engineeredthe EV3 and
PROJECTS - EV3DEV
Balancing Robot. This is still a work in progress. It is a Segway-style balancing robot based on the HTWay. You can control it with the EV3 IR Remote/Sensor. Interesting features: Uses udev to enumerate sensors and motors. Sensors and motors can be plugged into any port without any configuration changes. Can use either the EV3Gyro sensor or
TUTORIALS - EV3DEV
Tutorials on a wide range of ev3dev functionality, including networking, motor control, and usage of extra hardware. GETTING STARTED WITH EV3DEV To get started, you will need to download the release corresponding to the platform you are using. Visit the GitHub releases page and find the image that corresponds to your platform:. Releases for the LEGO MINDSTORMS EV3 start with ev3- ; Releases for the Raspberry Pi 1 start with rpi-; Releases for the Raspberry Pi 2 and 3 start with rpi2-; Releases for the BeagleBone start with evb-NETWORKING - EV3DEV
Once you have plugged in a dongle, you can use Brickman’s “ Wireless and Networks > Wi-Fi ” menu to connect to a network. Make sure you check the “ Powered ” box so that it starts searching for Wi-Fi networks, and then choose the one you want from the list that appears. If you have a long Wi-Fi password, we highly recommend usinga
CONNECTING TO EV3DEV USING SSH In a terminal, run the following command to use it to connect to your EV3 or other ev3dev device. ssh robot@ev3dev.local. If you have never connected before, you will be prompted to confirm the authenticity of the host, so type yes when prompted. The authenticity of host 'ev3dev.local (192.168.2.3)' can't be CONNECTING TO THE INTERNET VIA USB Now, we need to assign an IP address to our EV3. In brickman, go to Wireless and Networks and select All Network Connections, then select the Wired connection with the USB icon. Then select Connect. The Status should change to Connecting and then Online to indicate thatyou are
SETTING UP WI-FI USING THE COMMAND LINE Setting Up Wi-Fi Using the Command Line. You must have another way to connect to your robot first before following this tutorial. On the EV3, that means USB or Bluetooth. If you have a Raspberry Pi, you can plug in a monitor and keyboard to the Raspberry Pi. SENDING AND RECEIVING MESSAGES WITH MQTTSEE MORE ON EV3DEV.ORG WRITING AN SD CARD IMAGE USING UBUNTU DISK IMAGE WRITER There’s an easier way to image your SD card! Check out the “Getting Started” guide for a cross-platform guide. Open up the folder where you downloaded the ev3dev image file. Right-click and select Extract Here to uncompress the file. This will extract a single file with the same name minus the .xz (or .zip).Right-click this new file and select Open With > Disk Image Writer.PROJECTS - EV3DEV
Balancing Robot. This is still a work in progress. It is a Segway-style balancing robot based on the HTWay. You can control it with the EV3 IR Remote/Sensor. Interesting features: Uses udev to enumerate sensors and motors. Sensors and motors can be plugged into any port without any configuration changes. Can use either the EV3Gyro sensor or
DOWNLOADS - EV3DEV
Downloads Bootable SD card image files. Downloads. Select the download below that corresponds to your hardware. Then head to the Getting Started page for installation instructions. GETTING STARTED WITH EV3DEV To get started, you will need to download the release corresponding to the platform you are using. Visit the GitHub releases page and find the image that corresponds to your platform:. Releases for the LEGO MINDSTORMS EV3 start with ev3- ; Releases for the Raspberry Pi 1 start with rpi-; Releases for the Raspberry Pi 2 and 3 start with rpi2-; Releases for the BeagleBone start with evb- WELCOME TO EV3DEV’S DOCUMENTATION! ev3dev-buster is the current development version. It is currently in alpha, meaning that it may or may not actually be usable. Use this version if you like the cutting edge and making good bug reports. ev3dev-stretch is the current stable version. It only receives important bug fixes and security updates. GETTING STARTED WITH C Create a file called Makefile and open it: nano Makefile. Copy the following contents into the file: all: main.o gcc main.o -o bin main.o: main.c gcc -I . -c main.c clean: rm -rf *.o rm bin. When you paste the contents into nano, the indentation will likely disappear. Move your cursor using the arrow keys to the beginning of the linesthat are
CONTROLLING A WEDO 2.0 MOTOR Final notes. This is just an introduction to the WeDo 2.0 BLE protocol. LEGO has released a “Communication Software Development Kit” with some information about the several BLE services (not just the motor but also sensors, RGB Light, piezzo buzzer, battery).. If rumours are true, the next generation of LEGO Power Functions and Mindstorms will both share some components with thePS4EXPLOR3R
Pair your gamepad with EV3 by pressing and holding the PS button and the sharing button simultaneously. Select “Wireless and Networks > Bluetooth > Start scan”, then choose “Wireless Controller”. Copy ps4explor3r.py on to EV3 Brick. Write in command line chmod +x ps4explor3r.py. Choose file from brickman menu or run from commandline
USING DOCKER TO CROSS-COMPILE Using GDB. Docker is a light-weight virtual machine with excellent cross-platform support. This allows us to run something very close to the ev3dev OS on any desktop or notebook computer. This means that we get the same versions of all of the libraries running on the SETTING UP AN NFS FILE SHARE The -network and -mask options limit access to the shared directory to those on the 192.168 subnet. The -ro option limits access to read-only, while the -alldirs option provides access to all subdirectories of the specified path.. For this example, I’m going to share the Public folder under my userid (of course your userid will be different) and the subnet will be 192.168.2.0 for the case of WRITING AN SD CARD IMAGE USING LINUX COMMAND LINE TOOLS Writing an SD Card Image Using Linux Command Line Tools. There’s an easier way to image your SD card! Check out the “Getting Started” guide for a cross-platform guide. Make sure that you SD card is unplugged. Then run df. You should see something like this: user@host ~/ $ df -h Filesystem Size Used Avail Use% Mounted on /dev/sda1 119G79G
EV3DEV HOMESTART HEREDOWNLOADSSUPPORTNEWSCOMMUNITYTUTORIALS ev3dev is your EV3. re-imagined. ev3dev is a Debian Linux -based operating system that runs on several LEGO ® MINDSTORMS compatible platforms including the LEGO ® MINDSTORMS EV3 and Raspberry Pi -powered BrickPi . Just like you can take apart your LEGO ® models and build something completely different, we have reverse-engineeredthe EV3 and
TUTORIALS - EV3DEV
Tutorials on a wide range of ev3dev functionality, including networking, motor control, and usage of extra hardware.SUPPORT - EV3DEV
If the issue is with detection of a sensor or motor: unplug and plug in the device and include the output of dmsg | tail. If the issue is with an USB device like a WiFi dongle: include the output of lsusb. If the issue is with the Brick Manager (brickman): include the output of systemctl status brickman.service -l. CONNECTING TO EV3DEV USING SSH In a terminal, run the following command to use it to connect to your EV3 or other ev3dev device. ssh robot@ev3dev.local. If you have never connected before, you will be prompted to confirm the authenticity of the host, so type yes when prompted. The authenticity of host 'ev3dev.local (192.168.2.3)' can't bePS4EXPLOR3R
Pair your gamepad with EV3 by pressing and holding the PS button and the sharing button simultaneously. Select “Wireless and Networks > Bluetooth > Start scan”, then choose “Wireless Controller”. Copy ps4explor3r.py on to EV3 Brick. Write in command line chmod +x ps4explor3r.py. Choose file from brickman menu or run from commandline
SETTING UP WI-FI USING THE COMMAND LINE Setting Up Wi-Fi Using the Command Line. You must have another way to connect to your robot first before following this tutorial. On the EV3, that means USB or Bluetooth. If you have a Raspberry Pi, you can plug in a monitor and keyboard to the Raspberry Pi.PLATFORM COMPARISON
The version number is not actually printed on the BrickPi circuit board. ↩ The Grove sensor ports are not usable with EVB or QuestCape because of shared pins.↩ SENDING AND RECEIVING MESSAGES WITH MQTTSEE MORE ON EV3DEV.ORG SETTING UP AN NFS FILE SHARE The -network and -mask options limit access to the shared directory to those on the 192.168 subnet. The -ro option limits access to read-only, while the -alldirs option provides access to all subdirectories of the specified path.. For this example, I’m going to share the Public folder under my userid (of course your userid will be different) and the subnet will be 192.168.2.0 for the case of MINDSENSORS PISTORMS A major difference compared to LEGO MINDSTORMS EV3 is that the PiStorms cannot automatically detect sensors. You must manually configure each input port to tell it what kind of sensor is attached. Many LEGO MINDSTORMS sensors will work with PiStorms. There are some caveats though. Support for EV3/UART and EV3/Analog sensors is hardcoded.
EV3DEV HOMESTART HEREDOWNLOADSSUPPORTNEWSCOMMUNITYTUTORIALS ev3dev is a Debian Linux-based operating system that runs on several LEGO ® MINDSTORMS compatible platforms including the LEGO ® MINDSTORMS EV3 and Raspberry Pi-powered BrickPi.. Just like you can take apart your LEGO ® models and build something completely different, we have reverse-engineered the EV3 and created a new software platform for programming your robots.TUTORIALS - EV3DEV
Tutorials on a wide range of ev3dev functionality, including networking, motor control, and usage of extra hardware.SUPPORT - EV3DEV
If the issue is with detection of a sensor or motor: unplug and plug in the device and include the output of dmsg | tail. If the issue is with an USB device like a WiFi dongle: include the output of lsusb. If the issue is with the Brick Manager (brickman): include the output of systemctl status brickman.service -l. SENDING AND RECEIVING MESSAGES WITH MQTTSEE MORE ON EV3DEV.ORG CONNECTING TO EV3DEV USING SSH In a terminal, run the following command to use it to connect to your EV3 or other ev3dev device. ssh robot@ev3dev.local. If you have never connected before, you will be prompted to confirm the authenticity of the host, so type yes when prompted. The authenticity of host 'ev3dev.local (192.168.2.3)' can't bePS4EXPLOR3R
Pair your gamepad with EV3 by pressing and holding the PS button and the sharing button simultaneously. Select “Wireless and Networks > Bluetooth > Start scan”, then choose “Wireless Controller”. Copy ps4explor3r.py on to EV3 Brick. Write in command line chmod +x ps4explor3r.py. Choose file from brickman menu or run from commandline
SETTING UP WI-FI USING THE COMMAND LINE Setting Up Wi-Fi Using the Command Line. You must have another way to connect to your robot first before following this tutorial. On the EV3, that means USB or Bluetooth. If you have a Raspberry Pi, you can plug in a monitor and keyboard to the Raspberry Pi.PLATFORM COMPARISON
The version number is not actually printed on the BrickPi circuit board. ↩ The Grove sensor ports are not usable with EVB or QuestCape because of shared pins.↩ SETTING UP AN NFS FILE SHARE The -network and -mask options limit access to the shared directory to those on the 192.168 subnet. The -ro option limits access to read-only, while the -alldirs option provides access to all subdirectories of the specified path.. For this example, I’m going to share the Public folder under my userid (of course your userid will be different) and the subnet will be 192.168.2.0 for the case of MINDSENSORS PISTORMS A major difference compared to LEGO MINDSTORMS EV3 is that the PiStorms cannot automatically detect sensors. You must manually configure each input port to tell it what kind of sensor is attached. Many LEGO MINDSTORMS sensors will work with PiStorms. There are some caveats though. Support for EV3/UART and EV3/Analog sensors is hardcoded.
PROJECTS - EV3DEV
Balancing Robot. This is still a work in progress. It is a Segway-style balancing robot based on the HTWay. You can control it with the EV3 IR Remote/Sensor. Interesting features: Uses udev to enumerate sensors and motors. Sensors and motors can be plugged into any port without any configuration changes. Can use either the EV3Gyro sensor or
GETTING STARTED WITH EV3DEV To get started, you will need to download the release corresponding to the platform you are using. Visit the GitHub releases page and find the image that corresponds to your platform:. Releases for the LEGO MINDSTORMS EV3 start with ev3- ; Releases for the Raspberry Pi 1 start with rpi-; Releases for the Raspberry Pi 2 and 3 start with rpi2-; Releases for the BeagleBone start with evb-NETWORKING - EV3DEV
Once you have plugged in a dongle, you can use Brickman’s “ Wireless and Networks > Wi-Fi ” menu to connect to a network. Make sure you check the “ Powered ” box so that it starts searching for Wi-Fi networks, and then choose the one you want from the list that appears. If you have a long Wi-Fi password, we highly recommend usinga
USING THE EV3 SPEAKER The EV3 uses pulse-width modulation (PWM) to drive an amplifier that produces the sounds that you hear through the speaker. It has two modes of operation. The first, we call Tone mode (aka Beep mode). In Tone mode, the PWM is set to a frequency in the audible range. The sound you hear is a square wave. The second mode is called PCMPlayback mode.
WELCOME TO EV3DEV’S DOCUMENTATION! ev3dev-buster is the current development version. It is currently in alpha, meaning that it may or may not actually be usable. Use this version if you like the cutting edge and making good bug reports. ev3dev-stretch is the current stable version. It only receives important bug fixes and security updates.PLATFORM COMPARISON
The version number is not actually printed on the BrickPi circuit board. ↩ The Grove sensor ports are not usable with EVB or QuestCape because of shared pins.↩ SETTING UP AN NFS FILE SHARE The -network and -mask options limit access to the shared directory to those on the 192.168 subnet. The -ro option limits access to read-only, while the -alldirs option provides access to all subdirectories of the specified path.. For this example, I’m going to share the Public folder under my userid (of course your userid will be different) and the subnet will be 192.168.2.0 for the case of GETTING STARTED WITH C Create a file called Makefile and open it: nano Makefile. Copy the following contents into the file: all: main.o gcc main.o -o bin main.o: main.c gcc -I . -c main.c clean: rm -rf *.o rm bin. When you paste the contents into nano, the indentation will likely disappear. Move your cursor using the arrow keys to the beginning of the linesthat are
EV3DEV LINUX KERNEL
The bleeding edge upstream development for linux-davinci is hosted at kernel.org. The ev3dev kernel was originally based on Davinci PSP 03.22.00.02 from TI.. Kernel Drivers. Most, if not all, of the customization of the ev3dev kernel is the addition and patching of hardware drivers for the EV3 specific hardware. GETTING STARTED WITH LEGO MINDSTORMS EV3 Download and install Etcher. Download the latest ev3dev image for LEGO MINDSTORMS EV3 from the ev3dev downloads page. Note. Follow the link on that page for ev3dev-stretch snapshot images. Run Etcher and flash the image to the microSD card. Click here if you need detailed instructions on using Etcher. Put the microSD card in the EV3 and turnit on.
* Start Here
* Downloads
* Documentation
* Tutorials
* Programming Languages* Networking
* Hardware Drivers __*
* Wiki __
* More...
* Support
* News
* Community
* Contribute
* Share
* Project showcase
We were unable to retrieve search data from the server. Make sure that JavaScript is enabled and that nothing is blocking networkaccess.
IN DOCS
No results
IN PROJECTS
No results
IN NEWS
No results
IN OTHER PAGES
No results
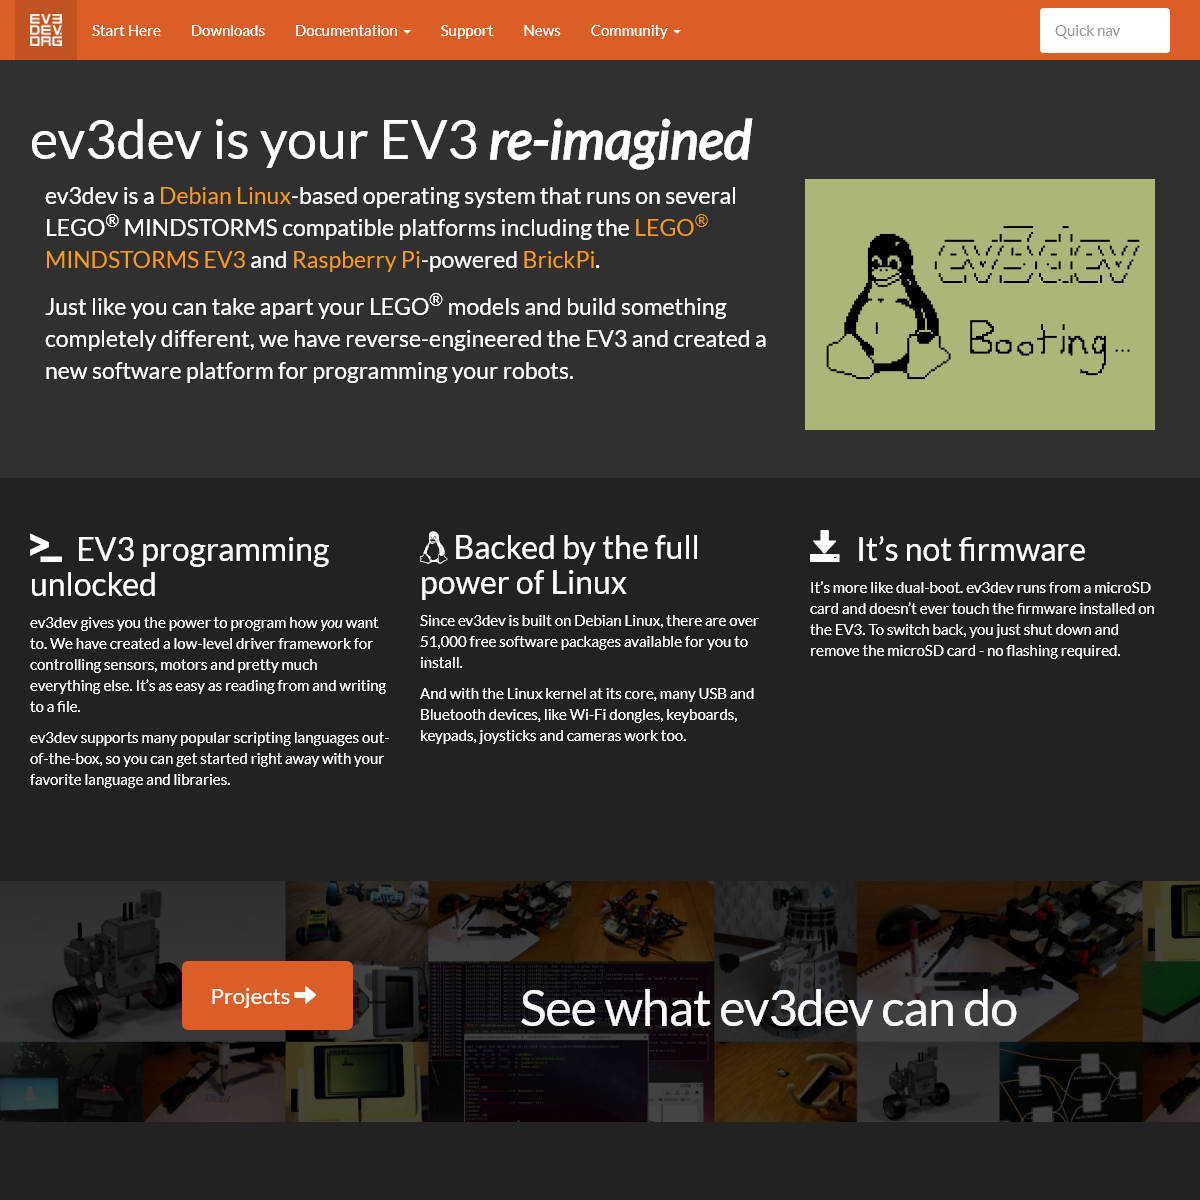
EV3DEV IS YOUR EV3 _RE-IMAGINED_ ev3dev is a Debian Linux -based operating system that runs on several LEGO® MINDSTORMS compatible platforms including the LEGO® MINDSTORMS EV3 and Raspberry Pi -powered BrickPi.
Just like you can take apart your LEGO® models and build something completely different, we have reverse-engineered the EV3 and created a new software platform for programming your robots. EV3 PROGRAMMING UNLOCKED ev3dev gives you the power to program how _you_ want to. We have created a low-level driver framework for controlling sensors, motors and pretty much everything else. It’s as easy as reading from andwriting to a file.
ev3dev supports many popular scripting languages out-of-the-box, so you can get started right away with your favorite language andlibraries.
__ BACKED BY THE FULL POWER OF LINUX Since ev3dev is built on Debian Linux, there are over 51,000 free software packages available for you to install. And with the Linux kernel at its core, many USB and Bluetooth devices, like Wi-Fi dongles, keyboards, keypads, joysticks and cameras worktoo.
IT’S NOT FIRMWARE
It’s more like dual-boot. ev3dev runs from a microSD card and doesn’t ever touch the firmware installed on the EV3. To switch back, you just shut down and remove the microSD card - no flashingrequired.
Projects
SEE WHAT EV3DEV CAN DO READY TO JUMP IN? GRAB YOUR BOT AND LET'S GO!Get started
LEGO® is a trademark of the LEGO Group of companies which does not sponsor, authorize or endorse this siteDetails
4