5
More Annotations


6


4
Favourite Annotations


5


1
Text
LATE VICTORIAN ENGLISH MANOR DOLLHOUSE: 1/12 MINIATURE When the plans were finalized I cut the openings into the MDF and covered the walls in 2 layers of Illustration board. The reason I used 2 layers is because I needed the first one to give me the depth I needed for the niches I was going to use, and the second layer I cut out openings for the plaster plaques that went over the frieze. LATE VICTORIAN ENGLISH MANOR DOLLHOUSE: 1/12 MINIATURE The chandelier is from the Getzans.Next I got to work on the floor. The old floor was not to my liking. the larger squares had a thicker glue underneath so after they were ironed into place they stood out from the border strips. also, you can see at the bottom of the picture that one square was put in with the grain in the wrong directiona nd it stood out like a sore thumb. LATE VICTORIAN ENGLISH MANOR DOLLHOUSE: 1/12 MINIATURE Since Dewell Manor's kitchen is 24 inches by 20 inches, I decided to take one area and build a proper scullery. The first Item I put together was the Dish rack. LATE VICTORIAN ENGLISH MANOR DOLLHOUSE: 1/12 MINIATURE The first step was to cut each step in 5/8 " MDF. Mine are 3 1/8 inches wide by 1 1/2" deep. I also cut the platform where the staircase changes direction. LATE VICTORIAN ENGLISH MANOR DOLLHOUSE: 1/12 MINIATURE The biggest challenge was the door. It took me a while to commit to a design. I decided on a classic pannel on the bottom half and linen fold detail for the top. LATE VICTORIAN ENGLISH MANOR DOLLHOUSE: 1/12 MINIATURE As with the firplace mantels, I strated by painting the illustration board a base color, let it dry 30 minutes, then took a wet sea sponge, squeezed out most of the water, dipped it lightly in the second paint color, then sponged it on making sure I turned the sponge to keep the pattern random. LATE VICTORIAN ENGLISH MANOR DOLLHOUSE: 1/12 MINIATURE The Gothic Hall is the room between the Nursery and the Bathroom with the attic staircase landing. I had a hard time deciding what this room
would be .
LATE VICTORIAN ENGLISH MANOR DOLLHOUSE: 1/12 MINIATURE The parquet section of the Great Room floor came right up. It was an easy fix, I just re-glued everything with The ultimate Glue and stacked books on top overnight, but I can officially say I've gone from not liking spray adhesive to hating, loathing, and abominatingthe stuff.
LATE VICTORIAN ENGLISH MANOR DOLLHOUSE: 1/12 MINIATURE The shelf unit is glued to the wall, and the front of the unit with the doors just comes right off. You can see in the picture above I glued a piece to go over the top of the unit, drilled holes that went through both, and glued a piece of dowell to the top unit. LATE VICTORIAN ENGLISH MANOR DOLLHOUSE: 1/12 MINIATURE The only room I had a problem with was the Girl's Bedroom. It is the only paper that ran when a bit too much paste got on the good side. In the end I can camouflage the imperfections or hide them with furniture and molding, I onle had to re-do one wall. LATE VICTORIAN ENGLISH MANOR DOLLHOUSE: 1/12 MINIATURE When the plans were finalized I cut the openings into the MDF and covered the walls in 2 layers of Illustration board. The reason I used 2 layers is because I needed the first one to give me the depth I needed for the niches I was going to use, and the second layer I cut out openings for the plaster plaques that went over the frieze. LATE VICTORIAN ENGLISH MANOR DOLLHOUSE: 1/12 MINIATURE The chandelier is from the Getzans.Next I got to work on the floor. The old floor was not to my liking. the larger squares had a thicker glue underneath so after they were ironed into place they stood out from the border strips. also, you can see at the bottom of the picture that one square was put in with the grain in the wrong directiona nd it stood out like a sore thumb. LATE VICTORIAN ENGLISH MANOR DOLLHOUSE: 1/12 MINIATURE Since Dewell Manor's kitchen is 24 inches by 20 inches, I decided to take one area and build a proper scullery. The first Item I put together was the Dish rack. LATE VICTORIAN ENGLISH MANOR DOLLHOUSE: 1/12 MINIATURE The first step was to cut each step in 5/8 " MDF. Mine are 3 1/8 inches wide by 1 1/2" deep. I also cut the platform where the staircase changes direction. LATE VICTORIAN ENGLISH MANOR DOLLHOUSE: 1/12 MINIATURE The biggest challenge was the door. It took me a while to commit to a design. I decided on a classic pannel on the bottom half and linen fold detail for the top. LATE VICTORIAN ENGLISH MANOR DOLLHOUSE: 1/12 MINIATURE As with the firplace mantels, I strated by painting the illustration board a base color, let it dry 30 minutes, then took a wet sea sponge, squeezed out most of the water, dipped it lightly in the second paint color, then sponged it on making sure I turned the sponge to keep the pattern random. LATE VICTORIAN ENGLISH MANOR DOLLHOUSE: 1/12 MINIATURE The Gothic Hall is the room between the Nursery and the Bathroom with the attic staircase landing. I had a hard time deciding what this roomwould be .
LATE VICTORIAN ENGLISH MANOR DOLLHOUSE: 1/12 MINIATURE The parquet section of the Great Room floor came right up. It was an easy fix, I just re-glued everything with The ultimate Glue and stacked books on top overnight, but I can officially say I've gone from not liking spray adhesive to hating, loathing, and abominatingthe stuff.
LATE VICTORIAN ENGLISH MANOR DOLLHOUSE: 1/12 MINIATURE The shelf unit is glued to the wall, and the front of the unit with the doors just comes right off. You can see in the picture above I glued a piece to go over the top of the unit, drilled holes that went through both, and glued a piece of dowell to the top unit. LATE VICTORIAN ENGLISH MANOR DOLLHOUSE: 1/12 MINIATURE The only room I had a problem with was the Girl's Bedroom. It is the only paper that ran when a bit too much paste got on the good side. In the end I can camouflage the imperfections or hide them with furniture and molding, I onle had to re-do one wall. LATE VICTORIAN ENGLISH MANOR DOLLHOUSE: 1/12 MINIATURE I decided to make the walls and floor look like stone. After the structural elements were glued in I covered it all in 3 coats of gesso, then sponged on 2 paint colors, scribed the lines to create the stone, then washed everything with a 1 to 10 mix of water and burnt umber paint which I wiped off after about 3 minutes with paper towels. I then sealed everything with a mat spray and let it dry. LATE VICTORIAN ENGLISH MANOR DOLLHOUSE: 1/12 MINIATURE The chandelier is from the Getzans.Next I got to work on the floor. The old floor was not to my liking. the larger squares had a thicker glue underneath so after they were ironed into place they stood out from the border strips. also, you can see at the bottom of the picture that one square was put in with the grain in the wrong directiona nd it stood out like a sore thumb. LATE VICTORIAN ENGLISH MANOR DOLLHOUSE: 1/12 MINIATURE The biggest challenge was the door. It took me a while to commit to a design. I decided on a classic pannel on the bottom half and linen fold detail for the top. LATE VICTORIAN ENGLISH MANOR DOLLHOUSE: 1/12 MINIATURE In the above picture you see the Queen Elizabeth bed on the right, and on the left you can see the gold fabric I fell in love with, the brown silk I had and decided to use as a lining fabric, the gold trim rope and a sample of the wallpaper in the room. LATE VICTORIAN ENGLISH MANOR DOLLHOUSE: 1/12 MINIATURE To finish the fireplace I made a simple firebox with illustration board and some leftover plastic brick sheet I had. I love yellow and black as a colour combination so I painted the mantel to look like giallo sienna marble and used jewelry bits and leftover materials to make the black insert. LATE VICTORIAN ENGLISH MANOR DOLLHOUSE: 1/12 MINIATURE In the above picture you see the paper pattern on the bottom left, the back cotton fabric on the bottom right with the stitches marked in pen, the piece of foam I used for the stuffing of the quilt on the top left, and at the top right is a piece of raw silk I used for the topof the quilt.
LATE VICTORIAN ENGLISH MANOR DOLLHOUSE: 1/12 MINIATURE Jo has a list of the Getzan chandeliers I want for each room. I got the 2 Versailles chandeliers for the Music room and the Princess Pat (on the left) for the Dining Room. The breakfront also goes int heMusic room.
LATE VICTORIAN ENGLISH MANOR DOLLHOUSE: 1/12 MINIATURE Hello my dear friends, I hope you are all doing well and enjoying a lovely month of June. I must be honest, after your incredible feedback on the last post about the Breakfast Room it is a little intimidating to write a post with very little to say, but I promised I would give you an update in 2 or 3 weeks so here it is. LATE VICTORIAN ENGLISH MANOR DOLLHOUSE: 1/12 MINIATURE The shelf unit is glued to the wall, and the front of the unit with the doors just comes right off. You can see in the picture above I glued a piece to go over the top of the unit, drilled holes that went through both, and glued a piece of dowell to the top unit. LATE VICTORIAN ENGLISH MANOR DOLLHOUSE: 1/12 MINIATURE The next step was faux walnut finishing the first half of the staircase. Again, I used oil paints mixed with liquin. A week later, just to make sure the oil paint was completely dry, I added basewood strips I had allready faux finished using Crafter's Pick "TheUltimate" glue.
LATE VICTORIAN ENGLISH MANOR DOLLHOUSE: 1/12 MINIATURE The Banquet Hall. I hope you are all doing well. I am still waiting on some candelabra for the table, but since it has been a while since my last post, I thought it was time to present the banquet hall to you. The room measures 24 inches wide, 39 inches deep and 18 1/2 inches high. The design was inspired by my favourite architect, Robert Adam. LATE VICTORIAN ENGLISH MANOR DOLLHOUSE: 1/12 MINIATURE 1- I covered the walls in single ply illustration board. 2- I painted that green. 3- I applied the wallpaper from Alison Davies with regular wallpaper paste. 4- I added a single ply illustration board paneling strip, pre-painted. 5- I added chair rail, baseboards and squares in the panels, all pre painted. Here is what the finished walls looked LATE VICTORIAN ENGLISH MANOR DOLLHOUSE: 1/12 MINIATURE When the dowels were through the supports, I spaced them using a 1 1/4 inch piece of wood and glued them into place. Next, I put together the top and side of the dish rack box and glued in the dowel pieces when it was dry. I glued on the second side piece. For the back piece, I glued pieces of 1/8 inch x 1/16 inch lumber at the same level as LATE VICTORIAN ENGLISH MANOR DOLLHOUSE: 1/12 MINIATURE The last few weeks have been spent finishing the Earl's Bedroom. This was not a renovation job, but more of a finishing job. This is the way the room looked before: The last time I posted about the room I had built the columns and griffins that frame the bed alcove. The furniture is the Wexburgh collection from Bespaq. LATE VICTORIAN ENGLISH MANOR DOLLHOUSE: 1/12 MINIATURE The first step was to cut each step in 5/8 " MDF. Mine are 3 1/8 inches wide by 1 1/2" deep. I also cut the platform where the staircase changes direction. Once these were cut and sanded, I started gluing them together using wood glue and a drop of gel superglue. The LATE VICTORIAN ENGLISH MANOR DOLLHOUSE: 1/12 MINIATURE The location of the Cliff is somewhere in Cornwall England, inspired by Manderlay, the estate from the 1940 film Rebecca. Basically, the cliff is at the end of a vast estate with a beech at the bottom of the cliff and is surrounded by woods, orchards, LATE VICTORIAN ENGLISH MANOR DOLLHOUSE: 1/12 MINIATURE To finish the fireplace I made a simple firebox with illustration board and some leftover plastic brick sheet I had. I love yellow and black as a colour combination so I painted the mantel to look like giallo sienna marble and used jewelry bits and leftover materials to make the black insert. LATE VICTORIAN ENGLISH MANOR DOLLHOUSE: 1/12 MINIATURE When the doors were done I glued them to a piece of lumber that would sit on the top of the bookcase. In the picture above you see me addinglumber to
LATE VICTORIAN ENGLISH MANOR DOLLHOUSE: 1/12 MINIATURE The Gothic Hall is the room between the Nursery and the Bathroom with the attic staircase landing. I had a hard time deciding what this roomwould be .
LATE VICTORIAN ENGLISH MANOR DOLLHOUSE: 1/12 MINIATURE In the above picture you see the paper pattern on the bottom left, the back cotton fabric on the bottom right with the stitches marked in pen, the piece of foam I used for the stuffing of the quilt on the top left, and at the top right is a piece of raw silk I used for the topof the quilt.
LATE VICTORIAN ENGLISH MANOR DOLLHOUSE: 1/12 MINIATURE Hello my dearest friends, I hope you are all doing well during these crazy times. I have been away far too long but 2020 has not been akind year.
LATE VICTORIAN ENGLISH MANOR DOLLHOUSE: 1/12 MINIATURE The location of the Cliff is somewhere in Cornwall England, inspired by Manderlay, the estate from the 1940 film Rebecca. Basically, the cliff is at the end of a vast estate with a beech at the bottom of the cliff and is surrounded by woods, orchards, LATE VICTORIAN ENGLISH MANOR DOLLHOUSE: 1/12 MINIATURE The chandelier is from the Getzans.Next I got to work on the floor. The old floor was not to my liking. the larger squares had a thicker glue underneath so after they were ironed into place they stood out from the border strips. also, you can see at the bottom of the picture that one square was put in with the grain in the wrong directiona nd it stood out like a sore thumb. LATE VICTORIAN ENGLISH MANOR DOLLHOUSE: 1/12 MINIATURE The next step was gluing on the shafts of the pilasters, fireplace and overmantel mirror. All the plaster pieces in the room are from Sue Cook miniatures. I have purchased many of her items, but these are my favorite to date. The pilasters are 9 inches tall and I needed to figure out a base for them. LATE VICTORIAN ENGLISH MANOR DOLLHOUSE: 1/12 MINIATURE The kitchen measures 24" x 20". As I made progress on the manor, I realized the space was big enough to incorporate a scullery and a butler's pantry. The butler's pantry is the first thing you see when you walk from the dining room to the kitchen. The first floor of the manor is 14" high so I decided to go as high as I could. LATE VICTORIAN ENGLISH MANOR DOLLHOUSE: 1/12 MINIATURE The manor will be brick and stone. I am using the Magic Brick system. I painted the balcony wall the colour I want the grout, then I applied the tape that came with the Brick kit. I added water to the powder until it was icing consistency, then applied it over the surface,waited 5
LATE VICTORIAN ENGLISH MANOR DOLLHOUSE: 1/12 MINIATURE The first one is a wood sink victorians used to wash china (porcelain sinks would chip the dishes) and the second is a copper sink used for messy preperation (cleaning fish and washing pots and pans). Both sinks are simple wood boxes on wood supports. I used embossing metal sheets for the copper sink. This is a fairly soft sheet of copper. LATE VICTORIAN ENGLISH MANOR DOLLHOUSE: 1/12 MINIATURE The fireplace is an inexpensive resin one I faux painted using a technique by Whitledge-Burgess. I wanted the walls to be panneled, but chose a simpler design then LATE VICTORIAN ENGLISH MANOR DOLLHOUSE: 1/12 MINIATURE Working in the attic was an interesting challenge. Contrary to the 2 main floors, the structure went up before I had envisionned the rooms. Originaly the attic was going to be storage space and the morning room was going to house the electrical elements. LATE VICTORIAN ENGLISH MANOR DOLLHOUSE: 1/12 MINIATURE The details above show you the steps for making curtain details: illustration board cut out, covered front, the back where you can see where the edges were glued, next you see the trim detail I used glued on the back, and the finished piece. I used Carpenters Pick Ultimate glue and gel super glue to made the draped. LATE VICTORIAN ENGLISH MANOR DOLLHOUSE: 1/12 MINIATUREENGLISH COTTAGE DOLLHOUSE KITENGLISH DOLLHOUSE KITSENGLISH VICTORIAN DOLLHOUSEENGLISHSTYLE DOLLHOUSES
The Banquet Hall. I hope you are all doing well. I am still waiting on some candelabra for the table, but since it has been a while since my last post, I thought it was time to present the banquet hall to you. The room measures 24 inches wide, 39 inches deep and 18 1/2 inches high. The design was inspired by my favourite architect, Robert Adam. LATE VICTORIAN ENGLISH MANOR DOLLHOUSE: 1/12 MINIATURE 1- I covered the walls in single ply illustration board. 2- I painted that green. 3- I applied the wallpaper from Alison Davies with regular wallpaper paste. 4- I added a single ply illustration board paneling strip, pre-painted. 5- I added chair rail, baseboards and squares in the panels, all pre painted. Here is what the finished walls looked LATE VICTORIAN ENGLISH MANOR DOLLHOUSE: 1/12 MINIATURE When the dowels were through the supports, I spaced them using a 1 1/4 inch piece of wood and glued them into place. Next, I put together the top and side of the dish rack box and glued in the dowel pieces when it was dry. I glued on the second side piece. For the back piece, I glued pieces of 1/8 inch x 1/16 inch lumber at the same level as LATE VICTORIAN ENGLISH MANOR DOLLHOUSE: 1/12 MINIATURE The last few weeks have been spent finishing the Earl's Bedroom. This was not a renovation job, but more of a finishing job. This is the way the room looked before: The last time I posted about the room I had built the columns and griffins that frame the bed alcove. The furniture is the Wexburgh collection from Bespaq. LATE VICTORIAN ENGLISH MANOR DOLLHOUSE: 1/12 MINIATURE The first step was to cut each step in 5/8 " MDF. Mine are 3 1/8 inches wide by 1 1/2" deep. I also cut the platform where the staircase changes direction. Once these were cut and sanded, I started gluing them together using wood glue and a drop of gel superglue. The LATE VICTORIAN ENGLISH MANOR DOLLHOUSE: 1/12 MINIATURE The location of the Cliff is somewhere in Cornwall England, inspired by Manderlay, the estate from the 1940 film Rebecca. Basically, the cliff is at the end of a vast estate with a beech at the bottom of the cliff and is surrounded by woods, orchards, LATE VICTORIAN ENGLISH MANOR DOLLHOUSE: 1/12 MINIATURE To finish the fireplace I made a simple firebox with illustration board and some leftover plastic brick sheet I had. I love yellow and black as a colour combination so I painted the mantel to look like giallo sienna marble and used jewelry bits and leftover materials to make the black insert. LATE VICTORIAN ENGLISH MANOR DOLLHOUSE: 1/12 MINIATURE When the doors were done I glued them to a piece of lumber that would sit on the top of the bookcase. In the picture above you see me addinglumber to
LATE VICTORIAN ENGLISH MANOR DOLLHOUSE: 1/12 MINIATURE The Gothic Hall is the room between the Nursery and the Bathroom with the attic staircase landing. I had a hard time deciding what this roomwould be .
LATE VICTORIAN ENGLISH MANOR DOLLHOUSE: 1/12 MINIATURE In the above picture you see the paper pattern on the bottom left, the back cotton fabric on the bottom right with the stitches marked in pen, the piece of foam I used for the stuffing of the quilt on the top left, and at the top right is a piece of raw silk I used for the topof the quilt.
LATE VICTORIAN ENGLISH MANOR DOLLHOUSE: 1/12 MINIATUREENGLISH COTTAGE DOLLHOUSE KITENGLISH DOLLHOUSE KITSENGLISH VICTORIAN DOLLHOUSEENGLISHSTYLE DOLLHOUSES
The Banquet Hall. I hope you are all doing well. I am still waiting on some candelabra for the table, but since it has been a while since my last post, I thought it was time to present the banquet hall to you. The room measures 24 inches wide, 39 inches deep and 18 1/2 inches high. The design was inspired by my favourite architect, Robert Adam. LATE VICTORIAN ENGLISH MANOR DOLLHOUSE: 1/12 MINIATURE 1- I covered the walls in single ply illustration board. 2- I painted that green. 3- I applied the wallpaper from Alison Davies with regular wallpaper paste. 4- I added a single ply illustration board paneling strip, pre-painted. 5- I added chair rail, baseboards and squares in the panels, all pre painted. Here is what the finished walls looked LATE VICTORIAN ENGLISH MANOR DOLLHOUSE: 1/12 MINIATURE When the dowels were through the supports, I spaced them using a 1 1/4 inch piece of wood and glued them into place. Next, I put together the top and side of the dish rack box and glued in the dowel pieces when it was dry. I glued on the second side piece. For the back piece, I glued pieces of 1/8 inch x 1/16 inch lumber at the same level as LATE VICTORIAN ENGLISH MANOR DOLLHOUSE: 1/12 MINIATURE The last few weeks have been spent finishing the Earl's Bedroom. This was not a renovation job, but more of a finishing job. This is the way the room looked before: The last time I posted about the room I had built the columns and griffins that frame the bed alcove. The furniture is the Wexburgh collection from Bespaq. LATE VICTORIAN ENGLISH MANOR DOLLHOUSE: 1/12 MINIATURE The first step was to cut each step in 5/8 " MDF. Mine are 3 1/8 inches wide by 1 1/2" deep. I also cut the platform where the staircase changes direction. Once these were cut and sanded, I started gluing them together using wood glue and a drop of gel superglue. The LATE VICTORIAN ENGLISH MANOR DOLLHOUSE: 1/12 MINIATURE The location of the Cliff is somewhere in Cornwall England, inspired by Manderlay, the estate from the 1940 film Rebecca. Basically, the cliff is at the end of a vast estate with a beech at the bottom of the cliff and is surrounded by woods, orchards, LATE VICTORIAN ENGLISH MANOR DOLLHOUSE: 1/12 MINIATURE To finish the fireplace I made a simple firebox with illustration board and some leftover plastic brick sheet I had. I love yellow and black as a colour combination so I painted the mantel to look like giallo sienna marble and used jewelry bits and leftover materials to make the black insert. LATE VICTORIAN ENGLISH MANOR DOLLHOUSE: 1/12 MINIATURE When the doors were done I glued them to a piece of lumber that would sit on the top of the bookcase. In the picture above you see me addinglumber to
LATE VICTORIAN ENGLISH MANOR DOLLHOUSE: 1/12 MINIATURE The Gothic Hall is the room between the Nursery and the Bathroom with the attic staircase landing. I had a hard time deciding what this roomwould be .
LATE VICTORIAN ENGLISH MANOR DOLLHOUSE: 1/12 MINIATURE In the above picture you see the paper pattern on the bottom left, the back cotton fabric on the bottom right with the stitches marked in pen, the piece of foam I used for the stuffing of the quilt on the top left, and at the top right is a piece of raw silk I used for the topof the quilt.
LATE VICTORIAN ENGLISH MANOR DOLLHOUSE: 1/12 MINIATURE Hello my dearest friends, I hope you are all doing well during these crazy times. I have been away far too long but 2020 has not been akind year.
LATE VICTORIAN ENGLISH MANOR DOLLHOUSE: 1/12 MINIATURE The location of the Cliff is somewhere in Cornwall England, inspired by Manderlay, the estate from the 1940 film Rebecca. Basically, the cliff is at the end of a vast estate with a beech at the bottom of the cliff and is surrounded by woods, orchards, LATE VICTORIAN ENGLISH MANOR DOLLHOUSE: 1/12 MINIATURE The chandelier is from the Getzans.Next I got to work on the floor. The old floor was not to my liking. the larger squares had a thicker glue underneath so after they were ironed into place they stood out from the border strips. also, you can see at the bottom of the picture that one square was put in with the grain in the wrong directiona nd it stood out like a sore thumb. LATE VICTORIAN ENGLISH MANOR DOLLHOUSE: 1/12 MINIATURE The next step was gluing on the shafts of the pilasters, fireplace and overmantel mirror. All the plaster pieces in the room are from Sue Cook miniatures. I have purchased many of her items, but these are my favorite to date. The pilasters are 9 inches tall and I needed to figure out a base for them. LATE VICTORIAN ENGLISH MANOR DOLLHOUSE: 1/12 MINIATURE The kitchen measures 24" x 20". As I made progress on the manor, I realized the space was big enough to incorporate a scullery and a butler's pantry. The butler's pantry is the first thing you see when you walk from the dining room to the kitchen. The first floor of the manor is 14" high so I decided to go as high as I could. LATE VICTORIAN ENGLISH MANOR DOLLHOUSE: 1/12 MINIATURE The manor will be brick and stone. I am using the Magic Brick system. I painted the balcony wall the colour I want the grout, then I applied the tape that came with the Brick kit. I added water to the powder until it was icing consistency, then applied it over the surface,waited 5
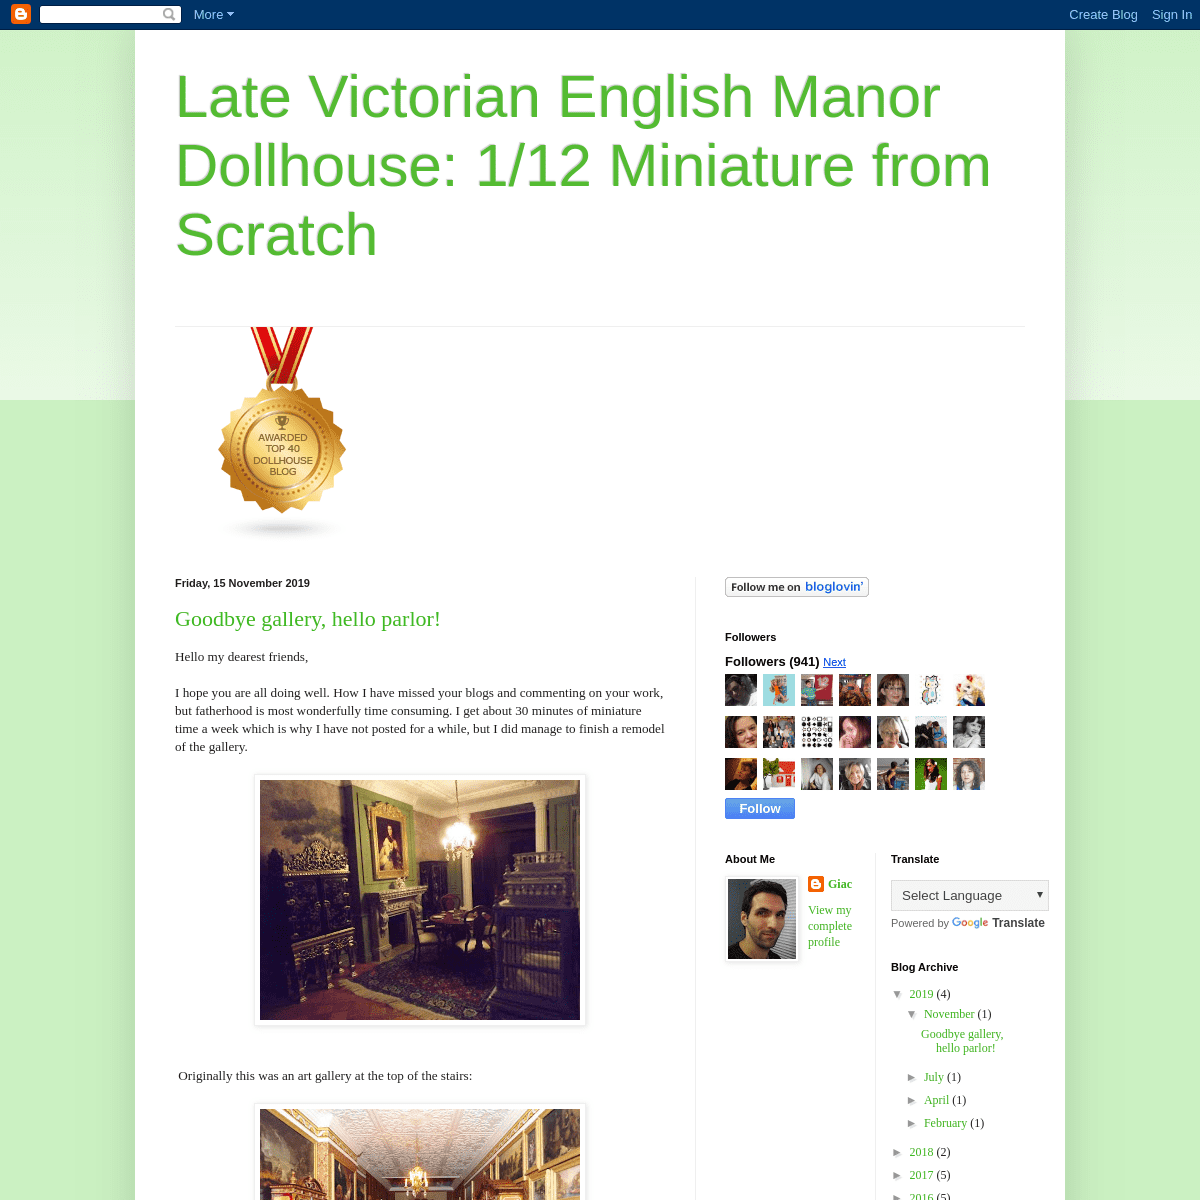
LATE VICTORIAN ENGLISH MANOR DOLLHOUSE: 1/12 MINIATURE The first one is a wood sink victorians used to wash china (porcelain sinks would chip the dishes) and the second is a copper sink used for messy preperation (cleaning fish and washing pots and pans). Both sinks are simple wood boxes on wood supports. I used embossing metal sheets for the copper sink. This is a fairly soft sheet of copper. LATE VICTORIAN ENGLISH MANOR DOLLHOUSE: 1/12 MINIATURE The fireplace is an inexpensive resin one I faux painted using a technique by Whitledge-Burgess. I wanted the walls to be panneled, but chose a simpler design then LATE VICTORIAN ENGLISH MANOR DOLLHOUSE: 1/12 MINIATURE Working in the attic was an interesting challenge. Contrary to the 2 main floors, the structure went up before I had envisionned the rooms. Originaly the attic was going to be storage space and the morning room was going to house the electrical elements. LATE VICTORIAN ENGLISH MANOR DOLLHOUSE: 1/12 MINIATURE The details above show you the steps for making curtain details: illustration board cut out, covered front, the back where you can see where the edges were glued, next you see the trim detail I used glued on the back, and the finished piece. I used Carpenters Pick Ultimate glue and gel super glue to made the draped. LATE VICTORIAN ENGLISH MANOR DOLLHOUSE: 1/12 MINIATURE FROM SCRATCH FRIDAY, 15 NOVEMBER 2019 GOODBYE GALLERY, HELLO PARLOR! Hello my dearest friends, I hope you are all doing well. How I have missed your blogs and commenting on your work, but fatherhood is most wonderfully time consuming. I get about 30 minutes of miniature time a week which is why I have not posted for a while, but I did manage to finish a remodel of the gallery. Originally this was an art gallery at the top of the stairs: Since I am planning a sculpture gallery next to the banquet hall and the décor of the room was exactly the same as the Tudor hall and the entrance, I figured I could use the space in a more interesting way. I am happy to present the parlor: I started by ripping up the old décor and built a dividing wall to separate the staircase landing from the front of the room. I then worked on the ceiling: It is made up of 2 pieces of single ply illustration board. The bottom layer is to cover up imperfections from the wallpaper I pulled off, and the top one (first picture) has a cutout to accommodate the plaster details from Sue Cook . In the second picture you see all the plaster details and some basewood moldings before it was painted. When it was installed and the wallpaper on the walls was up, I finished it with a leaf pattern cornice, also from Sue. The chandelier is from the Getzans . Next I got to work on the floor. The old floor was not to my liking. the larger squares had a thicker glue underneath so after they were ironed into place they stood out from the border strips. also, you can see at the bottom of the picture that one square was put in with the grain in the wrong directiona nd it stood out like a sore thumb. I was afraid to tackle a new floor because I would have taken months with Vigo to take care of, but just as I was about to leave the old one in I remembered I kept the old floor I had made for the winter parlor whish was demolished to make room for the banquet hall. It was big enough so I cut it to size andglued it down.
I never had time to take pictures, so here is a mock-up of the wallsrenovation.
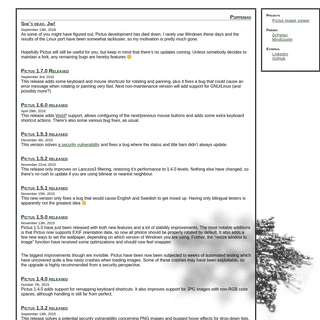
1- I covered the walls in single ply illustration board 2- I painted that green 3- I applied the wallpaper from Alison Davies with regular wallpaperpaste
4- I added a single ply illustration board paneling strip, pre-painted 5- I added chair rail, baseboards and squares in the panels, all prepainted.
Here is what the finished walls looked like. I was able to save the Jim Coates fireplace and painted a new marble slab to use as a hearth. I am glad I saved the fireplace because it is one of Jo's favoritepieces.
And this is what the finished room looks like, as well as an emptyroom shot.
I really love the way Sue's Doric columns frame the staircasebehind the room.
VIGO NEWS
Vigo is doing fantastic. He is in terrific health and aside from teething does not have a care in the world. He was baptised in August and was a perfect gentleman... ...he started eating solid food at 6 months which was hilarious. when we put him in his high chair he giggles and gets really excited.He loves to eat...
..and the force was with him for Halloween: And that is all for now my friends. I miss your blogs terribly and look forward to having more time to get back to blog world...eventually. Right now Vigo is my world and I am loving everyexhausting moment.
I wish you all the best and since my decorations and Christmas trees are up, I wish you all a very happy holiday season.Big hugs,
Giac
P.S. please ignore any spelling mistakes. My mom is leaving so my leisure time is over, no time for proof reading.Posted by Giac
at 17:38
50 comments:
Email This
BlogThis!
Share
to Twitter
Share
to Facebook
Share
to Pinterest
MONDAY, 8 JULY 2019
SLOWLY WORKING ON MINIATURES AGAIN...AND VIGO NEWS.Hello everyone,
I hope you are all doing well. It has been such a long time since I have posted on my blog or left a comment on any of yours that I thought I would stop by and say hello. I did not make it to the miniature show this year, but I had planned on picking up a project I commissioned from Karl Blindheim. He was nice enough to mail it to me after the show. I asked him to interpret the sculpture of the Townley Greyhound from the British Museum. I could not be happier with Karl's masterpiece! I asked him not to paint it so that I can faux marble it when the new sculpture gallery of the manor is built. I am in love with this piece. I have been enjoying my parental leave from work and am having the time of my life being a dad, but I must say I have missed working on my manor. I started up again this past weekend by demolishing the old gallery and will slowly turn it into a card or tea room. Not sure when I will be able to post about it...but I will keep you up to date. I will not work on the banquet hall or new sculpture gallery yet as they are huge projects and Vigo comes first. Speaking of Vigo, he is doing fantastic. He is growing well and is in perfect health. His pediatrician says he is strong for his age and she was happy to see how much he could focus at 2 1/2 months. He is making new sounds every day and can be quite the chatterbox. He has just discovered sucking his thumb and grabbing things (I will have a bald spot on my chest in the next few weeks) and he smiles all the time and has started laughing. He is a great eater and a pretty good sleeper. In short, we were blessed with the most wonderful boy. Here are afew pictures.
That is all for now. I hope it will not be so long until my next post, but in the meantime I wish you all a wonderful summer and wish you all the best. I am still following your posts, but commenting with a sleeping baby in my arms is too difficult ;) Big hugs to you all,Giac
Posted by Giac
at 12:43
43 comments:
Email This
BlogThis!
Share
to Twitter
Share
to Facebook
Share
to Pinterest
THURSDAY, 11 APRIL 2019 GOODBYE MINIATURES...HELLO DIAPERS!Hello everyone,
It is with an insanely happy heart that I must tell you that I will not be working on miniatures for a while, because I will be busy changing diapers. Jo and I have a son. We got a call one day at 1:30 in the afternoon saying there was a healthy baby boy waiting to come home with us. At 3:30 pm, we were holding him in our arms. We named him Vigo. We got him when he was 16 and a half hours old. He is perfect and I am still in amazement at just how much I love him. I thank you all for your incredible support and best wished through the years. It was a long and heartbreaking 7 year wait, In fact we were absolutely convinced the day would never come, but it did. I will keep on following your wonderful blogs to keep on being inspired, but I hope you understand if I will not be commenting much...at least fora while.
I send you all a great big hug, Giac (the happiest man in the world)Posted by Giac
at 13:36
74 comments:
Email This
BlogThis!
Share
to Twitter
Share
to Facebook
Share
to Pinterest
WEDNESDAY, 13 FEBRUARY 2019 I'M BACK AND GUESS WHAT...I RENOVATED THE DINING ROOM...AGAIN!Hello everyone,
Happy Valentines day. I hope you are all well. It has been such a long time since I posted and I am sorry to have been away so long, but it took me quite a while to get over my neck and back pain. I am much better now, but I am still being careful...no more ballrooms! I have started working on miniatures again, finally, and what better way to come back to blogging then doing what I do best...starting a room over. This time I present to you the final version of the manor'sdining hall.
Before you have me declared insane, let me explain. Here it is last version of the dining room: I did like the Dining room before, but many people commented that the veins in my marble were too big. With time it really bother me. Also, I thought the doorcases I made were nice, but they were a bit too big for the space. Another reason was I was not happy with the height at which the border in the wallpaper separated the top and bottom pattern. For these reasons, the room had to go. ____
And here it is today: DEMOLITION AND REFRAMING I started by ripping out all the molding in the room except for thecoffered ceiling.
The room is 14 inches high and the wallpaper was 11 inches high. This meant that the border separating the 2 patterns was at 6 inches from the ground. It split the room in a very odd way that looked wrong, but I loved the top of the paper so I just lived with it. Then one day, Les Chinoiserie reissued the Avignon wallpaper without the bottom lattice pattern. It was a sign! My inspiration for the new room came from Holkham Hall and the rooms of Robert Adam. I decided to install a niche to the right of the door that leads to the Tudor hall. I used my Dremel to cut out a rough opening in the 5/8 MDF wall. The ceiling stayed, but I did not like that the coffered part stuck out from the ceiling... …so I used single and double ply illustration board to make the sides of the ceiling flush with the coffered section. __ The last step was covering the walls in illustration board because I was afraid any imperfections where I removed molding and ripped the old wallpaper would show when the new one was installed. The new paper was only the one pattern, but it was still too short for the room so I decided to add paneling 3 1/2 inch high. The new Avignon paper is just a bit less yellow then the original one which I liked very much.THE CEILING
I added some would strips which I painted to accommodate the moldingsI planned on adding
To cover the gap between the coffered section and the sides I used a paneled Frieze, under that I installed a cornice, then I re-installed the original frieze that was in the dining room, and finished that with a molding from that matched the new doorcasesTHE DOORCASES
The next step was creating the doorcases. I wanted to use Sue Cooks Adam doorcases so I drew up some plans and she was kind enough to make custom size doorcases for me. 2 of the door openings are 4" x 8", and a third one is 2 1/2" x 8". For the broken pediment, I used basewood strips and illustration board to create the triangle bases... ...then I covered them in smaller cornice moldings. In the next picture you can see the painted elements for the doorcase. As I mentioned Sue made the custom doorcases using the 3 piece doorcase and an additional 3 piece architrave, and I made the 3 piecebroken pediment.
And here it is installed: After the doorcase were in place, I installed the paneling I made out of double ply illustration board and quarter round molding, and I installed the painted niche. I liked it, but the broken pediment wastoo square...
...so I added some half brackets that match the doorcase. I originally planned on putting a bust atop each door... ...but they did not look right so I ordered some pineapple finials and painted them to match. I figured since the pineapple is the symbol of hospitality it was the perfect touch The door that leads to the breakfast room is much smaller, so I used a simpler version of the doorcase design. Later on you will see a smaller pineapple finial atop that door. If you look through the doorcase of the back wall at just the right angle you can see into the kitchen. The noise from the kitchen would have been disturbing, so I decided to add a second door. I used illustration board backed with basewood strips and covered in a white molding and matching wallpaper on one side... ...and walnut painted molding and matching tiles for the kitchen side. You can barely see it, but it is there.. FIREPLACE, STATUES AND A TABLE. I had a William Kent fireplace and found a picture of the real version which was being auctioned at Chatsworth house. I used the picture to finish the fireplace to look like stone...no veins this time. The insert has Terry Curran's Fable Set tiles. I love it! I decided to put less furniture in the room to make it look grandeur. Sine I removed the piano, I glued a bracket to support a bust and a sculpture in the niche. I decided to use the china cabinets elsewhere in the manor and purchased a second sideboard for the back wall. I was trying to choose some paintings by Canaletto to go over them, but I liked the bracket so much I had a dry run to see what I liked best. The brackets and sculptures were the winner. I think they look very elegant and they don't take the attention away from my silverware andchina.
__
Since the larger furniture would not be going back in, I started looking for a smaller sideboard to go next to the fireplace. I found nothing! I had 2 bar stools that were falling apart, so I decided to make a small table until I could find something I like. The marble top is 2 layers of illustration board with a chair rail molding. I painted the marble with a brush, not a sponge. First I stippled on 3 different shades of base color, then I added veins, and I finished with a wash of 1 part paint to 5 parts water. There are about 9 coats of glaze on it which was rubbed with 0000 steel wool and waxed. The base is basewood, legs from the stools and a quarter roundmolding.
I think it is my best marble. I like it enough that finding a mahogany replacement is not such a priority anymore. And that, my friends, is all. Here are some pictures of the finished room with and without furniture. For those who are wondering where to get any of the items in this room, all the plasterwork (fireplace, doorcases, cornices, brackets, sculptures...) are from Sue Cook Miniatures , the resin Rococo frieze is from Lawbre ,and the lighting is from TheGetzans .
I think some people who like Victorian style will prefer the previous version of the room, but as I have mentioned before my tastes have changed over time and I am more interested in Georgian, neo-classical and Palladian interiors. One thing is for sure, this room is final. The lighting fixtures have been soldered into place so there is nogoing back.
My next project will be the banquet hall and new statue gallery addition. I will try not to wait so long before posting, but preperation for those rooms will take a while. Thank you once again for following my adventures, and a special thank you to those who contacted me because I was gone so long. I really appreciate it. I think some of your posts do not show up in my reading list for some odd reason, so if I haven't been commenting please letme know.
Big hugs to all,
Giac
Posted by Giac
at 19:33
56 comments:
Email This
BlogThis!
Share
to Twitter
Share
to Facebook
Share
to Pinterest
Older Posts
Home
Subscribe to: Posts (Atom)FOLLOWERS
ABOUT ME
* Giac
View my complete profileTRANSLATE
Select
LanguageAfrikaansAlbanianAmharicArabicArmenianAzerbaijaniBasqueBelarusianBengaliBosnianBulgarianCatalanCebuanoChichewaChinese(Simplified)Chinese
(Traditional)CorsicanCroatianCzechDanishDutchEsperantoEstonianFilipinoFinnishFrenchFrisianGalicianGeorgianGermanGreekGujaratiHaitian CreoleHausaHawaiianHebrewHindiHmongHungarianIcelandicIgboIndonesianIrishItalianJapaneseJavaneseKannadaKazakhKhmerKinyarwandaKoreanKurdish (Kurmanji)KyrgyzLaoLatinLatvianLithuanianLuxembourgishMacedonianMalagasyMalayMalayalamMalteseMaoriMarathiMongolianMyanmar (Burmese)NepaliNorwegianOdia (Oriya)PashtoPersianPolishPortuguesePunjabiRomanianRussianSamoanScots GaelicSerbianSesothoShonaSindhiSinhalaSlovakSlovenianSomaliSpanishSundaneseSwahiliSwedishTajikTamilTatarTeluguThaiTurkishTurkmenUkrainianUrduUyghurUzbekVietnameseWelshXhosaYiddishYorubaZuluPoweredby Translate
BLOG ARCHIVE
* ▼ 2019 (4)
* ▼ November
(1)
* Goodbye gallery, hello parlor!* ► July
(1)
* ► April
(1)
* ► February
(1)
* ► 2018 (2)
* ► May
(1)
* ► January
(1)
* ► 2017 (5)
* ► December
(1)
* ► September
(1)
* ► June
(1)
* ► April
(1)
* ► March
(1)
* ► 2016 (5)
* ► September
(1)
* ► August
(1)
* ► May
(1)
* ► February
(1)
* ► January
(1)
* ► 2015 (7)
* ► December
(2)
* ► September
(1)
* ► August
(1)
* ► June
(1)
* ► March
(1)
* ► January
(1)
* ► 2014 (10)
* ► December
(1)
* ► November
(1)
* ► October
(1)
* ► July
(1)
* ► June
(1)
* ► May
(2)
* ► April
(1)
* ► February
(1)
* ► January
(1)
* ► 2013 (11)
* ► December
(2)
* ► October
(1)
* ► August
(1)
* ► July
(1)
* ► June
(1)
* ► May
(1)
* ► April
(1)
* ► March
(1)
* ► February
(1)
* ► January
(1)
* ► 2012 (16)
* ► December
(1)
* ► November
(1)
* ► September
(1)
* ► August
(2)
* ► July
(1)
* ► May
(2)
* ► April
(2)
* ► March
(1)
* ► February
(3)
* ► January
(2)
* ► 2011 (29)
* ► December
(4)
* ► November
(2)
* ► October
(4)
* ► September
(3)
* ► August
(3)
* ► July
(7)
* ► June
(6)
Simple theme. Powered by Blogger .ORIGINAL TEXT
Contribute a better translation -------------------------Details
4